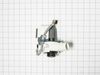
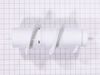
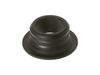
This replacement lid lock keeps your washing machine door securely closed during the wash cycle. If the washer won’t run or the lid won’t stay locked, this part may need replacing. Installation is sim...
This drain pump assembly is for washers. Drain pump assembly removes water from the washer during the drain portion of the cycle. The assembly may include multiple parts; refer to your parts diagram f...
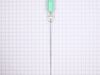
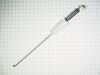
This replacement water inlet valve ensures accurate control of hot and cold water entering your washing machine. It plays a key role in maintaining proper water levels for each cycle. If your washer w...
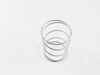
If your washer is shaking or making loud noises during the spin cycle, this left-side suspension rod and spring assembly might be the fix you need. It helps keep the drum stable and reduces vibration ...
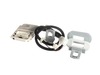
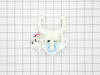
If your washer isn’t spinning or agitating like it should, this shift actuator might be the fix you need. It helps your machine switch between wash and spin cycles, and is usually found underneath the...
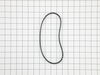
This drive belt is an authentic OEM replacement part for your washer. Over time the belt can become brittle and snap or become stretched out. If this happens the washer drum will not spin, may be nois...
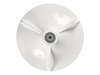
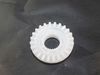
Located in the center of the washer tub, this white spiral auger helps move clothes through the water and detergent during each cycle. It lifts and drops garments to break up dirt and stains. If your ...
Ask our experts a question about this part and we'll get back to you as soon as possible!
8 questions answered by our experts.
< Prev
1
2
Next >
Sort by:
Search filter:
Clear Filter
Your search term must have 3 or more characters.
Keep searches simple. Use keywords, e.g. "leaking", "pump", "broken" or "fit".
Sorry, we couldn't find any existing answers that matched. Try using some different or simpler keywords, or submit your new question by using the "Ask a Question" button above!
Edwin
March 19, 2022
Goes through wash cycle fine. Fills up agitates stops agitates again spins water out end of cycle.It does not go into rinse .Why wont it rinse thanks edwin.
For model number GTW460ASJ4WW
Hi Edwin,
Thank you for your question. If your washer will not go to the rinse cycle, there are some parts that you will need to check to see which one is causing the issue. You will need to check the drain pump and the drain hose to see if they are clogged. Also check the drain hose to make sure it is positioned correctly and that it is not kinked. If the lid switch is malfunctioning, it can prevent the washer from operating correctly. You will need to test the lid switch for continuity with a multimeter. With your multimeter on the Rx1 setting, touch the probes to the terminals, then press and hold the switch button down. You should receive a reading of zero. If you do not receive this reading, you will need a replacement lid switch. Once you have determined the part you need, please feel free to call customer service. We are open 7 days a week and anyone will be happy to assist you. We look forward to hearing from you!
Was this helpful?
Thank you for voting!
Edwin
March 20, 2022
Fills up agitates pumps out spins, done. Did not rinse. Has new lid lock. Drain hose clear pumps water out fine. Does not go into rinse cycle. How too fix it to go into rinse cycle.
For model number GTW460ASJ4WW
Hello Edwin, Thank you for the question. This could be an indication the Control Board is skipping the Rinse Cycle and the board may need to be replaced. If you need help placing an order, customer service is open 7 days a week. Please feel free to give us a call. We look forward to hearing from you!
Hello Emerson, thank you for writing. We recommend testing the Lid switch FIX16554755 as this is the most likely cause of the unit not starting. If you need help placing an order, customer service is open 7 days a week. Please feel free to give us a call. We look forward to hearing from you.
Agitator does not work spins freely makes a clicking noise
For model number GTW460ASJ4WW
Hi Mark, thank you for contacting us. We recommend you check the dryer drive belt, part number FIX11767488, and the motor, part number FIX11759153. If the sound problem still persists, make sure there is nothing stuck in the washer drain. Ensure that no coins or other minor items are getting pushed into the wash by examining the washing machine, the drain, and all pockets of clothing. We hope this helps, good luck with this repair!
Washer won't shut off, I've replaced the lid lock, & the water inlet value, read the reason it wont shut off is the computer thinks its still fill. I not found any water leaks either
For model number GTW460ASJ4WW
Hello Michael, thank you for the question. Based on our understanding of the issue, we would recommend checking the control board, part number FIX16874148, to fix the issue. We hope this helps!
Drain all the water out of the tub with a shop vac Remove rear drain hose and drained rest of water into a bucket Remove small rear panel (bottom left hand corner) where the drain hose connects Tipped washer up about 45 degrees to get underneath it - Supported it with a few paint cans Remove internal drain hose/clamps
... Read morefrom pump - w/ pliers Remove belt cover (gray plastic) with socket - 3 bolts Remove wire assembly plug from socket Remove old drain pump with socket - 3 bolts Install new drain pump - 3 bolts - plug wire assembly into socket Reinstall belt cover - 3 bolts Reinstall hose to drain pump (note panel will be inside washer) Feed drain hose panel through hole and reinstall - 1 nut Re attached drain hose to exterior drain plug You are done !
I thought it was the control board from the onset, but 'Online experts" said it was more likely the mode shifter or the lid lock. I ordered one of each, did not correct problem. Ordered the control board that was designated for this unit, it did not correct problem. Defective? Was send replacememnt, did not fix problem. Twice? Phone conve
... Read morersation with parts person, and after a little digging, it was NOT the correct board, correct board was not available. Returned all parts, refunds all around. Ordered correct board from another site, installed, programed, SUCCESS! Total repair time/installation-less than 15 minutes. Getting the correct part 30 days.