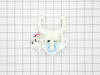
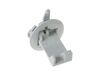
This replacement lid lock keeps your washing machine door securely closed during the wash cycle. If the washer won’t run or the lid won’t stay locked, this part may need replacing. Installation is sim...
This drain pump assembly is for washers. Drain pump assembly removes water from the washer during the drain portion of the cycle. The assembly may include multiple parts; refer to your parts diagram f...
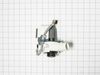
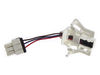
If your washer isn’t spinning or agitating like it should, this shift actuator might be the fix you need. It helps your machine switch between wash and spin cycles, and is usually found underneath the...
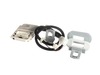
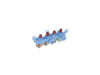
This dual-valve inlet assembly is designed to control water flow into compatible washing machines during the wash cycle. Each valve operates independently via its own wire terminal, allowing precise r...
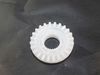
This impeller sits at the bottom of the washer tub and helps move clothes through the water for better cleaning. It?s a common fix for poor wash results or noisy cycles. Be sure to unplug the washer a...
Ask our experts a question about this part and we'll get back to you as soon as possible!
3 questions answered by our experts.
< Prev
1
Next >
Sort by:
Search filter:
Clear Filter
Your search term must have 3 or more characters.
Keep searches simple. Use keywords, e.g. "leaking", "pump", "broken" or "fit".
Sorry, we couldn't find any existing answers that matched. Try using some different or simpler keywords, or submit your new question by using the "Ask a Question" button above!
Roland
November 28, 2022
I replaced the gear box and suspension rods and when it goes to final spin the tub shakes like crazy and it will go to balance mode . What could be the problem.
For model number GTW750CPL0DG
Hello Roland, thank you for contacting us. Provided that the suspension rod kit is properly installed, we would recommend checking the ball joint, part number FIX12227573. It connects the suspension rod to the socket in the upper cabinet. Customer service is always available to help you place an order if you are having trouble doing so. Good luck with your repair.
The washer is not draining and seems to be making a humming sound. And it keeps showing Cancel.
For model number GTW750CPL0DG
Hi Roland, thank you for contacting us. Based on the description that you have provided, we would recommend making sure that the drain hose is not kinked or blocked. If that is not causing the issue, then the drain pump assembly, part number FIX12723115, is most likely faulty and may need to be replaced. We hope this sorts out your problem!
Hi Roland, thank you for reaching out. A malfunctioning lid switch or lock mechanism could be the reason of this issue. The lid lock service kit for your model is part number FIX17626546. You may need to replace it to fix the issue. We hope this solves your problem!
Drain all the water out of the tub with a shop vac Remove rear drain hose and drained rest of water into a bucket Remove small rear panel (bottom left hand corner) where the drain hose connects Tipped washer up about 45 degrees to get underneath it - Supported it with a few paint cans Remove internal drain hose/clamps
... Read morefrom pump - w/ pliers Remove belt cover (gray plastic) with socket - 3 bolts Remove wire assembly plug from socket Remove old drain pump with socket - 3 bolts Install new drain pump - 3 bolts - plug wire assembly into socket Reinstall belt cover - 3 bolts Reinstall hose to drain pump (note panel will be inside washer) Feed drain hose panel through hole and reinstall - 1 nut Re attached drain hose to exterior drain plug You are done !
Very simple to repair. Be sure to drain the tub outside or into the sump pump then lay the washer on its side. The pump is right there on the bottom of the basket with 3 bolts. You will also need to remove the belt cover to get to the plug. So simple and saves you hundreds off repair man prices.
Removed the control panel back plate cover. Removed the 3 screws that held the water control valve in place. I then unplugged each solenoid one at a time and plugged it into the new control valve. Once all wires were transferred, I pulled the old valve up and put the new valve on. Then reinstalled the screws that held it down and reinstal
... Read moreled the cover plate. Very simple job !