


Models
>
WMXR3080T8WW
WMXR3080T8WW General Electric Washer
Jump to:
Find Part by Name
Keep searches simple, eg. "belt" or "pump".
Diagrams for WMXR3080T8WW
Viewing 4 of 4


Keep searches simple, eg. "belt" or "pump".

$25.10
This is a genuine OEM replacement timer knob for your dryer. It is made of white plastic, and includes the metal clip that fits onto a D-shaped shaft. Replacing this part is an easy repair, simply pul...
In Stock
Order now and your part arrives by Jul 20


In Stock
Order now and your part arrives by Jul 20

$15.26
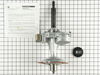
This part is a replacement socket rod support for your washer. The socket rod support is found at the top of the washer frame in the front part of the washer. It supports the suspension rod, so the ro...
In Stock
Order now and your part arrives by Jul 20

$85.40
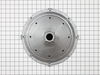
This part is the replacement inner tub base hub for your washer. It is made of metal and is approximately 15 inches in diameter. The inner tub base hub fits between the wash tub and the spin basket, a...
In Stock
Order now and your part arrives by Jul 20

Special Order

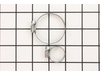
This transmission and brake assembly comes with a new tub seal. This kit aids in the spinning or agitating cycles.
No Longer Available

$25.10
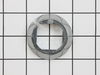
This hose clamp kit contains two clamps. The smaller of the two is an inch in diameter while the larger of the two is two inches in diameter.
In Stock
Order now and your part arrives by Jul 20


Special Order

The timer controls most of the operations of the washer: water level, tub filling and emptying, length of cycles, and cycle setting sequences.
No Longer Available

In Stock
Order now and your part arrives by Jul 20
Common Problems and Symptoms for WMXR3080T8WW
Viewing 6 of 6Leaking
Fixed by these parts

How to fix it
Will not agitate
Fixed by these parts
How to fix it
Won’t Start
Fixed by these parts

How to fix it
Will Not Start
Fixed by these parts
How to fix it
Noisy
Fixed by these parts
How to fix it
Noisy and Marks Left on Clothes
Fixed by these parts
How to fix it


Keep searches simple. Use keywords, e.g. "leaking", "pump", "broken" or "fit".
- Customer:
- SAM from ROCK HILL, NY
- Parts Used:
- WH1X2721
- Difficulty Level:
- Really Easy
- Total Repair Time:
- Less than 15 mins
Replaced broken START knob on dryer.
Slid off the old START knob, then pushed on the new START knob.
I created and printed a label on my computer for use with the time selector dial, which must be set at or beyond 10 minutes, before turning the START knob.
I made a label that says "Minimum" with a red arrow that points past the 10 minute setting on the ... Read more time selector dial.
My teenage daughter was not setting the time selector dial, to a point past 10 minutes. When she turned the START knob, the dryer would not come on, because the time selector dial was not set past the 10 minute setting.
My daughter had continually twisted the START knob until it broke. I am hoping she will be able to see the large printed label I put on the dryer near the time selector, saying "Minimum" with a large red arrow pointing past 10 minutes.
I am very pleased that I was quickly able to find the exact matching START knob for my dryer and the exact same color, from PartSelect.Com
Read less
Was this instruction helpful to you?
Thank you for voting!
- Customer:
- Frank from Irvine, CA
- Parts Used:
- WH1X2721
- Difficulty Level:
- Really Easy
- Total Repair Time:
- Less than 15 mins
The inside of the Selector Knob was stripped
Removed the damaged knob and replaced it with the new knob. Very ease
Was this instruction helpful to you?
Thank you for voting!
- Customer:
- Victor from League City, TX
- Parts Used:
- WH38X10002
- Difficulty Level:
- Difficult
- Total Repair Time:
- More than 2 hours
- Tools:
- Nutdriver, Pliers, Screw drivers, Socket set, Wrench (Adjustable), Wrench set
Bearing on the transmission to tub wore out (mostly due to the washer not being level)
The back of the control panel had an instruction pamplet that was very useful. 2 parts did not go as written tho. To "pop" the spinner out, required short 1x4s and a shake/shingle bar to pry it up and the wedging of the 1x4s under it, until enough strain was put on it to "pop" it off. Then the large 1&11/16 nut was a bear. It require
... Read more
d a short pipe wrench (so it fit in the tub) and a hammer to brake it loose.
Read less
Was this instruction helpful to you?
Thank you for voting!