


Models
>
GTW585BSV3WS
GTW585BSV3WS General Electric Washer
Jump to:
Find Part by Name
Keep searches simple, eg. "belt" or "pump".
Diagrams for GTW585BSV3WS
Viewing 4 of 4


Keep searches simple, eg. "belt" or "pump".

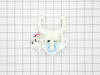
$53.52
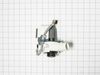
This drain pump assembly is for washers. Drain pump assembly removes water from the washer during the drain portion of the cycle. The assembly may include multiple parts; refer to your parts diagram f...
In Stock
Order now and your part arrives by Mar 27

In Stock
Order now and your part arrives by Mar 27

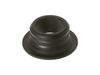
If your washer is shaking or making loud noises during the spin cycle, this left-side suspension rod and spring assembly might be the fix you need. It helps keep the drum stable and reduces vibration ...
In Stock
Order now and your part arrives by Mar 27

In Stock
Order now and your part arrives by Mar 27

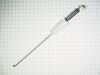
$51.43
If your washer isn’t spinning or agitating like it should, this shift actuator might be the fix you need. It helps your machine switch between wash and spin cycles, and is usually found underneath the...
In Stock
Order now and your part arrives by Mar 27

In Stock
Order now and your part arrives by Mar 27

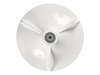
$55.18
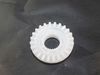
Located in the center of the washer tub, this white spiral auger helps move clothes through the water and detergent during each cycle. It lifts and drops garments to break up dirt and stains. If your ...
In Stock
Order now and your part arrives by Mar 27

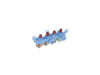
$64.74
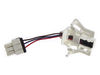
This dual-valve inlet assembly is designed to control water flow into compatible washing machines during the wash cycle. Each valve operates independently via its own wire terminal, allowing precise r...
In Stock
Order now and your part arrives by Mar 27

The agitator rotates back and forth to move the clothes inside the tub to clean the load.
In Stock
Order now and your part arrives by Mar 27

In Stock
Order now and your part arrives by Mar 27

In Stock
Order now and your part arrives by Mar 27

In Stock
Order now and your part arrives by Mar 27
Questions and Answers
We're sorry, but our Q&A experts are temporarily unavailable.
Please check back later if you still haven't found the answer you need.
Common Problems and Symptoms for GTW585BSV3WS
Viewing 14 of 14Will not drain
Fixed by these parts

How to fix it
Spinning Issues
Fixed by these parts
How to fix it
Will not agitate
Fixed by these parts

How to fix it
Leaking
Fixed by these parts
How to fix it
Shaking and Moving
Fixed by these parts

How to fix it
Noisy and Marks Left on Clothes
Fixed by these parts

How to fix it
Spins slowly
Fixed by these parts
How to fix it
Draining Issues
Fixed by these parts
How to fix it
Water Filling Issues
Fixed by these parts
How to fix it
Burning smell
Fixed by these parts
How to fix it
Will Not Start
Fixed by these parts
How to fix it
Cycle Not Advancing
Fixed by these parts
How to fix it
Does not dispense fabric softener or detergent
Fixed by these parts

How to fix it
Locking Issues
Fixed by these parts
How to fix it

Keep searches simple. Use keywords, e.g. "leaking", "pump", "broken" or "fit".
- Customer:
- Mike from NAPLES, FL
- Parts Used:
- WH23X28418
- Difficulty Level:
- Really Easy
- Total Repair Time:
- 30 - 60 mins
- Tools:
- Nutdriver, Pliers, Screw drivers, Socket set
Washer ran fine but woudl not drain water - low humming noise
Drain all the water out of the tub with a shop vac
Remove rear drain hose and drained rest of water into a bucket
Remove small rear panel (bottom left hand corner) where the drain hose connects
Tipped washer up about 45 degrees to get underneath it - Supported it with a few paint cans
Remove internal drain hose/clamps ... Read more from pump - w/ pliers
Remove belt cover (gray plastic) with socket - 3 bolts
Remove wire assembly plug from socket
Remove old drain pump with socket - 3 bolts
Install new drain pump - 3 bolts - plug wire assembly into socket
Reinstall belt cover - 3 bolts
Reinstall hose to drain pump (note panel will be inside washer)
Feed drain hose panel through hole and reinstall - 1 nut
Re attached drain hose to exterior drain plug
You are done !
Read less
Was this instruction helpful to you?
Thank you for voting!
- Customer:
- Micheal from South Bend, IN
- Parts Used:
- WH23X28418
- Difficulty Level:
- Very Easy
- Total Repair Time:
- Less than 15 mins
- Tools:
- Socket set
Would not drain the water from the tub.
Very simple to repair. Be sure to drain the tub outside or into the sump pump then lay the washer on its side. The pump is right there on the bottom of the basket with 3 bolts. You will also need to remove the belt cover to get to the plug. So simple and saves you hundreds off repair man prices.
Was this instruction helpful to you?
Thank you for voting!
- Customer:
- Richard Bibb from ARLINGTON, TX
- Parts Used:
- WH13X26637
- Difficulty Level:
- Very Easy
- Total Repair Time:
- 30 - 60 mins
- Tools:
- Nutdriver, Pliers
Water was dripping into the detergent tray when the unit was off.
Removed the control panel back plate cover. Removed the 3 screws that held the water control valve in place. I then unplugged each solenoid one at a time and plugged it into the new control valve. Once all wires were transferred, I pulled the old valve up and put the new valve on. Then reinstalled the screws that held it down and reinstal
... Read more
led the cover plate. Very simple job !
Read less
Was this instruction helpful to you?
Thank you for voting!