


Models
>
FWX223LBS6
FWX223LBS6 Frigidaire Washer
Jump to:
Find Part by Name
Keep searches simple, eg. "belt" or "pump".
Diagrams for FWX223LBS6
Viewing 6 of 6


Keep searches simple, eg. "belt" or "pump".

$23.05
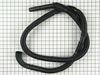
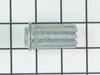
If your washer drum is not spinning, there may be an issue with your drive belt. The drive belt wraps around the motor pulley and helps the basket to spin. Other signs there are issues with the belt i...
In Stock
Order now and your part arrives by Mar 21

In Stock
Order now and your part arrives by Mar 21

$151.41
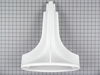
The pump is what your washer uses to remove the water from the tub. This part is the pump and motor assembly which includes the red flapper to prevent drain back flow.
In Stock
Order now and your part arrives by Mar 21

$101.68
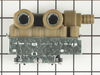
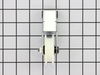
This water inlet valve assembly is designed for use in washing machines and regulates the flow of both hot and cold water into the appliance during wash cycles. It ensures the correct amount of water ...
In Stock
Order now and your part arrives by Mar 21

This screw-in plastic leveling leg supports the washing machine. If your washer loses balance while it is tumbling, or makes loud noises, then it is best to replace the leveling leg to make sure the h...
Special Order

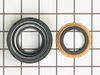
This seal helps prevent any leaking around the transmission of washing machines.
No Longer Available

$23.05
This screw is designed to fit washers and dryers. Refer to the diagram provided by the manufacturer for further installation instructions and accurate application of screw in your tool.
In Stock
Order now and your part arrives by Mar 21


$24.10
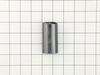
This is a screw and it is used with a variety of home appliances. It is less than 1/2 an inch long, and is #8-18 x 3/8. This part is a pan head, sheet metal, screw. It is made of metal.
In Stock
Order now and your part arrives by Mar 21

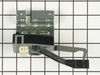
Mounting bracket on this part replaces old style ( You may need to drill off old bracket before mounting new lock).
No Longer Available

Questions and Answers
We're sorry, but our Q&A experts are temporarily unavailable.
Please check back later if you still haven't found the answer you need.
Common Problems and Symptoms for FWX223LBS6
Viewing 13 of 13Leaking
Fixed by these parts
How to fix it
Will not drain
Fixed by these parts


How to fix it
Will not agitate
Fixed by these parts
How to fix it
Burning smell
Fixed by these parts
How to fix it
No hot or cold water
Fixed by these parts
How to fix it
Spins slowly
Fixed by these parts
How to fix it
Noisy
Fixed by these parts

How to fix it
Will Not Start
Fixed by these parts

How to fix it
Draining Issues
Fixed by these parts
How to fix it
Spinning Issues
Fixed by these parts
How to fix it
Won’t Start
Fixed by these parts
How to fix it
Not draining
Fixed by these parts
How to fix it
Touchpad does not respond
Fixed by these parts
How to fix it


Keep searches simple. Use keywords, e.g. "leaking", "pump", "broken" or "fit".
- Customer:
- rodney from fairfield bay, AR
- Parts Used:
- 134511600
- Difficulty Level:
- Really Easy
- Total Repair Time:
- 15 - 30 mins
- Tools:
- Screw drivers
replace broken drive belt
carefully pry up on front washer top to release plastic keeper pins,remove 2 phillips screws from beneath lower front washer panel,slightly lift upward on panel to release.remove old broken belt,push new belt beneath large tub pulley,put belt on small motor pulley,push back belt tension /idler arm,start belt on large tub pulley,turn tub p
... Read more
ulley by hand to run belt on,release tension on idler arm.replace front panel and lower top.WALAAH!!!! you are done.
Read less
Was this instruction helpful to you?
Thank you for voting!
- Customer:
- kenneth from willard, OH
- Parts Used:
- 137221600
- Difficulty Level:
- Really Easy
- Total Repair Time:
- 15 - 30 mins
- Tools:
- Nutdriver, Pliers, Screw drivers
would't spin all water out or rinse out clothes
uplugged washer took front off washer 2 screws pryed up top pump was mounted with 2 screws and 2 wires took off found change in pump and the fins to pump worn off ordered part off line the wait for part was longer than the amount of time to fix problem and cost of part saved me about $25-35 if I was to buy local worth wait save money and
... Read more
fix problem washes like new spins and drains all water from tub.
Read less
Was this instruction helpful to you?
Thank you for voting!
- Customer:
- Patrick from Humble, TX
- Parts Used:
- 5308002401, 5303279394, 3204405, 131557201, 131398303, 131076600
- Difficulty Level:
- A Bit Difficult
- Total Repair Time:
- More than 2 hours
- Tools:
- Screw drivers, Socket set
Noisy spin cycle
1) Unplugged washer and disconnected the hot and cold hoses.
2) removed the 2 phillips screws at the bottom of the front panel then removed front panel, you need enough clearance by the floor, this is tricky because you have to lean washer back and push down on the front panel.
3) removed the agitator from the washer
4) lif ... Read more ted top of washer and leaned back against the wall and removed the splash tub cover one clip at a time with a flat screw driver.
5) removed the trunion, this is difficult and will take some time due to the corrosion from many years of use use a hammer (3Lb short handle) and tap one side then the other. You will need to rock it back and forth awhile.
6) lift the basket out of splash tub
7) I removed the hose for water level and removed the 3 bolts that hold the splash tub to the three base mounts (support arms).
8) remove the splash tub
9)change the plastic washer that is between the splash tub and the transmission in the bottom of the splash tub
10) change the bearing(metal sleeve) on the bottom of splash tub and lightly grease w/ a thin film of teflon grease
11) install splash tub and install the 3 bolts along w/ the water level tube
12) install the larger seal (w/ spring in it) and push into the splash tub firmly
13) use some tub and faucet silicone grease on the smaller seal because you don't want to damage this main seal, install the main seal (sits on top of the larger one that's in the tub already) be careful when getting to flat part of the shaft when installing ( spin around the shaft as you pass this point) it will keep the seal from coming out.
14) install trunion (sits down on top of the seal) you will feel the tension of the spring when bolting the trunion back into place.
15) install basket and bolt it to the trunion (I installed a new filter on the bottom of the basket and required some special glue, ask for "3M" GMGA600 adhesive.
16) installed splash tub cover, agitator and front cover.
Washer works great and is quieter than it was new.
Read less
Was this instruction helpful to you?
Thank you for voting!