


Models
>
LWA50AW
LWA50AW (PLWA50AW) Amana Washer
Jump to:
Find Part by Name
Keep searches simple, eg. "belt" or "pump".
Diagrams for LWA50AW
Viewing 10 of 10


.gif "MISCELLAEOUS INFORMATION Diagram and Parts List for PLWA50AW Amana Washer")


Manuals & Guides for LWA50AW
Click to downloadKeep searches simple, eg. "belt" or "pump".

In Stock
Order now and your part arrives by Aug 6

$13.07
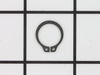
This metal retaining ring is well under an inch long. Use it for your Maytag brand clothes washer or your clothes dryer.
In Stock
Order now and your part arrives by Aug 6

$21.82
This is a screw and it is made for multiple appliances in your home. This model is called a sheet metal screw because it has sharp points, and the threads are closer together. This screw is designed t...
In Stock
Order now and your part arrives by Aug 6

$7.60
This is a multi-use screw and can be used on a variety of appliances. The measurements of the screw are: 8/18 x 3/8. *Please note: the screw is sold individually. Refer to the manual provided by the m...
In Stock
Order now and your part arrives by Aug 6

$50.36
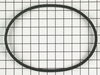
This v-shaped spin belt helps transfer power from the motor to the transmission to help pump the water in and out of the washer. It also helps runs the spin cycle in the washer.
In Stock
Order now and your part arrives by Aug 6

$7.60
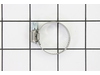
This hose clamp extends from half an inch to an inch in diameter. It is made entirely of metal and is intended for use with Maytag brand washing machines.
In Stock
Order now and your part arrives by Aug 6

$17.44
Sold Individually. This adjustable leveling leg comes with a stop nut.
In Stock
Order now and your part arrives by Aug 6

$54.12
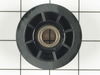
This wheel has a center metallic bearing. A dryer's idler pulley wheel serves to help the belt to rotate the drum.
In Stock
Order now and your part arrives by Aug 6

$75.36
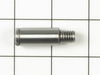
This shaft is made to fit the center of the idler pulley wheel of many clothes dryers. It is less than two inches long, and is made of metal.
Special Order

$7.60
Sold individually. NOTE: The color on the screw may not be the same as the image, but will still function the same.
In Stock
Order now and your part arrives by Aug 6

In Stock
Order now and your part arrives by Aug 6

$56.24
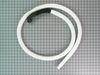
This hose attaches to the pump to help remove the water out of the washer. 7 feet in length.
In Stock
Order now and your part arrives by Aug 6
Common Problems and Symptoms for LWA50AW
Viewing 7 of 7Leaking
Fixed by these parts
How to fix it
Noisy
Fixed by these parts

How to fix it
Burning smell
Fixed by these parts
How to fix it
Will not agitate
Fixed by these parts
How to fix it
Will not drain
Fixed by these parts

How to fix it
No hot or cold water
Fixed by these parts
How to fix it
Spins slowly
Fixed by these parts
How to fix it


Keep searches simple. Use keywords, e.g. "leaking", "pump", "broken" or "fit".
- Customer:
- Bruce from Medina, OH
- Parts Used:
- 205217P, WP27001007
- Difficulty Level:
- A Bit Difficult
- Total Repair Time:
- 1- 2 hours
- Tools:
- Screw drivers, Socket set
Belt wore out
Had to remove pump-not easy. Nothing wrong with pump, but had to trash it to get it off the motor shaft, so I had to replace it, too.
Pop up top of cabinet and remove front panel. (I leaned unit back against a wall to facilitate internal access once panel was removed.)
Remove motor assy - 4 screws & connector ... Read more .
Remove 3 pump screws (torx) and 2 hoses. Pry pump off motor shaft (not easy). I used a heat gun to help expand the plastic fitting on the motor shaft.
Remove old belt, put on new belt. (Do not use automotive belt-this belt is designed to slip because it also spins the tub. The tub will not spin when it's full of water, and the pump will not pump the water if the tub is bogging down the pump. Plus, you will probably overheat the motor.)
Press new pump back on motor shaft (advise not to re-use old pump as seals were probably damaged by removal process.)
Caution: Pressing pump onto motor shaft may cause pump rotor to bind in housing. Try to press it on a little too far so you back off slightly.
Replace pump screws.
Replace motor, giving attention to belt alignment.
Replace motor screws and connector.
Re-attach hoses on pump.
Button up cabinet.
Done.
The hardest part was removing the pump. If not for that, it would have been a 15-min, $20 repair.
Because I felt it wise to replace the pump also, it was a $70 repair.
Read less
Was this instruction helpful to you?
Thank you for voting!
- Customer:
- Stephen from Laveen, AZ
- Parts Used:
- 205217P, WP285655, WP27001007, WP40045001
- Difficulty Level:
- A Bit Difficult
- Total Repair Time:
- 30 - 60 mins
- Tools:
- Pliers, Screw drivers, Socket set, Wrench set
Drive Pump Leaked
It took some trial and error but overall not a difficult project. 1. Take the front covers off. 2. Undo the pully spring to loosen belt 3. Remove belt off idler pulley wheel and free up belt from the large wheel. 4. Disconect the wiring harness and the hoses. 5. Undo the motor mounting bolts (4) 6. Take motor out of washer an
... Read more
d remove the 3 screws holding the pump to the motor. 7. The pump had melted to the shaft and required I chisel the pump off of the shaft. 8. Attach new pump paying attention to where the belt is positioned. 9. Reattach the motor bolts, hoses, and wiring harnes. 10. Attach the belt and test the pump. 11. Put the front back on.
Read less
Was this instruction helpful to you?
Thank you for voting!
- Customer:
- Mark from Cheektowaga, NY
- Parts Used:
- WP27001007
- Difficulty Level:
- Easy
- Total Repair Time:
- 30 - 60 mins
- Tools:
- Screw drivers, Socket set
The spin belt failed due to overloading the washing machine.
Unplugged the washing machine and turned off the water to the machine. Removed the two front covers; unhooked the two front springs; removed the (4) motor mounting bolts; unhooked the two hoses for the water pump; unhooked the wiring harness; removed the belt from the driven pulley; pulled the motor assembly out; removed the (3) screws t
... Read more
o separate the water pump from the motor; removed the belt from the motor pulley; installed new belt and repeated above in reverse to put everything back together; started washing machine and it worked great.
Read less
Was this instruction helpful to you?
Thank you for voting!