


Models
>
TAA800
TAA800 (P7575111W) Amana Washer
Jump to:
Find Part by Name
Keep searches simple, eg. "belt" or "pump".
Diagrams for TAA800
Viewing 15 of 15


Keep searches simple, eg. "belt" or "pump".

On Order

$13.07
This metal retaining ring is well under an inch long. Use it for your Maytag brand clothes washer or your clothes dryer.
In Stock
Order now and your part arrives by Apr 6

$7.60
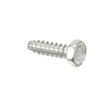
This is a multi-use screw and can be used on a variety of appliances. The measurements of the screw are: 8/18 x 3/8. *Please note: the screw is sold individually. Refer to the manual provided by the m...
In Stock
Order now and your part arrives by Apr 6

$7.60
This hose clamp extends from half an inch to an inch in diameter. It is made entirely of metal and is intended for use with Maytag brand washing machines.
In Stock
Order now and your part arrives by Apr 6

$17.44
Sold Individually. This adjustable leveling leg comes with a stop nut.
In Stock
Order now and your part arrives by Apr 6

$9.79
This front cover spring retaining clip is not quite an inch long. It is made entirely of metal and is used for some washing machines.
In Stock
Order now and your part arrives by Apr 6
 – Part Number: WP28808")
This v-style drive belt is thirty-two and a half inches long and half of an inch wide.
In Stock
Order now and your part arrives by Apr 6

In Stock
Order now and your part arrives by Apr 6

In Stock
Order now and your part arrives by Apr 6

In Stock
Order now and your part arrives by Apr 6

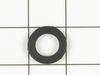
This high pressure inlet hose washer is black. It is an inch in diameter, made of rubber, and used with many washing machines, refrigerators, and dishwashers.
No Longer Available

$66.86
This triangular main tub bearing assembly is five inches long. It is made of metal.
In Stock
Order now and your part arrives by Apr 6
Questions and Answers
We're sorry, but our Q&A experts are temporarily unavailable.
Please check back later if you still haven't found the answer you need.
Common Problems and Symptoms for TAA800
Viewing 6 of 6Noisy
Fixed by these parts


How to fix it
Leaking
Fixed by these parts


How to fix it
Will not agitate
Fixed by these parts

How to fix it
Burning smell
Fixed by these parts
How to fix it
Will not drain
Fixed by these parts

How to fix it
Spins slowly
Fixed by these parts
How to fix it


Keep searches simple. Use keywords, e.g. "leaking", "pump", "broken" or "fit".
- Customer:
- John from Milton, PA
- Parts Used:
- WP28808
- Difficulty Level:
- Really Easy
- Total Repair Time:
- 15 - 30 mins
- Tools:
- Nutdriver, Screw drivers
Frayed V-belt
VERY EASY!!!
SAFETY FIRST-Always unplug the appliance.
Use 8mm socket to remove front panel screws. Loosened up two hose clamps connected to the pump and removed both lines (Hoses contain water, use a towel) which is located underneath the motor. Disconnect motor electrical connector on the left side of the motor. With socket, r ... Read more emove 4 mounting bracket screws that secure the motor and pump assembly. Pull back the tension/idler pulley to loosen belt off the main pulley to the washer drum. Tilt and pull out motor/pump assembly. Underneath the pump, use star-bit to remove the pump from motor assembly to remove the belt. Install new belt on motor pulley (Good time to check for debris or anything restricing free movement of pump) and re-install pump. Install the motor/pump assembly and loosely secure the motor/pump assembly. Place the belt onto the motor pulley and pull back the tensioner/idler pulley to allow slack of belt to be placed on washer drum pulley. Put the belt on the lip of the drum pulley and rotate while pulling back the tensioner/idler pulley until the belt is seated on the groove of the drum pulley. Tighten the motor/pump assembley. Re-attach the 2 hoses and tighten down the clamps. Re-connect the electrical connector to the motor...Don't forget to plug in the washer and secure the front panel...Piece 'O cake, you're done! About 15 minutes to do the job. Much like changing a belt on most vehicles.
Read less
Was this instruction helpful to you?
Thank you for voting!
- Customer:
- mike from hull, IA
- Parts Used:
- WP40004201P
- Difficulty Level:
- A Bit Difficult
- Total Repair Time:
- More than 2 hours
- Tools:
- Nutdriver, Pliers, Screw drivers, Socket set, Wrench (Adjustable), Wrench set
Bearing went out causing lots of noise.
This is not a bad repair, but give yourself some time. I did not have to take the tranny and motor out, but the inner and outer tub and all related parts had to come out, along with the outer tub base. If you are replacing the tub bearing, you HAVE to order the seal kit. Don't try to skimp like I did, since you will need the seal kit as t
... Read more
his is what causes that bearing to fail in the first place. We forgot how quiet the washer was after I fixed it, and it saved us from buying a new washer since we were ready to say the heck with it and buy a new pair. You might need an 1.5 inch socket to get the big nut off the spindle, but I was able to get with a visegrip and hammer. The nice thing about this repair is even if you screw it up, you won't have water all over the place because of the seal design. I just checked under the washer a few times for the first few weeks and all seems fine.
Read less
Was this instruction helpful to you?
Thank you for voting!
- Customer:
- Stephen from Kittanning, PA
- Parts Used:
- R9900543
- Difficulty Level:
- Difficult
- Total Repair Time:
- More than 2 hours
- Tools:
- Nutdriver, Pliers, Screw drivers, Wrench set
Brake pads were worn out
Unplug the washer
Took off the front with nut driver to two fasteners at the bottom.
Took off two tub springs using channel lock pliers.
Tipped the tub back for more hand room.
Took brake bolts off with box end wrench.
Put Screw driver above brake clamps and pried down to make the old brake pads drop down below th ... Read more e seats and then take brakes off. You might have to use a screw driver to expand the brake clamps so they will release the brake. (brake clamps look like a pulley but the edges will spread some bit.)
Twisted large screw driver between the brake clamps and pushed new brake in as far as would go while beside (to the left or right of) the brake seat.
Pried brake clamps down and rotated brake around until it is lined up with the brake seat. Then pried pads up into the seat.
Re-twisted large screw driver between the brake clamps to separate them and pulled the brake pad back to within 1/8th to 1/16th inch of the back. This lined up the bolt hole.
Inserted the bolt with rubber grommett into the brake pad hole and twisted it counter clockwise and tightened with wrench. (If the bolt would not thread, then you have to adjust the brake pad forward or backward until the holes line up.) Tighten the bolt until it is firmly tight.
There are three brakes. Each is installed the same way. The one in back required a little cross legged contortion for me to reach around both sides of the motor and two front brake pad mounts. The key is lining up the bolt hole in the brake pad with the mount. I pretty well had it figured out after the second pad install. Time for me.. 4 hours. Cost, leg cramps, sore muscles from awkward positions, and the joy of not having to buy a new washer.
Return the springs to the tub on the front. Close front panel and return the two fasteners with the nut drivers.
How did I know I needed the brakes? When in agitation mode the tub spun the opposite direction of the spin cycle. When the agitator turned the opposite direction, the water inside went into a very strong vortex and sometimes sloshed out the top or around the top edges When there were a lot of clothes and a high fill level in the tub. We also had trouble with straps winding around the agitator. The tub spun so quickly that the water without agitation was driven to the top outer edges of the tub by centrifugal force.
Read less
Was this instruction helpful to you?
Thank you for voting!