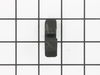
Commonly referred to as dog ears, these agitator directional cogs are manufacturer approved replacement parts that come in a package of 4 and are usually used with direct drive washing machines. We re...
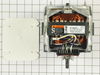
This is an OEM direct drive motor coupling, which provides a cushioned connection between the transmission and the motor shaft. This is the newer version of this part, made with new metal sleeves for ...
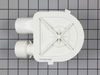
This thermostat is an OEM replacement part for a dryer. It is sold individually. It measures approximately 2-inches by 1.5-inches, is black and silver, and constructed of plastic and metal material. Y...
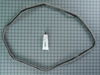
This kit includes two door strikes, and three door catches, to service doors that have one or two catches. The strike is mounted on the body of the dryer, while the catch is mounted on the dryer door....
This OEM kit comes with two ignition coils (one three-terminal boost/hold coil, and one two-terminal secondary coil). Usually only one of them burns out, but you should replace them as a set as both h...
This suspension spring is a genuine OEM replacement part for a variety of washers and washer-dryer combos. The primary purpose of the suspension spring is to support the outer tub and keep the tub ste...
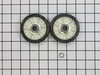
This is a rear drum support roller kit for your dryer. The 2 rollers come with 4 tri-rings, and 1 palnut. We recommend that you replace both rollers at once. This kit stabilizes the drum cylinder, whi...
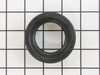
Often referred to as a dryer belt tension pulley wheel, this idler pulley is an OEM approved replacement part for a variety of dryer models. The idler pulley puts tension on the drive belt, and if the...
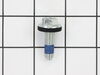
There are many symptoms that may indicate an issue with your water inlet valve. These can include your washer not filling with water, it will not stop filling, the washer is leaking, or it is both fil...
This is a single dryer drum belt that measures 93.5 inches. The belt rotates the dryer drum and is a common wear part that can become brittle over time. It can also stretch and change shape, so keep t...
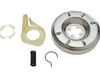
This is a genuine OEM replacement clutch assembly for your washing machine. A clutch assembly, also known as a clutch or a washer clutch, is responsible for spinning the tub during the spin cycle. If ...
This is a genuine OEM replacement igniter kit for your gas-heated clothes dryer. The silicon carbide igniter is used to light the gas that creates the heat in order to dry your clothes. If your dryer ...
In Stock
Order now and your part arrives by Jun 18
Questions and Answers
Ask our experts a question about this part and we'll get back to you as soon as possible!
1 question answered by our experts.
< Prev
1
Next >
Sort by:
Search filter:
Clear Filter
Your search term must have 3 or more characters.
Keep searches simple. Use keywords, e.g. "leaking", "pump", "broken" or "fit".
Sorry, we couldn't find any existing answers that matched. Try using some different or simpler keywords, or submit your new question by using the "Ask a Question" button above!
Lisa
August 5, 2022
Whirlpool thin twin heavy duty stacked washer dryer had water overflow. Tube appeared fine and connected. Assumed pressure switch. Makes click when blown into. Didn’t have a multimeter. Unfortunately, while water filling we turned knob to ex small load size. This caused a burn in the harness that plugs into the timer. Not sure if this made it or repairable. The machine still fills water in the off position of the cycle now. Wondering if we should try changing the timer before giving up. The gas dryer is still going strong. Original owners. Thank you for any help! Love this machine!
For model number LTG6234AW0
Hello Lisa, thank you for your question. We agree with your suggestion for changing the timer. The correct timer is part PS11742162. If you need help placing an order, customer service is open 7 days a week. Please feel free to give us a call. We look forward to hearing from you.
The job looked intimidating but turned out to be very easy. First take off the water pump by removing the two clips that hold it in place. Place a shallow pan under the pump to catch the water that is in the pump and hoses. Open the hose clamps with a pair of pliers or channel locks (better) and slide the hoses off of the water pum
... Read morep. The motor comes off next. Unplug the electrical connector from the motor and two wires from the capacitor. Remove the two screws holding the clamps in place and then pop off the two clamps. You will need to hold up the motor with one hand while you remove the clamps or it will fall to the floor once the clamps are removed. One piece of the coupling assemble will be attached to the motor and the other will be attached to the gearcase drive shaft. If you want to clean up the mess created by the shredded rubber center piece of the coupling assembly you will have to take off the motor mounting plate. It is held on by two bolts and removing it makes installing the coupling easier but probably not necessary. Push the back half of the coupling on to the gearcase drive shaft until the shaft is flush with the face of the coupling. Install the new rubber center piece on to the coupling then re-install the motor mounting plate. Install the other half of the coupling on to the motor shaft and lift the motor up to the coupling. You have to rotate the motor shaft by spinning the fan blades until the coupling lines up so you can slide it into the other half of the coupling. Then just reattach the motor, connectors and water pump in the reverse order of disassembly.
Read less
1122 of 1224 peoplefound this instruction helpful.
First pry off the cap of the agitator. Then using a socket remove the bolt that holds the plastic cup in place. Remove this cup by prying it loose from the two tabs that hold it in place. Once this cup is removed you can get to the broken cogs. Slip the new cogs into the underside of the cup, and slide the cup back down in the a
... Read moregitator housing using the slots on the side for a guide. (You may want to remove the entire agitator and assemble everything upside down, then flip it all back over to mount, so the cogs don't fall out). Tighten the bolt, snap the cap back in place on top of the agitator and your'e done. Easy repair.
Received your parts, Popped them both right into place, Even though only one side needed to be replaced, I wanted them to match up. It was amazing how easy this was. My husband was quite impressed I had ordered these rather then look for either a new or used dryer from some other source.