


Models
>
YWET4027HW1
YWET4027HW1 Whirlpool Washer Dryer Combo
Jump to:
Find Part by Name
Keep searches simple, eg. "belt" or "pump".
Diagrams for YWET4027HW1
Viewing 9 of 9


Keep searches simple, eg. "belt" or "pump".

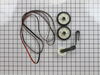
$36.42
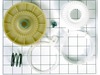
This is an authentic drum support roller kit for 29-inch-wide dryers. It includes 1 belt, 2 roller wheels and an idler pulley. The parts in this kit allow the dryer to tumble properly by supporting th...
In Stock
Order now and your part arrives by Jul 20

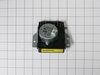
$17.44
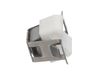
The dryer thermal fuse, also sometimes referred to as the thermal cut off or temperature fuse, is a 2 by 1/2-inch, white, plastic safety mechanism that halts the flow of electricity to the motor circu...
In Stock
Order now and your part arrives by Jul 20

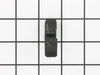
Commonly referred to as dog ears, these agitator directional cogs are manufacturer approved replacement parts that come in a package of 4 and are usually used with direct drive washing machines. We re...
In Stock
Order now and your part arrives by Jul 20

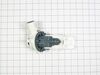
$27.28
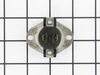
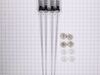
This thermostat is an OEM replacement part for a dryer. It is sold individually. It measures approximately 2-inches by 1.5-inches, is black and silver, and constructed of plastic and metal material. Y...
In Stock
Order now and your part arrives by Jul 20

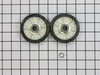
$18.54
This is a rear drum support roller kit for your dryer. The 2 rollers come with 4 tri-rings, and 1 palnut. We recommend that you replace both rollers at once. This kit stabilizes the drum cylinder, whi...
In Stock
Order now and your part arrives by Jul 20

$27.28
Often referred to as a dryer belt tension pulley wheel, this idler pulley is an OEM approved replacement part for a variety of dryer models. The idler pulley puts tension on the drive belt, and if the...
In Stock
Order now and your part arrives by Jul 20

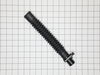
$25.10
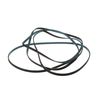
This is a single dryer drum belt that measures 93.5 inches. The belt rotates the dryer drum and is a common wear part that can become brittle over time. It can also stretch and change shape, so keep t...
In Stock
Order now and your part arrives by Jul 20

$11.98
This small but mighty OEM piece is called a tri-ring and is used to support the drum roller shaft and the idler pulley shaft in your dryer. It helps to provide a tight seal between components by evenl...
In Stock
Order now and your part arrives by Jul 20

$36.42
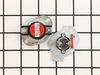
This genuine OEM kit includes a high limit thermostat and a thermal cut-off fuse for your dryer. The thermostat has a limit of 250 degrees Fahrenheit, and the fuse has a limit of 360 degrees Fahrenhei...
In Stock
Order now and your part arrives by Jul 20

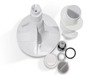
$15.26
This is an authentic OEM agitator cam kit for your washing machine. The kit includes a bearing, the cam holder, and four individual cams. You may need to replace the agitator cam if you find your wash...
In Stock
Order now and your part arrives by Jul 20

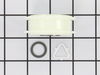
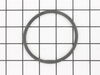
$9.79
Also known as an O-Ring. This black o-ring seal is three inches in diameter.
In Stock
Order now and your part arrives by Jul 20

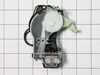
This heating element connection wire kit is a genuine OEM replacement for your electric dryer. The kit is used to connect the thermostat to the heater element. The kit comes with a yellow wire nut and...
In Stock
Order now and your part arrives by Jul 20
Common Problems and Symptoms for YWET4027HW1
Viewing 25 of 25Noisy
Fixed by these parts
How to fix it
Will not agitate
Fixed by these parts


How to fix it
Not Heating
Fixed by these parts

How to fix it
Drum Not Spinning
Fixed by these parts
How to fix it
Won’t Start
Fixed by these parts
How to fix it
Too hot
Fixed by these parts
How to fix it
Spinning Issues
Fixed by these parts
How to fix it
Shaking and Moving
Fixed by these parts
How to fix it
Door won’t close
Fixed by these parts

How to fix it
Leaking
Fixed by these parts

How to fix it
Spins slowly
Fixed by these parts
How to fix it
Door Pops Open
Fixed by these parts
How to fix it
Noisy and Marks Left on Clothes
Fixed by these parts

How to fix it
Marks left on clothes
Fixed by these parts
How to fix it
Cycle Not Advancing
Fixed by these parts
How to fix it
Will not drain
Fixed by these parts
How to fix it
Does not dispense fabric softener or detergent
Fixed by these parts

How to fix it
Will Not Start
Fixed by these parts
How to fix it
Touchpad does not respond
Fixed by these parts
How to fix it
Timer Not Working
Fixed by these parts
How to fix it
Burning smell
Fixed by these parts
How to fix it
Heat stays on after drum has stopped
Fixed by these parts
How to fix it
Not cleaning dishes properly
Fixed by these parts
How to fix it
Draining Issues
Fixed by these parts
How to fix it
Lid or door won’t close
Fixed by these parts

How to fix it


Keep searches simple. Use keywords, e.g. "leaking", "pump", "broken" or "fit".
- Customer:
- ANTHONY from CHESHIRE, CT
- Parts Used:
- WP3392519
- Difficulty Level:
- Easy
- Total Repair Time:
- 15 - 30 mins
- Tools:
- Nutdriver, Pliers, Screw drivers
Dryer was working, but no heat.
First I unplugged the dryer, then removed the back panel, this exposed most all of the wiring and I could see the heater coils.
Not knowing what the problem was I started looking at the coils and could not see any broken parts.
So then checked the thermal fuse for continuity I removed the two wires from it with a small pair of ... Read more needle nose pliers, it was held in place by two screws, once they were removed the fuse came out easily, I checked continuity with a volt meter placing the meter on X1 Ohms and could not get a reading.
I replaced with a new one and put it all back together the way I took it apart.
Then I plugged it in and it worked first time, I now have warm dry clothes.
Read less
Was this instruction helpful to you?
Thank you for voting!
- Customer:
- mike from Kent, WA
- Parts Used:
- 80040
- Difficulty Level:
- Easy
- Total Repair Time:
- 15 - 30 mins
- Tools:
- Screw drivers, Socket set
washer wouldn't agitate
First pry off the cap of the agitator. Then using a socket remove the bolt that holds the plastic cup in place. Remove this cup by prying it loose from the two tabs that hold it in place. Once this cup is removed you can get to the broken cogs.
Slip the new cogs into the underside of the cup, and slide the cup back down in the a ... Read more gitator housing using the slots on the side for a guide. (You may want to remove the entire agitator and assemble everything upside down, then flip it all back over to mount, so the cogs don't fall out).
Tighten the bolt, snap the cap back in place on top of the agitator and your'e done. Easy repair.
Read less
Was this instruction helpful to you?
Thank you for voting!
- Customer:
- Dana from Grassvally, CA
- Parts Used:
- WP3392519
- Difficulty Level:
- A Bit Difficult
- Total Repair Time:
- More than 2 hours
- Tools:
- Screw drivers
No heat but would run otherwise
Cleaning the lint out of the whole machine took quite a bit of time--it was everywhere. Underneath the lint trap was a collection that ultimately ruined the thermal fuse where it restricted the air flow considerably.
Ascertaining the problem was the most time consuming part.
The actual repair was quite simple and did ... Read more n't take but 15-20 minutes.
Ascertaining the problem was the most time consuming part.
The actual repair was quite simple and did ... Read more n't take but 15-20 minutes.
Read less
Was this instruction helpful to you?
Thank you for voting!