


Models
>
WM6998HBA
WM6998HBA (ABLEEUS) LG Washer Dryer Combo
Jump to:
Find Part by Name
Keep searches simple, eg. "belt" or "pump".
Diagrams for WM6998HBA
Viewing 4 of 4


Keep searches simple, eg. "belt" or "pump".

$20.95
The locking pin is used to hold the shock absorber on the washer. There is a pin used at the bottom and top of the shock absorber. Sold individually.
Special Order

In Stock
Order now and your part arrives by Mar 26

In Stock
Order now and your part arrives by Mar 26

$128.95
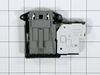
If your washer isn’t locking or starting like it should, this replacement door lock switch could be the fix you need. It helps your machine know when the door is closed so it can lock and begin the cy...
In Stock
Order now and your part arrives by Mar 26

$46.30
This part is the replacement rear tub gasket for your washer. It is made of black plastic and is approximately 3-1/4 inches in diameter. The rear tub gasket forms a watertight seal between the rear tu...
In Stock
Order now and your part arrives by Mar 26

$11.50
This drain hose plug, also known as a hose cap, is a genuine OEM part for your washing machine. This plug caps the drain hose from the pump housing, and helps prevent leaks from your washer. Before be...
In Stock
Order now and your part arrives by Mar 26

In Stock
Order now and your part arrives by Mar 26

$64.21
Tub bearing. This part is very difficult to install. The manufacturer recommends replacing the complete rear tub and bearing assembly.
In Stock
Order now and your part arrives by Mar 26

$93.95
This washer bearing and seal set supports the drum’s rotation and protects internal components from water damage. The bearing ensures smooth, quiet operation by reducing friction and vibration, while ...
In Stock
Order now and your part arrives by Mar 26

$105.95
This heater assembly is a vital component for LG washing machines, designed to heat water to the correct temperature for optimal cleaning performance. It features an integrated thermistor (sensor prob...
In Stock
Order now and your part arrives by Mar 26

In Stock
Order now and your part arrives by Mar 26

In Stock
Order now and your part arrives by Mar 26
Questions and Answers
We're sorry, but our Q&A experts are temporarily unavailable.
Please check back later if you still haven't found the answer you need.
Common Problems and Symptoms for WM6998HBA
Viewing 6 of 6Leaking
Fixed by these parts


How to fix it
Locking Issues
Fixed by these parts
How to fix it
Lid or door won’t close
Fixed by these parts
How to fix it
Spinning Issues
Fixed by these parts

How to fix it
Will Not Start
Fixed by these parts
How to fix it
Water Filling Issues
Fixed by these parts

How to fix it

Keep searches simple. Use keywords, e.g. "leaking", "pump", "broken" or "fit".
- Customer:
- CURTIS from OLIVE BRANCH, MS
- Parts Used:
- EBF61315802
- Difficulty Level:
- Really Easy
- Total Repair Time:
- 15 - 30 mins
- Tools:
- Nutdriver, Screw drivers
Washer did not recognize the door was shut
I removed the Wire and spring from the tub seal and then removed the seal on the side of the washer that contains the Door switch. I removed the two screws that held the door switch in place while holding the switch with my other hand. Once the screws where out I pulled the switch assembly out thru the gap and removed the wires from old
... Read more
assembly. I then plugged the wires into the new assembly aligned the holes up and put the screws back in the new door switch assembly. I then put the door seal and tub seal holder back on. This took about 15 minutes. I do recomend that you unplug the washer before starting this process.
Read less
Was this instruction helpful to you?
Thank you for voting!
- Customer:
- Andrew from BOTHELL, WA
- Parts Used:
- AEG33121501
- Difficulty Level:
- Easy
- Total Repair Time:
- 30 - 60 mins
- Tools:
- Screw drivers, Socket set
TE error. Replaced heater / thermistor assembly.
removed top and front. heater is at the base of the tub. the nut compresses the rubber seal and may take some wiggling to remove the old one.
Was this instruction helpful to you?
Thank you for voting!
- Customer:
- Timothy from SCOTTSBORO, AL
- Parts Used:
- ACA56078801
- Difficulty Level:
- A Bit Difficult
- Total Repair Time:
- More than 2 hours
- Tools:
- Pliers, Screw drivers
Instructions on how to turn Clamp counter clockwise to get back on tube assembly
Watched videos but didn’t show the clamp had to be placed on counterclockwise
Was this instruction helpful to you?
Thank you for voting!