


Models
>
1106110800
1106110800 Kenmore Washer Dryer Combo
Jump to:
Find Part by Name
Keep searches simple, eg. "belt" or "pump".
Keep searches simple, eg. "belt" or "pump".

$19.63
This 10-watt clear bulb provides dependable lighting inside dryers and refrigerators, helping you see the interior clearly when the door is open. Compatible with a variety of appliance models, it inst...
In Stock
Order now and your part arrives by Aug 2

$7.60
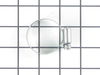
This is a multi-use screw and can be used on a variety of appliances. The measurements of the screw are: 8/18 x 3/8. *Please note: the screw is sold individually. Refer to the manual provided by the m...
In Stock
Order now and your part arrives by Aug 2

$7.60
This hose clamp extends from half an inch to an inch in diameter. It is made entirely of metal and is intended for use with Maytag brand washing machines.
In Stock
Order now and your part arrives by Aug 2

In Stock
Order now and your part arrives by Aug 2

In Stock
Order now and your part arrives by Aug 2

$7.60
This screw is a little under an inch long and is made of metal. It is used with a refrigerator's ice maker assembly. Sold individually.
In Stock
Order now and your part arrives by Aug 2

Special Order

Special Order

This two piece oil seal kit comes in two pieces and is used for the gearcase input shaft of your washer.
In Stock
Order now and your part arrives by Aug 2

In Stock
Order now and your part arrives by Aug 2

$8.70
Note: This part has been updated by the manufacturer. It may appear different but will still function the same as the original.
In Stock
Order now and your part arrives by Aug 2

Sold individually. The size of this screw is 1/4" hex head and 10-12 x 1/2".
In Stock
Order now and your part arrives by Aug 2
Common Problems and Symptoms for 1106110800
Viewing 2 of 2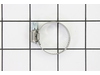


Keep searches simple. Use keywords, e.g. "leaking", "pump", "broken" or "fit".
- Customer:
- Mark from Huntington Station, NY
- Parts Used:
- WP18776
- Difficulty Level:
- Easy
- Total Repair Time:
- Less than 15 mins
- Tools:
- Screw drivers
broken clip on top panel hold down
pressed clip into hole on top of front panel. first remove two philip screws that hold filter so you can lift top up.
Was this instruction helpful to you?
Thank you for voting!
- Customer:
- MONTE from CHESAPEAKE, VA
- Parts Used:
- WP18776
- Difficulty Level:
- Very Easy
- Total Repair Time:
- Less than 15 mins
- Tools:
- Pliers, Screw drivers
Dryer Top Panel is Loose
1) Unplug power cable from dryer.
2) Remove the 2 screws that secure the chute for lint filter screen with
Phillips head screwdriver.
3) Remove the lint filter screen.
4) Depress plastic locking clip on each side with putty knife to release
tension and lift up top panel to clear the locking clips. Each ... Read more locking
clip is located 2-1/2 inches from the front edge of side panel.
5) Lift the top panel and lean against the wall for support. If dryer top
panel cannot be raised all the way due to cabinet(s) above, tape
the dryer top panel to cabinet above or have somebody hold the
top panel for temporary support.
6) Install the new metal locking clips. Ensure that the elongated tab
of the metal locking clip is towards the front of dryer. Compress
locking clip lightly with pliers and push down into the hole.
7) Lower the dryer top panel and press it down in place over the metal
locking clips for a tight fit.
8) Reinstall the 2 screws to secure the lint filter chute.
9) Reinstall lint filter screen.
10) Reconnect power cable for dryer.
11) Turn on dryer and inspect that all dryer panels (top, sides and
front) are tight and secured.
Repair Duration: 5 minutes
Read less
Was this instruction helpful to you?
Thank you for voting!
- Customer:
- Amy from JUNCTION, TX
- Parts Used:
- WP22002263
- Difficulty Level:
- Easy
- Total Repair Time:
- Less than 15 mins
- Tools:
- Screw drivers
Bulb worked for a couple days and has now burned out, filaments dangling
To replace the light bulb, I removed the screw and the cover, unscrewed the old bulb, replaced with the new bulb and replaced the cover, securing it with the small screw. It worked appropriately with normal use for a few days and then I noticed the light was not coming on when I opened the door.
I removed the cover and pulled ... Read more out the bulb to find that the filaments inside are dangling and burned through. I need them replaced, please.
I removed the cover and pulled ... Read more out the bulb to find that the filaments inside are dangling and burned through. I need them replaced, please.
Read less
Was this instruction helpful to you?
Thank you for voting!