


Models
>
41771733811
41771733811 Kenmore Washer Dryer Combo
Jump to:
Find Part by Name
Keep searches simple, eg. "belt" or "pump".
Diagrams for 41771733811
Viewing 5 of 5


Keep searches simple, eg. "belt" or "pump".

$43.95
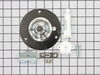
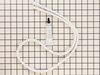
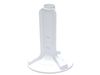
This ball-and-socket style bearing kit is used in your dryer to support the rear of the drum as it tumbles through the dry cycle. The bearing attaches on the inside of the rear panel of the dryer cabi...
In Stock
Order now and your part arrives by Jul 26

$10.95
The drum support bearing is an authentic OEM replacement part for your dryer. The bearing is used to support the drum and allow it to rotate smoothly and quietly. If your dryer is excessively noisy wh...
In Stock
Order now and your part arrives by Jul 26

In Stock
Order now and your part arrives by Jul 26

In Stock
Order now and your part arrives by Jul 26

$63.45
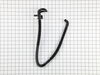
This door catch is an authentic OEM replacement part for your dryer. This part holds the door strike and ensures that the door stays closed while your dryer is running. This prevents hot air or laundr...
In Stock
Order now and your part arrives by Jul 26

$54.17
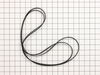
This dryer lint screen is for laundry centers.
Dryer lint screen captures lint and debris from the exhaust air flowing from the dryer.
Follow the instructions in the owner's manual when installing this part.
On Order

In Stock
Order now and your part arrives by Jul 26

$28.22
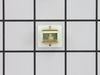
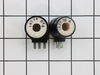
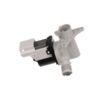
This coil ignition kit is used in dryers to open the gas valve when the dryer is on. This kit includes two coils. One is a two-wire secondary coil and the other is a three-wire booster coil. If your d...
In Stock
Order now and your part arrives by Jul 26

$23.05
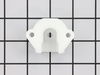
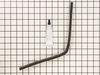
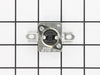
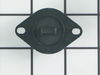
This drum bearing bracket is for dryers. Drum bearing bracket holds and supports the drum bearing
In Stock
Order now and your part arrives by Jul 26

In Stock
Order now and your part arrives by Jul 26

The upper felt seal for your dryer is attached to the top edge of the drum support area, and is held there by a high temperature adhesive. It creates a seal where the dryer door opens and closes, so t...
In Stock
Order now and your part arrives by Jul 26

$25.25
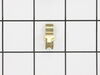
This screw is designed to fit washers and dryers. Refer to the diagram provided by the manufacturer for further installation instructions and accurate application of screw in your tool.
In Stock
Order now and your part arrives by Jul 26
Common Problems and Symptoms for 41771733811
Viewing 13 of 13Noisy
Fixed by these parts

How to fix it
Door won’t close
Fixed by these parts

How to fix it
Marks left on clothes
Fixed by these parts
How to fix it
Not Heating
Fixed by these parts
How to fix it
Drum Not Spinning
Fixed by these parts
How to fix it
Leaking
Fixed by these parts
How to fix it
Will not agitate
Fixed by these parts
How to fix it
Door Pops Open
Fixed by these parts
How to fix it
Too hot
Fixed by these parts
How to fix it
Won’t Start
Fixed by these parts
How to fix it
Will not drain
Fixed by these parts
How to fix it
Spinning Issues
Fixed by these parts
How to fix it
Will Not Start
Fixed by these parts

How to fix it


Keep searches simple. Use keywords, e.g. "leaking", "pump", "broken" or "fit".
- Customer:
- Steve from Wheelersburg, OH
- Parts Used:
- 137292700, 5303281153, 5303281153, 131825900, 5303281153, 131724301
- Difficulty Level:
- Really Easy
- Total Repair Time:
- 30 - 60 mins
- Tools:
- Screw drivers, Wrench set
squeeking like crazy
well, i started at the top and worked my way down. by taking the top off, it gave me more room to get the dryer tub out. took the two screw`s out of the vented plate on the back of the machine to undo the belt. this is a stackable washer-dryer combo, so next i took off the white plate on front between washer & dryer. took off the control
... Read more
panel, unpluged it, then took dryer door front off. then removed the two screw`s that hold that bracket on ,in the back of dryer, pulled the drum out & replaced the belt, but before replacing anything i took the shopvac to it , there was alot of lint in there.when replacing the Grounding Ball Clip & Grounding Ball, i took a one inch by two inch magnet and used it to hold the Grounding Ball & Clip in place so i could get the two screws started in the Drum Support Bearing & Bearing Bracket. after installing that i put the shaft in place & lined the dryer tub up with the 3 screw hole`s ,and boom, bang, pow...nothing to it. it`s easy...parts came very fast....Thx PartsSelect.com...i`ve told all my friend`s about PartsSelect
Read less
Was this instruction helpful to you?
Thank you for voting!
- Customer:
- Frank from Boyertown, PA
- Parts Used:
- 5303281153
- Difficulty Level:
- Easy
- Total Repair Time:
- 15 - 30 mins
- Tools:
- Nutdriver, Screw drivers
Loud Squeaking
1. Unplug dryer from outlet
2. Using Lg. flat screwdriver, pry under the front edge of the top and release two spring tabs
3. Lift up top and tilt back out of your way
4. Unscrew two phillips scews on inside of front panel
5. Lift up and out the front panel. Two spring clips at bottom.
6. Rlease tension on drum be ... Read more lt at the motor. Access panel at rear of dryer.
7.Unscrew 3 screws from inside, center rear of drum.
8. Remove drum through the front of the dryer. You may have to spread the sides apart a little bit for it to fit
9. Lift up on the rear drum bearing to remove it from the bearing retainer. ( U shaped plastic socket)
10. unsrew 2 screws and remove the bearing retainer, ground ball. Ball retainer is on outside of dryer.
11. Vacuum everything--duct, blower, lint trap, ect.
12. Intall new bearing retainer and grounding ball, an assistant is helpful at this time, one to hold ball retainer on rear of dryer, one to screw it in from the inside
13. reassemble remainder of parts in reverse order.
Read less
Was this instruction helpful to you?
Thank you for voting!
- Customer:
- Brett from Monticello, MN
- Parts Used:
- 5303931775
- Difficulty Level:
- Easy
- Total Repair Time:
- 15 - 30 mins
- Tools:
- Screw drivers
Dryer would heat initially then cool down
The top of the dryer was easily removed by prying the front up with a screwdriver then tipping it back and off of the mounting brackets. Then the front of the dryer was removed by unscrewing a single screw on each side that held the front to the side panels then pulling the front away from the dryer. Once the front was off, the coils we
... Read more
re easily accessible on the bottom left side. A metal bracket held the coils on and was somewhat tough to get the two screws removed on it as they were stuck, but once they were removed the coils easily came out and I was able to replace them in minutes. The whole job took 15-20 minutes and I now have a dryer that heats through the entire drying cycle.
Read less
Was this instruction helpful to you?
Thank you for voting!