


Models
>
1106309800
1106309800 Kenmore Washer Dryer Combo
Jump to:
Find Part by Name
Keep searches simple, eg. "belt" or "pump".
Keep searches simple, eg. "belt" or "pump".

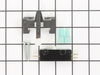
$22.91
This lid or door switch kit helps ensure your washer or dryer only runs when the door is properly closed. It’s a safety feature that prevents spills and keeps your appliance working as it should. The ...
In Stock
Order now and your part arrives by Jul 27

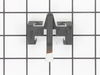
This black actuator spring with white rubber tip is used for both dryer doors and washer lids.
In Stock
Order now and your part arrives by Jul 27

$7.60
This is a multi-use screw and can be used on a variety of appliances. The measurements of the screw are: 8/18 x 3/8. *Please note: the screw is sold individually. Refer to the manual provided by the m...
In Stock
Order now and your part arrives by Jul 27

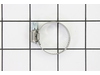
$7.60
This hose clamp extends from half an inch to an inch in diameter. It is made entirely of metal and is intended for use with Maytag brand washing machines.
In Stock
Order now and your part arrives by Jul 27

In Stock
Order now and your part arrives by Jul 27

In Stock
Order now and your part arrives by Jul 27

In Stock
Order now and your part arrives by Jul 27


$7.60
This screw is a little under an inch long and is made of metal. It is used with a refrigerator's ice maker assembly. Sold individually.
In Stock
Order now and your part arrives by Jul 27

Special Order

Special Order

This two piece oil seal kit comes in two pieces and is used for the gearcase input shaft of your washer.
In Stock
Order now and your part arrives by Jul 27
Common Problems and Symptoms for 1106309800
Viewing 5 of 5Leaking
Fixed by these parts


How to fix it
Will Not Start
Fixed by these parts
How to fix it
Will not drain
Fixed by these parts
How to fix it
Won’t Start
Fixed by these parts
How to fix it
Will not agitate
Fixed by these parts
How to fix it


Keep searches simple. Use keywords, e.g. "leaking", "pump", "broken" or "fit".
- Customer:
- Paul from Vero Beach, FL
- Parts Used:
- WP691581
- Difficulty Level:
- Really Easy
- Total Repair Time:
- Less than 15 mins
- Tools:
- Screw drivers
door switch actuator spring broken
-unplugged appliance
-removed lint trap
-removed 2 lint trap shute screws with phillips screwdriver
-popped open top of appliance with standard screwdriver by applying pressure at each front corner so that it could be tilted up to access actuator switch on right side of door
-removed 2 actuator switch screws, located o ... Read more n upper right side of laundry door, with phillips screwdriver (screws are accessed from outside of door frame not through appliance top).
-discarded broken actuator spring (accessed from open appliance top)
-replaced new actuator spring
-replaced 2 actuator switch screws
-closed top
-replaced 2 lint trap shute screws
-replaced lint trap
-plugged in appliance
-tested for operation
-kissed by happy wife
Read less
Was this instruction helpful to you?
Thank you for voting!
- Customer:
- Kenneth from Wilmington, IL
- Parts Used:
- W10820036
- Difficulty Level:
- Easy
- Total Repair Time:
- 1- 2 hours
- Tools:
- Nutdriver, Screw drivers, Socket set
Lid closes, switch wouldn't turn on machine.
Used toothpick for a year to push switch acctuator far enough to engage switch. Broke my foot and found time to order part thru PartSelect. Went from cast to boot and received part 2 days after ordered. Had difficulty with foot and getting to switch. Went back into PartSelect and figured out how to dis-assemmble panels thru the diagrams.
... Read more
Time on my job doesn't, just that their service and expertise that is available to everyone is there to use. Broken bones or not, I will always get my parts and advice from PartSelect. Thanks to PartSelect.
Read less
Was this instruction helpful to you?
Thank you for voting!
- Customer:
- Glen from Plano, TX
- Parts Used:
- W10820036
- Difficulty Level:
- A Bit Difficult
- Total Repair Time:
- 30 - 60 mins
- Tools:
- Screw drivers
Washer would fill up, wash, then stop
I deduced the lid switch was the problem.
I removed the two screws holding the control panel on. Pulled the control panel back.
Disconnected the ground wire of the lid switch.
removed the two top clamps that hold the panel to the top of the machine.
Pulled back the casing (outside of the washer) and placed ... Read more it on it's side on the floor. Here I could reach the switch. Removed old, installed new and reversed the process.
The part that gave me the biggest problem was setting the casing back on to the frame. You have to slide the front part in at the bottome, then lean back the rest of it.
Read less
Was this instruction helpful to you?
Thank you for voting!