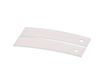
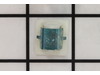
This single drum bearing slide is an OEM approved replacement part for dryers. It can also be known as a bearing drum slide, pad, or glide. The slides attach to the inner most slots on the front beari...
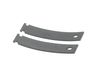
This single drum bearing slide attaches to the outer-most side of the bearing. This part is also sometimes referred to as a drum slide, drum glide, or drum pad. It provides support to the front of the...
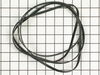
This 89.5-inch drive belt is for dryers. It has a 4-rib design on the inside for a better grip. If comparing the size of your current belt to the new one, keep in mind that a small amount of stretchin...
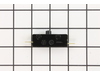
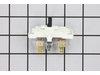
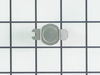
This push-to-start switch is a genuine OEM part and is used to activate your dryer. If your dryer will not start, or will only start if the switch is pushed down, or the timer knob is not engaging wit...
This Genuine OEM door latch is designed for use with a wide range of GE clothes dryers. Constructed from a combination of durable metal and plastic, the latch is mounted onto the dryer frame to secure...
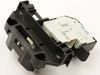
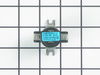
This interlock switch is a genuine OEM part that can be used in a variety of appliances like dishwashers and dryers. The switch is also known as a belt switch and works as a simple on and off mechanis...
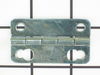
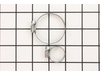
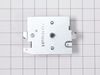
TThe door strike for your dryer is mounted on the dryer frame that the door shuts onto. It fits into the door catch on the door and keeps the door closed. If the door strike is damaged or missing, the...
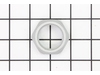
The door latch lid lock is to lock the door on your washer when the appliance is in use. Your washer will not start if your door is not locked. If your latch is broken, you may not be able to start a ...
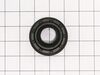
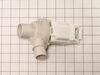
This part is the replacement high-limit thermostat or safety thermostat for your dryer. The high-limit thermostat is found on the upper right-hand side of the heater housing, and it cuts off power to ...
In Stock
Order now and your part arrives by Jul 19
Questions and Answers
Ask our experts a question about this part and we'll get back to you as soon as possible!
2 questions answered by our experts.
< Prev
1
Next >
Sort by:
Search filter:
Clear Filter
Your search term must have 3 or more characters.
Keep searches simple. Use keywords, e.g. "leaking", "pump", "broken" or "fit".
Sorry, we couldn't find any existing answers that matched. Try using some different or simpler keywords, or submit your new question by using the "Ask a Question" button above!
Rudy
May 26, 2023
Hi. So I have a stackable washer/dryer and when the washer is in spin mode it is extremely loud. Where is the tub bearing part number I don’t see it? Do you carry the whole motor tub assembly in one piece so I can replace the entire thing if you don’t carry the tub bearing if so what’s the manufacture number?
For model number GTUP270EM4WW
Hello Ruby, Thank you for writing. The Bearing is only sold as part of the Outer Tub assembly, Fix Number: FIX10055836. We hope this helps!
Where is the bearing located on the washer? The washer is very loud and sounds like an airplane during the spin cycle.
For model number GTUP270EM4WW
Hello Demarcus, thank you for the question. According to our research, if your washer is making a very loud sound, you may need to replace the white drum bearing slide, part number FIX755842, and the green drum bearing slide, part number FIX6447706, to fix the issue. They are located behind the front panel. You have to remove the front panel of the washer, and you will have access to the bearing slides. We hope this helps!
Removed the front Dryer panel. Left drum in place and lifted it up slightly to get access to motor drive. Slipped belt in place and put panel back on. This was a first attempt ever at fixing an appliance and it was no big deal.
It was actually my father, he doesn't use the internet. He thought that because the dyer got real hot and then shut off he thought the thermostat wasn't working and the high temp shutoff was okay. He went through the manual and found the part and took it out. He called the service number but they wanted $50 dollars plus shipping. I saw it
... Read more was a Thermo-disc part so I tried the manufacture's website but I couldn't match the numbers on the back to their part numbers. I tried several other sites and your site was the cheapest. It was real easy to use the web site and diagrams to find the right schematic and part. I ordered it online and it was delivered in 2 days with the regular shipping. When he first put it in the dyer didn't turn on. He found no power coming out of the timer so he cleaned the contacts and it worked. Thanks for making the ordering so easy.
First I really had to hunt for the proper way to get my dryer drum accessible for the repair. With my model it was as simple as removing two screws to take off the top panel (located by opening the dryer door), and then removing two other screws inside the front panel at the top. The front will then be able to swing to the left side (th
... Read moree door switch wires are on this side for this model). Simply remove the drum bearing by gently pulling it off. My slides were in such poor shape for less than 4 years old!! One of them had completely disintegrated! These slides have a small whole on one end which attaches to a small nub at the edge of a slot while the other side just slid into a slot at the other end. No need to even take out the drum!! The hardest part of the job was to get into the dryer!