


Models
>
GTUP240GM0WW
GTUP240GM0WW General Electric Washer Dryer Combo
Jump to:
Find Part by Name
Keep searches simple, eg. "belt" or "pump".
Diagrams for GTUP240GM0WW
Viewing 12 of 12


Manuals & Guides for GTUP240GM0WW
Click to downloadInstall
Installation Instructions
(6.25MB)
Install
Installation Instructions
(6.80MB)
Manual
Owner's Manuals
(3.98MB)
Keep searches simple, eg. "belt" or "pump".

$33.20
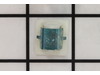
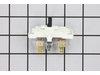
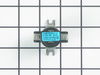
This push-to-start switch is a genuine OEM part and is used to activate your dryer. If your dryer will not start, or will only start if the switch is pushed down, or the timer knob is not engaging wit...
On Order

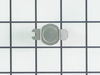
$21.82
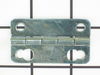
This Genuine OEM door latch is designed for use with a wide range of GE clothes dryers. Constructed from a combination of durable metal and plastic, the latch is mounted onto the dryer frame to secure...
In Stock
Order now and your part arrives by Jul 23

$35.34
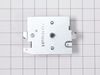
This interlock switch is a genuine OEM part that can be used in a variety of appliances like dishwashers and dryers. The switch is also known as a belt switch and works as a simple on and off mechanis...
In Stock
Order now and your part arrives by Jul 23

$60.95
This is a replacement lint filter slide for your dryer. It is approximately 14 inches long and 5 inches wide. It is made of white plastic and is sold individually. The slide mounts to your dryer and a...
In Stock
Order now and your part arrives by Jul 23

$15.26
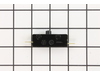
TThe door strike for your dryer is mounted on the dryer frame that the door shuts onto. It fits into the door catch on the door and keeps the door closed. If the door strike is damaged or missing, the...
In Stock
Order now and your part arrives by Jul 23

$60.67
This thermostat helps to regulate the dryer's internal temperature. L210-30F
In Stock
Order now and your part arrives by Jul 23

$37.49
A door switch is a simple on/off mechanism that prohibits the dryer from operating when the door is open.
In Stock
Order now and your part arrives by Jul 23

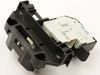
$94.95
The door latch lid lock is to lock the door on your washer when the appliance is in use. Your washer will not start if your door is not locked. If your latch is broken, you may not be able to start a ...
In Stock
Order now and your part arrives by Jul 23

This part is the replacement high-limit thermostat or safety thermostat for your dryer. The high-limit thermostat is found on the upper right-hand side of the heater housing, and it cuts off power to ...
In Stock
Order now and your part arrives by Jul 23

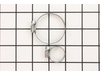
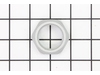
$35.34
The tub seal is manufactured to create a watertight seal between the tub and the inner spin basket. Your seal will wear over time causing the rubber to dry out and crack, breaking the seal in your was...
In Stock
Order now and your part arrives by Jul 23

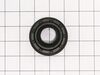
$27.95
This hub nut is a genuine OEM replacement part for your stackable washing machine. Removing the hub nut may require a spanner wrench, as per the manufacturer specifications. Replacing this part requir...
In Stock
Order now and your part arrives by Jul 23

In Stock
Order now and your part arrives by Jul 23
Common Problems and Symptoms for GTUP240GM0WW
Viewing 13 of 13Door won’t close
Fixed by these parts

How to fix it
Will Not Start
Fixed by these parts
How to fix it
Won’t Start
Fixed by these parts

How to fix it
Leaking
Fixed by these parts
How to fix it
Too hot
Fixed by these parts
How to fix it
Will not drain
Fixed by these parts
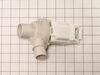
How to fix it
Door Pops Open
Fixed by these parts
How to fix it
Touchpad does not respond
Fixed by these parts
How to fix it
Door latch failure
Fixed by these parts
How to fix it
Locking Issues
Fixed by these parts
How to fix it
Timer Not Working
Fixed by these parts
How to fix it
Not Heating
Fixed by these parts
How to fix it
Lid or door won’t close
Fixed by these parts
How to fix it


Keep searches simple. Use keywords, e.g. "leaking", "pump", "broken" or "fit".
- Customer:
- David from Auburn, MA
- Parts Used:
- WE4M181
- Difficulty Level:
- Really Easy
- Total Repair Time:
- 1- 2 hours
- Tools:
- Nutdriver, Screw drivers
Dryer would get very hot and then turn off
It was actually my father, he doesn't use the internet. He thought that because the dyer got real hot and then shut off he thought the thermostat wasn't working and the high temp shutoff was okay. He went through the manual and found the part and took it out. He called the service number but they wanted $50 dollars plus shipping. I saw it
... Read more
was a Thermo-disc part so I tried the manufacture's website but I couldn't match the numbers on the back to their part numbers. I tried several other sites and your site was the cheapest. It was real easy to use the web site and diagrams to find the right schematic and part. I ordered it online and it was delivered in 2 days with the regular shipping. When he first put it in the dyer didn't turn on. He found no power coming out of the timer so he cleaned the contacts and it worked. Thanks for making the ordering so easy.
Read less
Was this instruction helpful to you?
Thank you for voting!
- Customer:
- Joshua from Dallas, TX
- Parts Used:
- WE4M415
- Difficulty Level:
- A Bit Difficult
- Total Repair Time:
- 1- 2 hours
- Tools:
- Pliers, Screw drivers, Socket set
Dryer would not start
The end repair was very simple and took minimal effort. The time and difficulty was all in the testing. I disassembled the dryer and removed the drum and then hard wired each thermo-fuse to determine where the fault was. After test all of those I was stumped. When I opened the door the light would not come on so I assumed it was a pow
... Read more
er fault closer to the source. However after all of my testing I couldn't find anything wrong. I then removed the light bulb and realized it was burned out which led me to the door switch being the fault. I removed the switch and soldered the three wire together and the dryer started right up! All I had to do was order a new $15 part, unsolder the wires and plug them in. Would have been so much simpler if that light bulb hadn't of been burned out causing me to over think my diagnosis. This was my first major appliance repair and I did it with only the help of the parts diagram provided on the website.
Read less
Was this instruction helpful to you?
Thank you for voting!
dryer door wont stay shut
pulled out door striker anddoor latch out with pliers and just pushed in new parts. works like new in under a min.
Was this instruction helpful to you?
Thank you for voting!