


Models
>
9864VPV
9864VPV Magic Chef Wall Oven
Jump to:
Find Part by Name
Keep searches simple, eg. "belt" or "pump".
Diagrams for 9864VPV
Viewing 6 of 6


.gif "MICROWAVE Diagram and Parts List for Magic Chef Wall Oven")

Keep searches simple, eg. "belt" or "pump".

$19.75
This is a genuine OEM 40-Watt replacement light bulb that is compatible with various types of appliances. It has a frosted glass bulb with a standard metal socket base, making it easy to screw and uns...
In Stock
Order now and your part arrives by Jul 23

$50.36
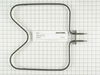
This bake element with push on wire terminals is located in ranges and ovens. The terminal depth is 3 inches, the total element length is 19 and the wire terminals are 16 inches wide. Detailed install...
In Stock
Order now and your part arrives by Jul 23

$21.82
This is a screw and it is made for multiple appliances in your home. This model is called a sheet metal screw because it has sharp points, and the threads are closer together. This screw is designed t...
In Stock
Order now and your part arrives by Jul 23

$27.83
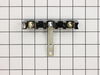
It provides a way of connecting individual electrical wires and offers protection of the device from electrical surges (voltages and/or currents).
In Stock
Order now and your part arrives by Jul 23


$7.60
This is a multi-use frame screw that fits a variety of power tools and equipment. Follow installation instructions and safety practices provided in the manual by the manufacturer.
In Stock
Order now and your part arrives by Jul 23
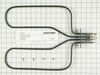
 – Part Number: WPY04000048")
This oven broil element with push on terminals can be used with some electric ranges or ovens. It comes with four screws and an instructions sheet. This element also has a terminal depth of three inch...
In Stock
Order now and your part arrives by Jul 23

In Stock
Order now and your part arrives by Jul 23

Special Order

In Stock
Order now and your part arrives by Jul 23

Special Order

This broil pan is fourteen inches wide, and almost sixteen inches long. It is made of black porcelain.
No Longer Available
Common Problems and Symptoms for 9864VPV
Viewing 7 of 7Little to no heat when baking
Fixed by these parts
How to fix it
Element will not heat
Fixed by these parts
How to fix it
Little to no heat when broiling
Fixed by these parts
How to fix it
Will Not Start
Fixed by these parts
How to fix it
Oven not heating evenly
Fixed by these parts
How to fix it
Touchpad does not respond
Fixed by these parts
How to fix it
Oven is too hot
Fixed by these parts
How to fix it


Keep searches simple. Use keywords, e.g. "leaking", "pump", "broken" or "fit".
- Customer:
- DENISE from GERMANTOWN, TN
- Parts Used:
- WPY04000066
- Difficulty Level:
- Really Easy
- Total Repair Time:
- Less than 15 mins
- Tools:
- Screw drivers
bottom heating element in oven disintegrated
First I removed the two screws that hold the element in place. I then pulled the element out about 3 inches and disconnected the two wires. I threw away the old pieces.
Then I connected the two wires on the new element. I pushed the wires back in the insulation in the wall of the cabinet. Then I inserted the two screws and t ... Read more ightened them in.
SUPER EASY!!!!!
This $40 part saved me $1500 on a new double wall oven.
Then I connected the two wires on the new element. I pushed the wires back in the insulation in the wall of the cabinet. Then I inserted the two screws and t ... Read more ightened them in.
SUPER EASY!!!!!
This $40 part saved me $1500 on a new double wall oven.
Read less
Was this instruction helpful to you?
Thank you for voting!
- Customer:
- Joseph from Decatur, GA
- Parts Used:
- WPW10245259
- Difficulty Level:
- Easy
- Total Repair Time:
- 30 - 60 mins
- Tools:
- Nutdriver, Screw drivers, Socket set, Wrench set
Burned terminal block and filter board
Removed and replaced above named parts, rewired.Be sure to tighten all nuts that secure wires. I believe this is what caused the problem.
Was this instruction helpful to you?
Thank you for voting!
- Customer:
- Shirley from Dallas, TX
- Parts Used:
- WPY04000066
- Difficulty Level:
- Really Easy
- Total Repair Time:
- 15 - 30 mins
- Tools:
- Pliers, Screw drivers
Oven heating element blew out
Removed 2 screws, pulled element out. My husband used an ohmmeter to see if the electricity needed to be turned off. It showed no voltage. He could not remove electrical connectors by hand, so he used insulated pliers. When he touched the connectors, a shower of sparks covered the inside of the oven and tripped the breaker switch. Th
... Read more
en we noticed the pliers were welded to the side of the oven. Thankfully the pliers had insulated handles and he was not hurt. It might be a good idea to put in the instructions to TURN OFF POWER TO OVEN in the breaker panel because our oven was definitely HOT. Oven works perfectly now.
Read less
Was this instruction helpful to you?
Thank you for voting!