


Models
>
KEBI171XBL1
KEBI171XBL1 KitchenAid Wall Oven
Jump to:
Find Part by Name
Keep searches simple, eg. "belt" or "pump".
Diagrams for KEBI171XBL1
Viewing 6 of 6


Keep searches simple, eg. "belt" or "pump".

$19.75
This is a genuine OEM 40-Watt replacement light bulb that is compatible with various types of appliances. It has a frosted glass bulb with a standard metal socket base, making it easy to screw and uns...
In Stock
Order now and your part arrives by Jul 25

$21.82
This is a screw and it is made for multiple appliances in your home. This model is called a sheet metal screw because it has sharp points, and the threads are closer together. This screw is designed t...
In Stock
Order now and your part arrives by Jul 25

$7.60
This is a multi-use screw and can be used on a variety of appliances. The measurements of the screw are: 8/18 x 3/8. *Please note: the screw is sold individually. Refer to the manual provided by the m...
In Stock
Order now and your part arrives by Jul 25

$24.15
This 18 ml bottle of white appliance touch-up paint is used to cover scratches or marks on your appliance. The white touch-up paint can be used on refrigerators, microwaves, ranges, clothes dryers, an...
In Stock
Order now and your part arrives by Jul 25

$50.36
This broiler pan and roasting rack set features a two-piece design that allows fat to drain away for cleaner cooking and reduced splatter. Made with a durable, high-heat resistant porcelain finish, it...
In Stock
Order now and your part arrives by Jul 25

$67.93
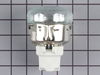
The light socket on your electric range connects the power source to the light bulb. If your oven light is malfunctioning, you may need to replace the light socket. The light socket is located in the ...
In Stock
Order now and your part arrives by Jul 25

In Stock
Order now and your part arrives by Jul 25


In Stock
Order now and your part arrives by Jul 25

$91.83
This bake element is found on the bottom of the oven. It has push-on terminal ends.
In Stock
Order now and your part arrives by Jul 25

In Stock
Order now and your part arrives by Jul 25

In Stock
Order now and your part arrives by Jul 25
Common Problems and Symptoms for KEBI171XBL1
Viewing 3 of 3Will Not Start
Fixed by these parts
How to fix it
Little to no heat when baking
Fixed by these parts
How to fix it
Element will not heat
Fixed by these parts
How to fix it


Keep searches simple. Use keywords, e.g. "leaking", "pump", "broken" or "fit".
- Customer:
- Edmund from Emporium, PA
- Parts Used:
- W11594027
- Difficulty Level:
- Easy
- Total Repair Time:
- 15 - 30 mins
- Tools:
- Pliers, Screw drivers
Socket Light had a bad thread
Socket Lite come with clips attached to the outside
of the housing. After you unhook the 3 lead wires
that are attached to the unit. All you have to do is push in on the clips and release the unit. Then you
snap in the new unit. Attach the 3 wire leads, put a
oven bulb in the socket end, and the install the light cove ... Read more r
of the housing. After you unhook the 3 lead wires
that are attached to the unit. All you have to do is push in on the clips and release the unit. Then you
snap in the new unit. Attach the 3 wire leads, put a
oven bulb in the socket end, and the install the light cove ... Read more r
Read less
Was this instruction helpful to you?
Thank you for voting!
- Customer:
- Lewis from Chapin, SC
- Parts Used:
- W11594027
- Difficulty Level:
- Easy
- Total Repair Time:
- 15 - 30 mins
- Tools:
- Nutdriver, Screw drivers
Inside brass liner in socket came out when bulb was removed. Apparently had welded itself to the base of the bulb
Removed oven from wall unit and took the back off. Removed the old socket assembly by depressing the ears and forcing unit into the oven. The electrical wires were easily removed since they are spade connections and slip off. They also are different sizes so that there is no chance of erroneously putting them back in an incorrect order.
... Read more
The new unit simply slips in from the front and snaps into place. The most difficult part of the entire process is removing the old unit. A little "friendly persuasion" is required to get the old unit out.
Read less
Was this instruction helpful to you?
Thank you for voting!
- Customer:
- Carol from Allison Park, PA
- Parts Used:
- W11594027
- Difficulty Level:
- Really Easy
- Total Repair Time:
- 15 - 30 mins
Oven light not working
I turned off the breaker (I'm a little nervous even unplugging a 220 plug). I first removed the cover from the back of the stove to get to the wiring/socket. Removed the two wires from the leads - they just pull off by hand but use a needlenose pilers if it is stuck. One is larger so no need to try to remember which one goes where. I re
... Read more
moved the glass cover and bulb from inside the oven. I read another post on this site that said there were clips that you had to press to get the old socket out which helped. That part was a little tricky as the insulation around the socket makes it hard to see and the opening is really tight. I finally found the clips and pressed one then got that side out enough to hold the clip back then pressed the other clip and I was able to push it right out. I did not have the strength to press both clips with enough pressure but if you do, that would probably be easier. From inside the oven, I pushed the new socket through the hole - there was a little notch in the opening that had to match up with the socket. I had to push pretty firmly until I felt both clips snap in place. Replaced the wires, turned on the power, screwed in the bulb and cover and I had light!
Read less
Was this instruction helpful to you?
Thank you for voting!