


Models
>
1544036640
1544036640 Kenmore Wall Oven
Jump to:
Find Part by Name
Keep searches simple, eg. "belt" or "pump".
Keep searches simple, eg. "belt" or "pump".

$39.63
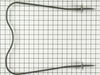
The bake element is found in the bottom of the oven and is used to provide the heat necessary to cook or bake. If your oven is not coming up to temperature, will not heat up at all, or has inconsisten...
In Stock
Order now and your part arrives by Jul 26

In Stock
Order now and your part arrives by Jul 26

In Stock
Order now and your part arrives by Jul 26

In Stock
Order now and your part arrives by Jul 26


In Stock
Order now and your part arrives by Jul 26
Special Order
Special Order
Special Order

Common Problems and Symptoms for 1544036640
Viewing 4 of 4Little to no heat when baking
Fixed by these parts
How to fix it
Element will not heat
Fixed by these parts
How to fix it
Oven not heating evenly
Fixed by these parts
How to fix it
Door won’t close
Fixed by these parts
How to fix it

Keep searches simple. Use keywords, e.g. "leaking", "pump", "broken" or "fit".
- Customer:
- Wendy from Red Hook, NY
- Parts Used:
- WPW10208653
- Difficulty Level:
- Easy
- Total Repair Time:
- More than 2 hours
- Tools:
- Screw drivers
mice had made nests in the insulation wrap in the range
I numbered every part. ex: 1 L., for first part removed left side. I used a magic marker to circle the holes and wrote the number of screws used on the part, set the srews in a separete place, so that I new where these screws went to. The cleanup was pretty time consuming, but I was able to keep my stove, when every repairman I called to
... Read more
fix my stove told me I was better off buying a new stove. ($600.00 stove 2 years old)Please Note: The insulation blanket needed for the entire stove is two pieces, the sides and top are one part # and the bottom and back, are another part #. I did not know this. I just purchased the top and sides. I got lucky, the back and bottom were still in good shape. So I guess I should have read the description of the part more carefully to see what it covers, before I ordered it. It took two people two hours to do the work, it was really nice to have an extra set of eyes, to remember what direction pieces of metal from the stove went. I would do it all over in a heart beat instead of buying a new stove.
Read less
Was this instruction helpful to you?
Thank you for voting!
- Customer:
- Chad from Bloomington, MN
- Parts Used:
- 326791
- Difficulty Level:
- Really Easy
- Total Repair Time:
- Less than 15 mins
- Tools:
- Screw drivers
Baking element in oven exploded
Removed the broken element by taking out the two screws in the back wall of the oven and unplugging the wires. Then did reverse to install the new element. Very simple repair job.
Was this instruction helpful to you?
Thank you for voting!
- Customer:
- Randy from Flagstaff, AZ
- Parts Used:
- 326791
- Difficulty Level:
- Really Easy
- Total Repair Time:
- 15 - 30 mins
- Tools:
- Screw drivers
Bottom heating element had burned out.
turned off the breaker (240 volts and it was outside, so it took longer than 15 minutes). Removed two screws in the back of the oven, one on each side of the old element, and pulled the old element forward. The wires on the back add some resistance, but they are long enough to pull forward a short distance (3 inches) without damage. Unpl
... Read more
ugged the old element, plugged in the new element, pushed it into place, and reinstalled the screws. Turned the power back on and it worked! Saved some money for the holidays! DIY para vida!
Read less
Was this instruction helpful to you?
Thank you for voting!