


Models
>
91141085994
91141085994 Kenmore Wall Oven
Jump to:
Find Part by Name
Keep searches simple, eg. "belt" or "pump".
Manuals & Guides for 91141085994
Click to downloadKeep searches simple, eg. "belt" or "pump".

$70.95
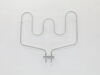
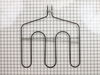
If the racks in your oven have become discolored, or if you need a spare, this is a genuine OEM replacement. The rack is used to hold cookware in the oven, and slides in and out of the oven for easy a...
In Stock
Order now and your part arrives by Jul 30

In Stock
Order now and your part arrives by Jul 30

In Stock
Order now and your part arrives by Jul 30

$15.26
This part is the replacement oven bulb lens cover. It is made of glass and is approximately 3 inches in diameter. The lens cover is rigid and protects the oven light bulb from being damaged. The main ...
In Stock
Order now and your part arrives by Jul 30

In Stock
Order now and your part arrives by Jul 30

In Stock
Order now and your part arrives by Jul 30

In Stock
Order now and your part arrives by Jul 30

$15.26
This part is a replacement screw for your oven. It is made of black metal and is sold individually. This screw is approximately 1/4 inch in diameter and about 1/2 inch in length. It is designed to con...
In Stock
Order now and your part arrives by Jul 30

In Stock
Order now and your part arrives by Jul 30

In Stock
Order now and your part arrives by Jul 30

In Stock
Order now and your part arrives by Jul 30

In Stock
Order now and your part arrives by Jul 30
Common Problems and Symptoms for 91141085994
Viewing 6 of 6Little to no heat when baking
Fixed by these parts
How to fix it
Element will not heat
Fixed by these parts
How to fix it
Oven not heating evenly
Fixed by these parts
How to fix it
Little to no heat when broiling
Fixed by these parts
How to fix it
Oven is too hot
Fixed by these parts
How to fix it
Will Not Start
Fixed by these parts
How to fix it


Keep searches simple. Use keywords, e.g. "leaking", "pump", "broken" or "fit".
- Customer:
- Yungti from Tomball, TX
- Parts Used:
- WB44T10018
- Difficulty Level:
- Easy
- Total Repair Time:
- 15 - 30 mins
- Tools:
- Nutdriver, Pliers
Broken element
First, disconnect the power from the electrical box, not just turn off that oven. specially if you have a double oven. Just turn one off is not enough.
I removed the two screws that hold the element in place. I then pulled the element out slowly about 2 inches to expose the connectors, and then disconnected the two wires by hol ... Read more ding the wire (female) connector by one plier and pull the element (male) connector out with another plier. Then, insert the new element connectors, and push the wire back into wall then fasten the element with 2 screws.
I removed the two screws that hold the element in place. I then pulled the element out slowly about 2 inches to expose the connectors, and then disconnected the two wires by hol ... Read more ding the wire (female) connector by one plier and pull the element (male) connector out with another plier. Then, insert the new element connectors, and push the wire back into wall then fasten the element with 2 screws.
Read less
Was this instruction helpful to you?
Thank you for voting!
- Customer:
- Sean from Highlands Ranch, CO
- Parts Used:
- WB23T10015
- Difficulty Level:
- Really Easy
- Total Repair Time:
- 15 - 30 mins
- Tools:
- Nutdriver, Screw drivers
Oven was not coming up to temperature
I had to remove the oven from the wall because the sensor plug connction is behind the unit. Two screws hold the sensor inside the oven and then I disconnected the lead and pulled the sensor out from the front. I installed the new sensor, tightened the two screws holding it in and connected the lead. Then reinstalled the oven into the wal
... Read more
l. Overall, a very easy repair once you get the oven out.
Read less
Was this instruction helpful to you?
Thank you for voting!
- Customer:
- David from Richardson, TX
- Parts Used:
- WB26K5061
- Difficulty Level:
- Really Easy
- Total Repair Time:
- Less than 15 mins
- Tools:
- Nutdriver, Socket set
Replace failed fan in control box
After turning off the breaker to cut power to the oven, I opened the oven door and, using the PartSelect exploded diagram as a guide, I removed 3 screws from the underside of the control panel - I was then able to slide the panel up and out to remove it. Leaving all of the control wires (especially the ribbon) connected to control panel,
... Read more
I saw the fan assembly mounted to the rear of the control box.
I noted the position of the two attached wires - black on top (or left), white on bottom (or right). Using a nutdriver with an extension bar, I unscrewed 4 screws holding the assembly in place. I removed the old fan and installed the new fan in its place. It was necessary to bend the new fan's legs out a bit to get them to line up with the holes. I reconnected the wires as mentioned above, then reinstalled the control panel.
I tested the oven by turning the breaker back on and letting the oven heat up to 450 degrees. The fan turned on as expected. After the oven cooled off, I reinstalled the 3 screws to secure the control panel.
Read less
Was this instruction helpful to you?
Thank you for voting!