


Models
>
ZET958SM3SS
ZET958SM3SS General Electric Wall Oven
Jump to:
Find Part by Name
Keep searches simple, eg. "belt" or "pump".
Diagrams for ZET958SM3SS
Viewing 7 of 7


Keep searches simple, eg. "belt" or "pump".

$60.49
This probe is used to check the internal temperature of the meat to ensure proper temperature is reached. Also known as a Meat Probe.
In Stock
Order now and your part arrives by Mar 30

In Stock
Order now and your part arrives by Mar 30

$141.70
The GE Oven Door Window Pack Assembly is a genuine OEM part that fits select GE ranges and ovens. It includes a heat-resistant inner glass panel, frame, and seals, providing insulation and clear visib...
In Stock
Order now and your part arrives by Mar 30

$15.26
This part is a replacement screw for your oven. It is made of black metal and is sold individually. This screw is approximately 1/4 inch in diameter and about 1/2 inch in length. It is designed to con...
In Stock
Order now and your part arrives by Mar 30

In Stock
Order now and your part arrives by Mar 30

Special Order

In Stock
Order now and your part arrives by Mar 30
 – Part Number: WB48T10059")
In Stock
Order now and your part arrives by Mar 30

In Stock
Order now and your part arrives by Mar 30

In Stock
Order now and your part arrives by Mar 30

In Stock
Order now and your part arrives by Mar 30

In Stock
Order now and your part arrives by Mar 30
Questions and Answers
We're sorry, but our Q&A experts are temporarily unavailable.
Please check back later if you still haven't found the answer you need.
Common Problems and Symptoms for ZET958SM3SS
Viewing 1 of 1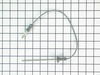


Keep searches simple. Use keywords, e.g. "leaking", "pump", "broken" or "fit".
- Customer:
- Micheal from SHEPHERDSVLLE, KY
- Parts Used:
- WB56T10105
- Difficulty Level:
- Really Easy
- Total Repair Time:
- 15 - 30 mins
- Tools:
- Nutdriver, Screw drivers
Inner oven door glass broke
Pull the old one put in the new one ... took about 20 minutes
Was this instruction helpful to you?
Thank you for voting!
- Customer:
- Rose from BEND, OR
- Parts Used:
- WB56T10105
- Difficulty Level:
- Easy
- Total Repair Time:
- 30 - 60 mins
- Tools:
- Socket set
Replace window pack assembly
This door required a lot more screws to be removed in order to remove the inside window assembly. I counted a total of 19 screws. That is why the estimated time is 30-60 minutes.
- remove door from range following the basic guide to removing any range door.
- place door on work surface with the outside facing down.
... Read more - remove three 1/4 socket screws from bottom and two star screws on top.
- Flip door over, remove outer door panel and set aside.
- There will be a separate pane of glass that needs to be removed. Remove 1/4 socket screws holding glass and set aside.
- Slide door over your work surface edge so you can remove the star screws holding the door hinges (from underneath). You could flip the door over but the door would have to be flipped back once the hinges were removed.
- Remove the remaining 1/4 screws holding the aluminum shielding.
- Remove the shielding being careful not to disturb the insulation around the window.
- Remove the damaged window. Take note of the writing and orientation on the aluminum window frame. (upper right if hinges were on the bottom)
- Set the new window in its place.
- Reverse the process by replacing the aluminum shield, hinges, than internal glass pane.
- Set outer door on top and holding everything together, flip door.
- Tighten the two star screws on top and the three 1/4 socket screws on the bottom.
- Replace door. Don't forget to lift up those hinge tabs before trying to close the door.
All done. Pat yourself on the back for a job well done.
Read less
Was this instruction helpful to you?
Thank you for voting!
- Customer:
- marc from PARK RIDGE, NJ
- Parts Used:
- WB56T10105
- Difficulty Level:
- Really Easy
- Total Repair Time:
- 15 - 30 mins
- Tools:
- Screw drivers
Broker inner glass
Very easy to remove the parts and to reassemble
Was this instruction helpful to you?
Thank you for voting!