


Models
>
JKD3000DN1WW
JKD3000DN1WW General Electric Wall Oven
Jump to:
Find Part by Name
Keep searches simple, eg. "belt" or "pump".
Diagrams for JKD3000DN1WW
Viewing 6 of 6


Keep searches simple, eg. "belt" or "pump".

In Stock
Order now and your part arrives by Jul 24

In Stock
Order now and your part arrives by Jul 24

$25.10
This OEM halogen bulb provides warm white light for top-mounted oven lighting. It operates at 120V and 40W, with a G9 base designed for high-heat environments. Ideal for replacing a dim or burnt-out b...
In Stock
Order now and your part arrives by Jul 24

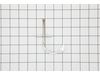
$15.26
This part is a replacement screw for your oven. It is made of black metal and is sold individually. This screw is approximately 1/4 inch in diameter and about 1/2 inch in length. It is designed to con...
In Stock
Order now and your part arrives by Jul 24

$35.84
This temperature sensor helps regulate heat inside the oven by sending temperature readings to the control board. It ensures consistent cooking and helps maintain the set temperature. A faulty sensor ...
In Stock
Order now and your part arrives by Jul 24

In Stock
Order now and your part arrives by Jul 24

$90.88
This window pack assembly is designed to enhance the performance and reliability of your appliance. Constructed from durable, high-quality materials, it supports smooth operation and long-lasting func...
In Stock
Order now and your part arrives by Jul 24

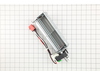
$105.69
This lower cooling fan circulates air through the oven’s internal components to prevent overheating and maintain stable temperatures. It’s a durable replacement for worn or noisy fans and may help res...
In Stock
Order now and your part arrives by Jul 24

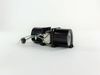
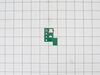
$64.95
Maintain safe and consistent oven performance with this genuine cooling fan sensor board. This electronic component monitors the cooling fan’s speed and communicates with the main control board to pre...
In Stock
Order now and your part arrives by Jul 24

In Stock
Order now and your part arrives by Jul 24

$70.95
This sturdy oven rack provides a reliable, elevated surface for baking and cooking, helping you maximize space inside your oven. Designed for a precise fit, it ensures stability and efficiency when pr...
In Stock
Order now and your part arrives by Jul 24

Special Order
Common Problems and Symptoms for JKD3000DN1WW
Viewing 3 of 3Will Not Start
Fixed by these parts
How to fix it
Oven is too hot
Fixed by these parts
How to fix it
Oven not heating evenly
Fixed by these parts
How to fix it
Keep searches simple. Use keywords, e.g. "leaking", "pump", "broken" or "fit".
- Customer:
- Thomas from Goshen, IN
- Parts Used:
- WB26X31060
- Difficulty Level:
- Easy
- Total Repair Time:
- 30 - 60 mins
- Tools:
- Nutdriver, Socket set
Blower Fan quit working
It took a while to remove approx 30 screws to get to the blower. So my oven was sitting, torn apart while I waited on the new blower fan that I had ordered. It arrived shortly, about 5 days. When I opened the box I saw that PARTSELECT had sent me a drain pump instead of the blower fan that I had ordered. Since an oven does not require a d
... Read more
rain pump and it wouldn't work to replace my broken blower fan I had to return it. I was told that I needed to send the part back in order to get a refund. After I sent their drain pump back at a cost of $13 they emailed me and said I didn't need to send the drain pump back. And they refunded me minus shipping So I had to pay shipping both ways for a part that was wrong. And I ordered it from someone else. I put the new blower fan that I had bought from another company in and replaced the 30 screws. And the oven has been working fine ever since. Thank you PARTSELECT for allowing me to tell people how you operate. They have a money back guarantee, but they don't give you back ALL your money. Thanks Again.
Read less
Was this instruction helpful to you?
Thank you for voting!
- Customer:
- Andrea from SILVERTON, OR
- Parts Used:
- WB26X35089, WB27X28659
- Difficulty Level:
- Easy
- Total Repair Time:
- 30 - 60 mins
- Tools:
- Nutdriver, Pliers
F97 on right side of double wall oven
My less than 2 year double wall oven was showing a F97 on the right hand side of display screen on my oven, indicating to me it was a lower cooling fan issue. Purchased the parts after a lot of research (and a GE technician telling me over the phone it would be a 600 or more costly repair). I decided to bite the bullet and just do it mys
... Read more
elf to save money! I’m glad I did! I built a table for it to rest on after it got it out of the wall as it’s a heavy oven. I asked my dad to help me get it out and onto the stand. After that, it was a matter of getting to the lower fan through the back abs having to remove some panels. All went well and best part is this fixed it! I figure even if it goes out again in 2 years it’s still cheaper than paying a technician to do it! I’m a woman with zero background in repair but lots of determination and desire to save money! Just do it yourself!
Read less
Was this instruction helpful to you?
Thank you for voting!
- Customer:
- Thomas from ROSEVILLE, CA
- Parts Used:
- WB26X35089, WB27X28659
- Difficulty Level:
- A Bit Difficult
- Total Repair Time:
- More than 2 hours
- Tools:
- Nutdriver, Screw drivers
Double oven was providing a F97 error when we would attempt to pre-heat.
I ordered the fan and the sensor. I had to pull the whole oven out anyway, why not replace both. Bought a piano dolly at Harbor Freight so I could set the oven on something while it was out of the hole. Make sure and remove the oven doors and racks prior to pulling it out. I was not able by myself. A neighbor had to assist. The fan and se
... Read more
nsor are located mid-way up the middle of the rear panel. I just take pictures with my phone as I disassemble so I have a roadmap for reassembly. Once I plugged the fan and sensor in I tested the oven while still out of the hole. I used the vegetable oil to provide a little lubrication to the runners while sliding the oven back in. Works like a charm.
Read less
Was this instruction helpful to you?
Thank you for voting!