This 40-watt light bulb has a standard screw-in base and is used in many different appliances. If your current bulb is burnt out or broken you will need to replace it. This light bulb is a genuine OEM...
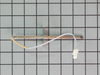
This is a temperature sensor for a range. The sensor is what detects the temperature inside the oven and is often replaced when the oven is having heating issues. Please note that the wire connector m...
This is a light bulb lens, and it is made for your oven. This part protects the light bulb inside your oven by covering it. The lens is made of glass, and has a 3-inch diameter. Before making this rep...
This 3400-watt bake element has screw style connections. The bake element is located on the bottom of the oven cavity and supplies the heat for baking. If your oven is not heating evenly, element will...
This oven rack provides a sturdy, level surface for cookware during baking, roasting, and broiling in ranges, wall ovens, and microwave oven combos. Made from durable, high-temperature-resistant metal...
Ask our experts a question about this part and we'll get back to you as soon as possible!
1 question answered by our experts.
< Prev
1
Next >
Sort by:
Search filter:
Clear Filter
Your search term must have 3 or more characters.
Keep searches simple. Use keywords, e.g. "leaking", "pump", "broken" or "fit".
Sorry, we couldn't find any existing answers that matched. Try using some different or simpler keywords, or submit your new question by using the "Ask a Question" button above!
Douglas
February 9, 2022
When setting the oven for 400 degrees it takes a long time to heat up and won’t go pass 150 degrees if that. Check continuity on element, temperature sensor, thermal fuse, getting power to the electrical block. The screen on the front of the oven shows a red line switching from bake to broil and back and forth. Thank you for your help.
For model number FGEW3045KBA
Hello Douglas, Thank you for the question. If the parts all tested good, this would indicate the Oven Controller, Fix Number: FIX2373543 is faulty and may need to be replaced. If you need help placing an order, customer service is open 7 days a week. Please feel free to give us a call. We look forward to hearing from you!
Replaced clock control by removing surface burner control knobs and plastic nuts, and then the cover over the oven control. Two screw hold the clock in place, after removal and disconnecting the plug-in you can reinstall the new clock control. The Heat Sensor inside the oven will also need to be replaced. It is located inside the oven
... Read moreand attached with two screws; the back of the oven will need to be removed to unplug. Reverse removal procedure and turn the power back on to the stove.
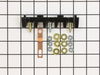
PF alarm appeared on display. Noticed clicking when cord was moved. Had arced for some time and melted original block. New part slightly different. Only has 3 lugs, old one had six. Stack using washers provided. Take note of colors before disassembly. Use caution while working through access opening. The edges are sharp. Only tools neede
... Read mored are phillips screwdriver, deep socket for lug nuts. Nut driver optional. Hope this is helpful.
Repair was quite easy, as long as you have the instructions for removing the door. The screws that hold the bottom of the door to the fixed hinge are placed into the side of the hinge assembly after removal; this holds the door at a 45 degree angle for easy removal. After that, just place the door on a flat surface and dismantle the door
... Read morefrom the inside. The inner glass is contained in a metal frame with another piece of glass; this frame comes apart easily using the clips in each side. The door assembles easily after the glass is replaced; just take your time and give yourself enough room to lay out the parts as you go. Good luck!