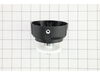
This is an OEM replacement cover for a string trimmer or edger. The cover holds the spool and line securely inside the spool housing. If this part has cracked or damaged, it will need to be replaced. ...
This authentic string trimmer lever assembly is sold individually. The lever is what controls the amount of line that is fed from the auto-feed spool. The lever tends to wear over time, and so should ...
This is an OEM spring located between the spool and spool cover of your trimmer. It is designed to hold the spool in position. This spring can lose tension over time and may cause the trimmer head to ...
This is a Genuine OEM Sourced replacement part designed for Black and Decker String Trimmer. This item is used to secure and drive the Spool. It is made out of Plastic and Metal. Includes a Plastic Ho...
This is a genuine Black and Decker replacement part designed for use with string trimmers. Edge guide serves a couple of purposes. When pushed down it can be used as a guide to edge your lawn. It can ...
This replacement screw is an authentic OEM sourced item, not an aftermarket equivalent. This is screw is used in a lot of different applications depending on your tool. Please check appropriate diagra...
This genuine OEM sourced replacement part is specially designed for use with handheld Black and Decker string trimmers. It is secured over the trimmer head to direct grass clippings away from the user...
This is a genuine Black and Decker replacement part that has been sourced from the original manufacturer to be used with trimmers. The metal spring is part of the cutting head assembly. The spring is ...
This motor and mount assembly includes both the motor and its mounting plate, making it a reliable replacement for damaged or worn-out components in 40V trimmers. It’s designed to restore proper funct...
The switch goes next to the trigger and is made of metal and plastic. This item is available as an individual replacement part. This is a genuine Black & Decker replacement part for use in string trim...
Ask our experts a question about this part and we'll get back to you as soon as possible!
4 questions answered by our experts.
< Prev
1
Next >
Sort by:
Search filter:
Clear Filter
Your search term must have 3 or more characters.
Keep searches simple. Use keywords, e.g. "leaking", "pump", "broken" or "fit".
Sorry, we couldn't find any existing answers that matched. Try using some different or simpler keywords, or submit your new question by using the "Ask a Question" button above!
John
August 6, 2022
My trimmer beeps in the motor housing and will not run. I have a fully charged battery the line cartridge is installed properly and yet it beeps and refuses to run.... what is my problem?
For model number LST140C
Hello John, Thank you for your inquiry. This is usually indicative of an issue with the motor. Check the connections to make sure they are plugged in securely and do not show any visible damage. Check the motor, the connecting wire, the switch, and the pcb assembly for any visible damage and test the parts with a multimeter. We hope this helps and if you need help placing an order, customer service is open 7 days a week. Please feel free to give us a call. We look forward to hearing from you!
How to disconnect the motor from the gear and spindle so I can replace the damaged spool housing?
For model number LST140C
Hi Mildred, thank you for reaching out. To disconnect the motor from the gear and spindle assembly, we would suggest following these general instructions: First, detach the wiring harness from the motor by removing the metal clips using needle nose pliers. Then, remove the bearing from the shaft to separate the motor from the gear and spindle assembly. Some models contain a small metal retaining ring at the top of the shaft. In that case, it has to be removed first using needle nose pliers. We hope this information helps!
Was this helpful?
Thank you for voting!
OWEN
August 26, 2023
CAN THE BATTERY HOLDER HANDLE ASSEMBLY BE REPLACED? THE PLASTIC CONNECTOR THAT THE BATTER PLUGS INTO ON THE HANDLE IS BROKE
For model number LST140C
Hi Owen, thank you for reaching out to Fix. To fix the issue, you may need to replace the handle assembly, part number FIX12466195. Good luck with the repair!
smoke came out by handle on weedeater lst 40v now it dont work is it the motor
For model number LST140C type1
Hello Gregory, thank you for getting in touch. Based on our understanding of the issue, we would suggest checking the motor and mount, part number FIX12526009, to fix the problem. We hope this solves your problem!
Took off line guard and guide. Remove 1 Phillips screw. Opened motor head. Remove 7 torx screws Opened split housing using a small straight slot screw driver. Removed gear from housing and pulled it out the bearing housing.
Opened split housing on trigger end. 8 torn screws. Opened split case with flat scr
... Read moreew driver. Removed motor connections in trigger end for motor.
Pulled motor cable and motor from extention tube.
Please note tube orientation for easy reassemble.
Install new cable/motor on trigger end. Reinstall housing on trigger end.
Install new motor and gear head into new housing. Be sure to install old electrical brace stop to protect new cable.
Roll gear head to verify easy non-binding rotation.