


Models
>
6657469001
6657469001 Kenmore Trash Compactor
Jump to:
Find Part by Name
Keep searches simple, eg. "belt" or "pump".
Keep searches simple, eg. "belt" or "pump".

$79.09
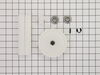
This is a genuine OEM drive gear kit for your trash compactor. It includes the drive gear, pin spring, a retaining clip which is also known as a c-ring, ram stop, and the ram cam. The ram is used to c...
On Order

$7.60
This is a multi-use screw and can be used on a variety of appliances. The measurements of the screw are: 8/18 x 3/8. *Please note: the screw is sold individually. Refer to the manual provided by the m...
In Stock
Order now and your part arrives by Aug 2

In Stock
Order now and your part arrives by Aug 2

$17.44
This is a genuine OEM replacement part. This bearing roller is commonly used in the assembly of trash compactors, it allows you to easily slide the container out of the appliance. If the drawer become...
In Stock
Order now and your part arrives by Aug 2

$27.83
This is an OEM part sourced directly from the manufacturer. This wheel assembly kit is for use with trash compactors. The kit included two wheel bearings. These bearings allow the container drawer to ...
In Stock
Order now and your part arrives by Aug 2

On Order

Sold individually. The size of this screw is 1/4" hex head and 10-12 x 1/2".
In Stock
Order now and your part arrives by Aug 2

$11.98
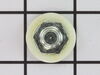
This is a genuine OEM replacement part. This switch nut is commonly used in the assembly of trash compactors. It can often be found holding the knob in place on the back of the appliance. However, due...
Special Order

In Stock
Order now and your part arrives by Aug 2

Special Order

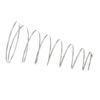
This is an authentic OEM replacement part. This spring is known as a contain spring, it is commonly used in trash compactors. It is located at the bottom of the machine. When you release the contain l...
In Stock
Order now and your part arrives by Aug 2

$7.60
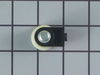
This is a genuine OEM replacement part. This replacement nut is commonly used in the assembly of trash compactors. This nut is the roller wheel lock nut, it is what hold the wheel in place at the bott...
Special Order
Common Problems and Symptoms for 6657469001
Viewing 6 of 6Compactor ram gets stuck
Fixed by these parts
How to fix it
Drawer is hard to open and or close
Fixed by these parts
How to fix it
Noisy
Fixed by these parts
How to fix it
Doesn’t stop at end of compacting cycle
Fixed by these parts
How to fix it
Won’t start
Fixed by these parts
How to fix it
Shaking and Moving
Fixed by these parts
How to fix it

Keep searches simple. Use keywords, e.g. "leaking", "pump", "broken" or "fit".
- Customer:
- Matt from Houston, TX
- Parts Used:
- 882699
- Difficulty Level:
- A Bit Difficult
- Total Repair Time:
- More than 2 hours
- Tools:
- Screw drivers, Socket set
Broken Gear
Trash compactor started making "bumping" sounds when the RAM went through a cycle and tried to come back up. Finally, one day heard a "pop" went the RAM traveled to the bottom. The gear broke in half. Purchased the gear parts "KIT" online and repair took 15 minutes. Easy to do. Unfortunately, this was not only problem. The "cause" of
... Read more
the gear breaking was the Momentary Start/Stop Switch was bad. It's failure led to the main switch not working. The unit could not tell when the RAM had reached the top of it's cycle. The other problem was that I didn't put trash in the compactor. Suggest HIGHLY to never operate the unit's RAM mechanism without the compactor being at least 1/2 full per the instruction manual. Running it empty can cause a major problem, such as the gear breaking/stripping.
Read less
Was this instruction helpful to you?
Thank you for voting!
- Customer:
- Mark from Littleton, CO
- Parts Used:
- 882699
- Difficulty Level:
- Easy
- Total Repair Time:
- 30 - 60 mins
- Tools:
- Nutdriver, Pliers, Socket set
Large Drive Gear Failure (split in half)
Moved the compactor out from under cabinet, laid it on it's side, removed bottom casing (two nuts front, three back), remove compression pin from small drive gear shart, replace new small drive gear and install compression pin, loosen motor mounts to allow large gear replacement, remove circlip holding large drive gear to shaft, remove an
... Read more
d repace damaged gear, set gear clearance and tighten motor mounts, grease gears, replace bottom casing. .
Read less
Was this instruction helpful to you?
Thank you for voting!
- Customer:
- clyde from Covington, GA
- Parts Used:
- 882699
- Difficulty Level:
- Easy
- Total Repair Time:
- 30 - 60 mins
- Tools:
- Nutdriver, Screw drivers
Drive Gear Broken
Replaced the gear and unit worked execpt the plunger hit the side of the garbage container. This appears the be the reason the gear broke in the first place. Defective assembly from the factory.
To correct I had to remove the newly installed gear system remove inside cardboard side cover, Remove the screws that hold the bea ... Read more ring for the lift screw so I could remove the chain. After removing the chain I could adjust the plunger to be level and not hit the side of the garbage container on its way down.
To correct I had to remove the newly installed gear system remove inside cardboard side cover, Remove the screws that hold the bea ... Read more ring for the lift screw so I could remove the chain. After removing the chain I could adjust the plunger to be level and not hit the side of the garbage container on its way down.
Read less
Was this instruction helpful to you?
Thank you for voting!