


Models
>
536881800
536881800 Craftsman Snow Blower
Jump to:
Find Part by Name
Keep searches simple, eg. "belt" or "pump".
Diagrams for 536881800
Viewing 11 of 11


Manuals & Guides for 536881800
Click to downloadKeep searches simple, eg. "belt" or "pump".

$26.72
This is a notched traction drive belt for a snowblower, sold individually. It is also sometimes referred to as a ground drive belt. It measures approximately 3/8-inches wide and 33-1/6-inches long. Th...
On Order

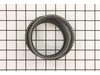
$10.83
This authentic replacement part is designed for use with Craftsman snowblowers. Ball bearings are used to reduce friction between rotating parts. The balls or rollers take the load and spin, distribut...
In Stock
Order now and your part arrives by Mar 27

$31.84
This Auger Drive Belt is an original part from Craftsman for use with Craftsman Snowblowers. The auger drive belt rotates the auger on the snowblower. The most common reason for replacing the drive be...
In Stock
Order now and your part arrives by Mar 27

In Stock
Order now and your part arrives by Mar 27

$35.03
This is an original part from Craftsman for use with Craftsman Snowblowers. The fiction wheel assembly meshes with the friction disc, causing the drive wheel axle to turn. The most common reason for r...
In Stock
Order now and your part arrives by Mar 27

$8.33
This nut is mostly used in lawn tractors and snow blowers and is in different locations in the machine, depending on snowblower. It is made from metal and measures to 5/16 inches for the diameter and ...
In Stock
Order now and your part arrives by Mar 27

This is a genuine OEM sourced replacement hardware designed for use with snowblowers. Shear bolts are installed in order to protect your unit. If the auger gets jammed or clogged, shear bolt is design...
In Stock
Order now and your part arrives by Mar 27

$6.51
This is a hair pin clip for your lawn equipment. You may also know it as a cotter pin. It is a multi-application part, depending on your unit, as well as the make and model. To correctly install the p...
In Stock
Order now and your part arrives by Mar 27

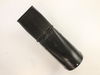
$11.12
The shear pin spacer sleeve goes between the auger and the snowblower screw. This part is priced individually. This is an authentic Craftsman replacement part that is sourced from the original manufac...
In Stock
Order now and your part arrives by Mar 27

This is a genuine Craftsman part for use with Craftsman Snowblowers. The Shear pin kit connects the auger to the rotating drive shaft. The shear pin is made of soft metal that purposely shears off or ...
No Longer Available

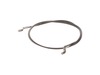
$9.37
This is available as an individual replacement part. The auger bearing connects to the auger plate and is made of plastic. If this part becomes broken it will need to be replaced and may require a scr...
In Stock
Order now and your part arrives by Mar 27

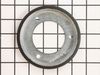
$24.05
This is a genuine OEM sourced part is which is specially designed for use with Murray snowthrowers. The inner retainer ring helps to secure the chute collar and the lower chute. Over time it may wear ...
In Stock
Order now and your part arrives by Mar 27
Questions and Answers
We're sorry, but our Q&A experts are temporarily unavailable.
Please check back later if you still haven't found the answer you need.
- < Prev
- 1
- Next >
Sort by:
Search filter:
Clear Filter
Your search term must have 3 or more characters.
Keep searches simple. Use keywords, e.g. "leaking", "pump", "broken" or "fit".
Sorry, we couldn't find any existing answers that matched.
Try using some different or simpler keywords, or submit your new question by using the "Ask a Question" button above!
Try using some different or simpler keywords, or submit your new question by using the "Ask a Question" button above!
Bruno
January 18, 2024
Drive not working. Is there a way to adjust the drive cable?
For model number 536881800
Hello Bruno, thank you for reaching out. In order to adjust the drive cable. Run the engine until the fuel tank is empty and the engine stops. Stand the snow thrower up on the front end of the auger housing. Loose the bolts on each side of the bottom panel. Remove the bottom panel. Disconnect the "Z" fitting from the drive lever. Slide the cable boot off the cable adjustment bracket. Push the bottom of the traction drive cable through the cable adjustment bracket until the "Z" hook can be removed. Remove the "Z" hook from the cable adjustment bracket. Move the "Z" hook down to the next adjustment hole. Pull the traction drive cable up through the cable adjustment bracket. Put the cable boot over the cable adjustment bracket. Install the "Z" hook to the traction drive lever. We hope this solves your problem!
2 people found this helpful.
Was this helpful?
Thank you for voting!
Common Problems and Symptoms for 536881800
Viewing 4 of 4Drive system does not work
Fixed by these parts

How to fix it
Auger will not turn
Fixed by these parts
How to fix it
Can't adjust chute
Fixed by these parts
How to fix it
Will not blow snow
Fixed by these parts
How to fix it
Keep searches simple. Use keywords, e.g. "leaking", "pump", "broken" or "fit".
Refurbishing for next winter season
I replaced the auger belt and drive belt by separating the machine. The auger belt alone can be replaced by simply tilting without separating but the drive belt can not. So after separating the machine, I removed the auger belt by loosening the belt guide and removing the tensioner. I then loosened the nut that secures the drive wheel.
... Read more
This gave me enough play to remove the drive belt from the drive tensioner and then wiggle it from the drive wheel and out of the machine. Install by wiggling the belt back behind the drive wheel until you can slip it on the wheel. pull tensioner pulley out of the way to get the belt on the top pulley. Tighten the nut to secure the drive wheel. Reconnect the machine at the bottom of the auger housing and replace the auger belt, tensioner, and belt guide. Complete by replacing the upper bolts that hold the two parts together. I have not replaced the friction wheel as of yet. My process took 30 - 45 minutes for both belts.
Read less
Was this instruction helpful to you?
Thank you for voting!
Quick
Old beld was off so was able to put on new quickly
Done less than 1 hr.
Done less than 1 hr.
Was this instruction helpful to you?
Thank you for voting!