This package contains one individual water filter that is NSF-certified, and OEM approved. To ensure that the filter is successfully removing contaminants, it will need to be replaced at least every 6...
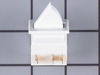
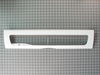
This genuine OEM part is a door cover for your refrigerator pantry drawer. It helps to maintain the proper temperature and humidity in the drawer by providing a seal when closed. Other names for this ...
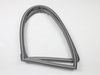
The crisper drawer is used to help prolong the life of your produce, by sealing itself off from the rest of the fridge to create a high humidity environment. If your drawer has become cracked or damag...
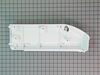
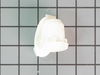
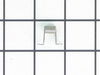
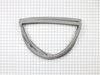
This genuine OEM part is an end cap used to support the pantry drawer in your refrigerator. This end cap is for the right side as if you were standing facing towards the appliance. The end cap mounts ...
This pantry end cap is a genuine OEM replacement part for your refrigerator. Also known as a drawer support, it is used to hold the rails and shelving for your pantry and crisper drawers. This specifi...
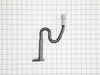
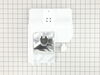
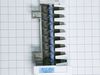
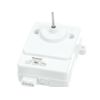
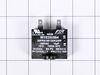
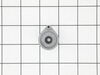
This part includes one authentically sourced 3-pin rocker switch for a refrigerator. It is responsible for turning the light on inside the fridge when the door is open. It is commonly replaced because...
This 18 ml bottle of white appliance touch-up paint is used to cover scratches or marks on your appliance. The white touch-up paint can be used on refrigerators, microwaves, ranges, clothes dryers, an...
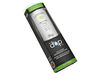
Want cleaner, better-tasting water from your fridge or ice maker? This water filter does the trick by removing unwanted particles and keeping your water fresh. It’s a genuine replacement part and supe...
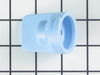
Need to keep your fridge’s water and ice working while the filter is out? This bypass cap lets water flow to the dispenser and ice maker without a filter. It’s easy to install and fits Whirlpool, Mayt...
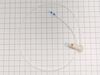
This authentic OEM part is a mounting screw for the door handle on your refrigerator. If the door handle is loose or you are having issues opening or closing the door, a new mounting screw may solve t...
This is a genuine replacement light bulb for a refrigerator. The inside of your refrigerator should illuminate when you open the door. If your fridge does not illuminate, you may need to replace this ...
In Stock
Order now and your part arrives by Jul 20
Questions and Answers
Ask our experts a question about this part and we'll get back to you as soon as possible!
1 question answered by our experts.
< Prev
1
Next >
Sort by:
Search filter:
Clear Filter
Your search term must have 3 or more characters.
Keep searches simple. Use keywords, e.g. "leaking", "pump", "broken" or "fit".
Sorry, we couldn't find any existing answers that matched. Try using some different or simpler keywords, or submit your new question by using the "Ask a Question" button above!
Melissa
February 15, 2023
I’ve purchased a new pad wpw10185234
How do i replace the pad?
For model number WRF550CDHZ00
Hi Melissa, thank you for reaching out. These are some instructions that may help you replace the pad. First, you need to remove the water dispenser with a knife and pull up the dispenser to free its tabs. Remove the wire harness and remove two screws in the plastic basket and remove it. Then, remove the ice level by unscrewing the retaining screw. The pad is in assembly inside held by a pin in the spring. Remove the pin and install a new pad. Install the plastic casing back and attach the wire harness. Snap the ice dispenser back in. Your repair is complete. We hope this helps!
Was this helpful?
Thank you for voting!
Ask a Question
Ask our experts a question on this part and we'll respond as soon as we can.
Pressed in the end of the filter cover, lowered it down part way. Twisted the old filter 1/4 turn and removed it. Set in the sink to drain. Inserted new filter and twisted it to lock. closed cover. Done. Total time @ 1 Minute.
I removed the drop-down outer housing by gently prying the sides of the two pivot pins at the rear. This gave me move 'room' to grip and slightly rotate then pull the old filter forward and away from the tight suction connection. I was concerned that I would be too forceful for the plastic assemblies and would break something; deliberate
... Read moremotions and a steady thought process on the problem helped disengage the darned old filter!
Removed door and crisper pans. Removed nuts on left end cap - think there were 3. Removed nuts on right end cap and one or two on back air regulator attached to right end cap. Replaced left end cap with new one using reserved nuts. Carefully removed back air regulator from right end cap. Attached back air regula
... Read moretor to new right end cap. Replaced right end cap and back air regulator and attached with nuts. Carefully inserted pantry door into pin on one side and slightly bent both right and left pins to insert door fully into end caps. Replaced crisper pans. That's it.