This is a genuine OEM replacement crisper drawer for refrigerators. It is sold as an individual part. The crisper drawer with humidity control allows you to adjust the humidity within the crisper, whi...
This is a manufacturer-approved refrigerator door shelf bin, also sometimes referred to as the crisper bin. It is sold individually. It is made of clear plastic with a white plastic trim. It is used a...
It is recommended to replace your refrigerator water filter every 6 months or 200 gallons of water. This will ensure consistently good-tasting water that is free of pollutants. This NSF-certified filt...
This is a genuine OEM 40-Watt replacement light bulb that is compatible with various types of appliances. It has a frosted glass bulb with a standard metal socket base, making it easy to screw and uns...
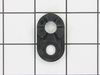
The lower door closing cam raises the door to keep it from touching the refrigerator liner when the door is closed. It fits both the left and right side of the refrigerator door. The most common reaso...
This clear convertible meat drawer is for the lower part of the refrigerator. It has an air duct that allows cold air to flow into the drawer from the freezer. It can be used to store meats and vegeta...
This is a refrigerator or freezer lower door closing cam. This part includes the door cam only, but you will need a new mounting screw to complete this repair, and it is sold separately. Door cams are...
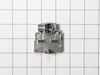
If the ice maker or water dispenser on your fridge are not working, or there is water leaking, it may be an issue with your water inlet valve. This part is found at the back of your refrigerator and s...
If your fridge has stopped making or dispensing ice, you may need to replace the ice maker assembly. Regular wear and tear can cause this part to fail over time, especially if used frequently. To repl...
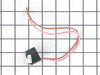
The control bracket, also known as a dispenser control bracket, holds the switches and light socket for the water and ice dispenser on your freezer door. If you are having issues with the dispenser no...
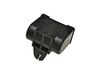
When the ice dispenser in your fridge is activated, the ice guide helps to ensure the ice flows into your glass. This is a genuine OEM replacement ice guide that is made of clear plastic. If your ice ...
This is a genuine OEM replacement slide out shelf with glass for your refrigerator. The plastic frame and glass are only sold together and are not available separately. This is a standalone shelf and ...
In Stock
Order now and your part arrives by Mar 19
Questions and Answers
Ask our experts a question about this part and we'll get back to you as soon as possible!
1 question answered by our experts.
< Prev
1
Next >
Sort by:
Search filter:
Clear Filter
Your search term must have 3 or more characters.
Keep searches simple. Use keywords, e.g. "leaking", "pump", "broken" or "fit".
Sorry, we couldn't find any existing answers that matched. Try using some different or simpler keywords, or submit your new question by using the "Ask a Question" button above!
Shelton
February 10, 2024
Model number ED5LHAXWB00 whirlpool side by side ice maker issue. Diagnostic light giving two flash code indicates water supply issue . So initially replaced water inlet valve. Ordered from Fix app on phone call for client. After connecting water inlet valve and reconnecting power , indicating flash is still showing water supply issues . Question 1. Is there a reset procedure to allow code clearance? If not how long should I wait for ice maker to initiate ice making? Question 2. If not 24 hours pass with no Ice? I replaced water filter same day as water inlet Valve . Should I replace the Ice maker.
For model number ED5LHAXWB00
Hi Shelton,
Thank you for your question. To bring the refrigerator out of diagnostic mode, unplug the refrigerator for 30 seconds. Once it is plugged back in it will be out of diagnostic mode. When you replace the water filter it is important to flush a couple of gallons through it first before using it. If you have done this and where you have just replaced the water inlet valve, you would wait 24 hours before the ice maker starts making ice. If the ice maker is still not making ice after 24 hours, you will need to inspect the water inlet valve. You should check the water inlet valve for continuity with a multimeter. Set your multimeter to the Rx1 setting and touch the terminals with the probes. You are testing for continuity and should receive a reading of 200 to 500 ohms. If you receive any other reading, you need a replacement water inlet valve. If the water inlet valve is fine, then you will need to check the ice maker and the electronic control board. We hope this helps!
Remove the icemaker service door... gently pry the door pins from the hinge sockets. Remove the 3 screws from the under side of the icemaker with a nut driver (1/4"). Gently remove the icemaker . It's a tight fit between the top of the compartment and the icemaker lower support tray. Next, disconnect the electrical connector at the ri
... Read moreght side. You're done! Reverse procedure for installing. Good luck. Remember, your working with cold plastic...take your time and don't force too much.


 Diagram and Parts List for Whirlpool Refrigerator")