


Models
>
WRS315SDHW09
WRS315SDHW09 Whirlpool Refrigerator
Jump to:
Find Part by Name
Keep searches simple, eg. "belt" or "pump".
Diagrams for WRS315SDHW09
Viewing 11 of 11


Keep searches simple, eg. "belt" or "pump".

Transform your daily hydration routine with the EDR1RXD1 water filter. It delivers pure, refreshing water for your family, enhancing the taste of your drinks and meals. Quick to install and long-lasti...
In Stock
Order now and your part arrives by Mar 28

In Stock
Order now and your part arrives by Mar 28

$31.05
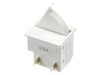
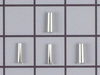
This part includes one authentically sourced 3-pin rocker switch for a refrigerator. It is responsible for turning the light on inside the fridge when the door is open. It is commonly replaced because...
In Stock
Order now and your part arrives by Mar 28

$98.81
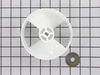
If you need a new bucket for your ice maker, this is a genuine OEM replacement part. Over time and with regular use, the ice bucket can become cracked and not function properly. If this happens the bu...
In Stock
Order now and your part arrives by Mar 28

$122.62
Need a new shelf bin for your fridge door? This replacement bin is perfect for storing food items and containers, helping you keep things organized. It measures 15" wide at its widest point, 13" wide ...
In Stock
Order now and your part arrives by Mar 28

$113.48
This crisper drawer is designed to maintain optimal humidity levels within the refrigerator, helping preserve the freshness of fruits and vegetables. Engineered for compatibility with specific refrige...
In Stock
Order now and your part arrives by Mar 28

$11.98
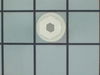
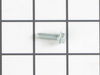
This authentic OEM part is a mounting screw for the door handle on your refrigerator. If the door handle is loose or you are having issues opening or closing the door, a new mounting screw may solve t...
In Stock
Order now and your part arrives by Mar 28

In Stock
Order now and your part arrives by Mar 28

$28.91
If your refrigerator or freezer is too warm, or making noises, you may need to replace the fan blade. The fan blade attaches to the evaporator motor, which is in the freezer section, to help circulate...
In Stock
Order now and your part arrives by Mar 28

$63.68
This genuine OEM replacement part is a door shelf for your refrigerator. The part is made of plastic and measures approximately 17-inches long by 5-inches wide. The shelf is used to keep items in plac...
In Stock
Order now and your part arrives by Mar 28

This is a replacement dairy compartment door for your refrigerator. The dairy compartment door opens and closes to allow access to the dairy items stored in the refrigerator door. Because it is made o...
In Stock
Order now and your part arrives by Mar 28

In Stock
Order now and your part arrives by Mar 28
Questions and Answers
We're sorry, but our Q&A experts are temporarily unavailable.
Please check back later if you still haven't found the answer you need.
Common Problems and Symptoms for WRS315SDHW09
Viewing 15 of 15Light not working
Fixed by these parts

How to fix it
Ice maker won’t dispense ice
Fixed by these parts

How to fix it
Leaking
Fixed by these parts

How to fix it
Noisy
Fixed by these parts


How to fix it
Ice maker not making ice
Fixed by these parts

How to fix it
Door won’t open or close
Fixed by these parts


How to fix it
Fridge too warm
Fixed by these parts
How to fix it
Not dispensing water
Fixed by these parts
How to fix it
Ice maker dispenses too little ice
Fixed by these parts
How to fix it
Frost buildup
Fixed by these parts


How to fix it
Too warm
Fixed by these parts
How to fix it
Fridge too cold
Fixed by these parts
How to fix it
Fridge and Freezer are too warm
Fixed by these parts
How to fix it
Clicking sound
Fixed by these parts
How to fix it
Freezer section too warm
Fixed by these parts
How to fix it


Keep searches simple. Use keywords, e.g. "leaking", "pump", "broken" or "fit".
- Customer:
- john from seaford, VA
- Parts Used:
- 4388736
- Difficulty Level:
- Easy
- Total Repair Time:
- 15 - 30 mins
- Tools:
- Nutdriver, Pliers, Screw drivers, Socket set
Plastic bits dispensed from Ice Dispenser in Door
Removed Ice bin from Fridge
Removed all bolts on bin with nut driver...about six
Removed housing...be careful with spring on crusher/cube control rod
Removed C clamp on end of auger with small slotted screw driver and needle nose pliers.
Removed plastic nut on end of auger shaft
Remov ... Read more ed Ice crusher jaws and laid them out in the correct order
Removed Ice propeller and installed new part
Put back together in opposite order
Easy
Read less
Was this instruction helpful to you?
Thank you for voting!
- Customer:
- Suzanne from Colorado Springs, CO
- Parts Used:
- 4388736
- Difficulty Level:
- Easy
- Total Repair Time:
- 15 - 30 mins
- Tools:
- Screw drivers, Socket set
plastic Ice bin auger broke and needed to be replaced
The repair was actually easy; however I have an ice dispencer/crusher attached and the which the diagram supplied with the part did not include. I had to make several calls before I was e-mailed the diagram.
Suggestions: note that the screw at the end of the auger goes in the reverse direction (this took me about 20 minutes to fi ... Read more gure out even though it was shown in the diagram). Also, be sure to keep the ice crusher parts in order and be sure the white plastic tab on the crusher fits into a depression in the housing. I did not notice this and had to take it all apart and redo the install. It works great!!!
Suggestions: note that the screw at the end of the auger goes in the reverse direction (this took me about 20 minutes to fi ... Read more gure out even though it was shown in the diagram). Also, be sure to keep the ice crusher parts in order and be sure the white plastic tab on the crusher fits into a depression in the housing. I did not notice this and had to take it all apart and redo the install. It works great!!!
Read less
Was this instruction helpful to you?
Thank you for voting!
- Customer:
- Kevin from Beckley, WV
- Parts Used:
- W11396033
- Difficulty Level:
- Really Easy
- Total Repair Time:
- Less than 15 mins
- Tools:
- Screw drivers
while closing the door, the light switch fouled, resulting in the switch breaking
I used a flat screwdriver and released the lock tab on the bottom of the light switch, and pried the switch out, being careful to not damage the plastic around the mounting place of the switch, unplugged wiring from old switch, plugged in the new one and pushed the new switch into place. Job finished light switch now working.
Was this instruction helpful to you?
Thank you for voting!