


Models
>
JFC2089BEM04
JFC2089BEM04 Whirlpool Refrigerator
Jump to:
Find Part by Name
Keep searches simple, eg. "belt" or "pump".
Diagrams for JFC2089BEM04
Viewing 8 of 8


Keep searches simple, eg. "belt" or "pump".

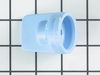
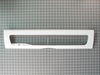
This genuine OEM part is a door cover for your refrigerator pantry drawer. It helps to maintain the proper temperature and humidity in the drawer by providing a seal when closed. Other names for this ...
In Stock
Order now and your part arrives by Mar 23

$106.39
The crisper drawer is used to help prolong the life of your produce, by sealing itself off from the rest of the fridge to create a high humidity environment. If your drawer has become cracked or damag...
In Stock
Order now and your part arrives by Mar 23

$48.36
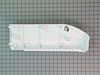
This genuine OEM part is an end cap used to support the pantry drawer in your refrigerator. This end cap is for the right side as if you were standing facing towards the appliance. The end cap mounts ...
In Stock
Order now and your part arrives by Mar 23

$52.99
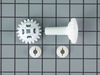
This pantry end cap is a genuine OEM replacement part for your refrigerator. Also known as a drawer support, it is used to hold the rails and shelving for your pantry and crisper drawers. This specifi...
In Stock
Order now and your part arrives by Mar 23

In Stock
Order now and your part arrives by Mar 23

$101.98
This is a genuine OEM replacement ice maker assembly for your refrigerator. This assembly works by receiving water from the water inlet valve into the mold. The water stays there until it is frozen so...
In Stock
Order now and your part arrives by Mar 23

In Stock
Order now and your part arrives by Mar 23

$29.82
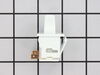
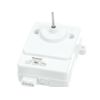
This part includes one authentically sourced 3-pin rocker switch for a refrigerator. It is responsible for turning the light on inside the fridge when the door is open. It is commonly replaced because...
In Stock
Order now and your part arrives by Mar 23

$43.21
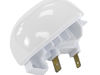
Also known as a duck bill. This kit includes the tube extension piece and spacer.
In Stock
Order now and your part arrives by Mar 23

$141.58
The door gasket is used to provide an airtight seal when your fridge door is closed. The gasket is a genuine OEM part that is gray in color and has magnets on all sides to help seal the door. Signs th...
In Stock
Order now and your part arrives by Mar 23

$58.09
This clear plastic door shelf bin adds extra storage space to your refrigerator door, ideal for holding bottles and jars. Its shallow design fits select models from Whirlpool, Kenmore, Maytag, and mor...
In Stock
Order now and your part arrives by Mar 23

$60.13
If the door shelf bin in your refrigerator is cracked, missing, or no longer holding items securely, this clear plastic replacement bin may be just what you need. Designed to fit inside the refrigerat...
In Stock
Order now and your part arrives by Mar 23
Questions and Answers
We're sorry, but our Q&A experts are temporarily unavailable.
Please check back later if you still haven't found the answer you need.
Common Problems and Symptoms for JFC2089BEM04
Viewing 20 of 20Light not working
Fixed by these parts

How to fix it
Leaking
Fixed by these parts


How to fix it
Door won’t open or close
Fixed by these parts

How to fix it
Ice maker not making ice
Fixed by these parts


How to fix it
Noisy
Fixed by these parts


How to fix it
Fridge too warm
Fixed by these parts

How to fix it
Not dispensing water
Fixed by these parts

How to fix it
Frost buildup
Fixed by these parts

How to fix it
Ice maker won’t dispense ice
Fixed by these parts
How to fix it
Door Sweating
Fixed by these parts

How to fix it
Freezer not defrosting
Fixed by these parts
How to fix it
Fridge too cold
Fixed by these parts
How to fix it
Fridge and Freezer are too warm
Fixed by these parts

How to fix it
Clicking sound
Fixed by these parts

How to fix it
Will Not Start
Fixed by these parts

How to fix it
Ice maker dispenses too much ice
Fixed by these parts
How to fix it
Too warm
Fixed by these parts
How to fix it
Won’t start
Fixed by these parts
How to fix it
Ice maker dispenses too little ice
Fixed by these parts
How to fix it
Freezer section too warm
Fixed by these parts
How to fix it


Keep searches simple. Use keywords, e.g. "leaking", "pump", "broken" or "fit".
- Customer:
- Gregory from Bethesda, MD
- Parts Used:
- WP12656105, WP12656018
- Difficulty Level:
- A Bit Difficult
- Total Repair Time:
- 15 - 30 mins
- Tools:
- Nutdriver
Broken pins holding pantry door
Removed door and crisper pans.
Removed nuts on left end cap - think there were 3.
Removed nuts on right end cap and one or two on back air regulator attached to right end cap.
Replaced left end cap with new one using reserved nuts.
Carefully removed back air regulator from right end cap.
Attached back air regula ... Read more tor to new right end cap.
Replaced right end cap and back air regulator and attached with nuts.
Carefully inserted pantry door into pin on one side and slightly bent both right and left pins to insert door fully into end caps.
Replaced crisper pans.
That's it.
Read less
Was this instruction helpful to you?
Thank you for voting!
- Customer:
- Jack from DINUBA, CA
- Parts Used:
- W10619951
- Difficulty Level:
- Really Easy
- Total Repair Time:
- 30 - 60 mins
- Tools:
- Nutdriver, Screw drivers
Water leaking from bottom of refrigerator onto floor
The video on website is very good and explains everything in detail. Just follow the directions. This is EASY!!!!
Was this instruction helpful to you?
Thank you for voting!
- Customer:
- Clint from Rayville, MO
- Parts Used:
- W11384469
- Difficulty Level:
- Really Easy
- Total Repair Time:
- Less than 15 mins
- Tools:
- Screw drivers
Lights inside refrigerator not working
I used a flat-head screwdriver to pop out the old light rocker switch. Then, I unplugged the wires, plugged them into the new light rocker switch, and then popped the new switch into the hole. That's it! Lights began working again.
Was this instruction helpful to you?
Thank you for voting!