


Models
>
WRT312CZJV00
WRT312CZJV00 Whirlpool Refrigerator
Jump to:
Find Part by Name
Keep searches simple, eg. "belt" or "pump".
Diagrams for WRT312CZJV00
Viewing 6 of 6


Keep searches simple, eg. "belt" or "pump".

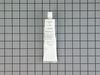
$11.98
This 18 ml bottle of white appliance touch-up paint is used to cover scratches or marks on your appliance. The white touch-up paint can be used on refrigerators, microwaves, ranges, clothes dryers, an...
In Stock
Order now and your part arrives by Apr 6

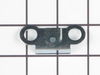
$13.07
This hinge bracket, also known as a door stop, is attached to the bottom of the door and is used to limit how far the door swings out to protect the refrigerator itself, and any surrounding cabinets f...
In Stock
Order now and your part arrives by Apr 6

$27.83
This is the replacement water tube kit for your refrigerator. This tubing is made of plastic, is 1/4 inch in diameter, and comes with 2 inserts. This tube may be longer than the original tube, and may...
In Stock
Order now and your part arrives by Apr 6

In Stock
Order now and your part arrives by Apr 6

In Stock
Order now and your part arrives by Apr 6

In Stock
Order now and your part arrives by Apr 6

$95.11
This water inlet valve regulates water flow to the ice maker and dispenser. A faulty valve may cause leaks or stop water and ice production.
To replace, disconnect power and water supply, swap out th...
In Stock
Order now and your part arrives by Apr 6

In Stock
Order now and your part arrives by Apr 6

In Stock
Order now and your part arrives by Apr 6

In Stock
Order now and your part arrives by Apr 6

In Stock
Order now and your part arrives by Apr 6

In Stock
Order now and your part arrives by Apr 6
Questions and Answers
We're sorry, but our Q&A experts are temporarily unavailable.
Please check back later if you still haven't found the answer you need.
Common Problems and Symptoms for WRT312CZJV00
Viewing 6 of 6Door won’t open or close
Fixed by these parts

How to fix it
Leaking
Fixed by these parts


How to fix it
Ice maker not making ice
Fixed by these parts

How to fix it
Not dispensing water
Fixed by these parts
How to fix it
Ice maker won’t dispense ice
Fixed by these parts
How to fix it
Clicking sound
Fixed by these parts
How to fix it


Keep searches simple. Use keywords, e.g. "leaking", "pump", "broken" or "fit".
- Customer:
- Michelle from Richardson, TX
- Parts Used:
- 72017
- Difficulty Level:
- Really Easy
- Total Repair Time:
- Less than 15 mins
Scratches in Surface
This product comes in a bottle with a brush like Liquid Paper. It goes on incredibly easy. A second coat might be needed. I wanted to prevent rust from setting in so I covered the scratches and dings. The paint is a little brighter since my washer is 10 years old but it still looks great.
Was this instruction helpful to you?
Thank you for voting!
- Customer:
- jesse from hacienda heights, CA
- Parts Used:
- W10823511
- Difficulty Level:
- Really Easy
- Total Repair Time:
- 30 - 60 mins
- Tools:
- Nutdriver, Pliers, Screw drivers
Water began to leak under the refrigerator. Source looked like it was coming from control valve suppling water to ice maker and water dispenser.
Followed instructions supplied. It was relatively easy and the parts fit exactly right. Sears wanted twice as much for the part and service would have charged me another $100 to come to my home. I saved over $100 doing the project myself.
Was this instruction helpful to you?
Thank you for voting!
- Customer:
- Melvin from OPELIKA, AL
- Parts Used:
- W10823511
- Difficulty Level:
- Very Easy
- Total Repair Time:
- Less than 15 mins
- Tools:
- Screw drivers
35 year old water tube became brittle and cracked; leaking water
Unscrewed clamp holding water tube to refrigerator ice maker. Pulled water tube from ice maker and water valve inlet. Cut the new tubing to the exact same length and inserted one end to the water valve inlet and the other end to the ice maker then screwed clamp holding water tube back to the refrigerator ice maker.
Was this instruction helpful to you?
Thank you for voting!