


Models
>
3ET22DKXBW02
3ET22DKXBW02 Whirlpool Refrigerator
Jump to:
Find Part by Name
Keep searches simple, eg. "belt" or "pump".
Diagrams for 3ET22DKXBW02
Viewing 7 of 7


Manuals & Guides for 3ET22DKXBW02
Click to downloadKeep searches simple, eg. "belt" or "pump".

This door shelf end cap set contains two white end caps. Each end cap can be used as either the right or the left side. These end caps also come with adhesive strips and an instructions sheet.
In Stock
Order now and your part arrives by Mar 26

In Stock
Order now and your part arrives by Mar 26

This clip-on thermostat will sense the temperature increase in the evaporator during the defrost cycle and will cycle the defrost heater off after the ice or frost is melted.
In Stock
Order now and your part arrives by Mar 26


$11.98
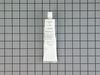
This 18 ml bottle of white appliance touch-up paint is used to cover scratches or marks on your appliance. The white touch-up paint can be used on refrigerators, microwaves, ranges, clothes dryers, an...
In Stock
Order now and your part arrives by Mar 26

$13.07
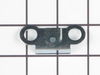
This hinge bracket, also known as a door stop, is attached to the bottom of the door and is used to limit how far the door swings out to protect the refrigerator itself, and any surrounding cabinets f...
In Stock
Order now and your part arrives by Mar 26

In Stock
Order now and your part arrives by Mar 26

In Stock
Order now and your part arrives by Mar 26

In Stock
Order now and your part arrives by Mar 26

In Stock
Order now and your part arrives by Mar 26

This part may be too long for your appliance and may need to be cut to fit your specific dimensions.
No Longer Available

In Stock
Order now and your part arrives by Mar 26
Questions and Answers
We're sorry, but our Q&A experts are temporarily unavailable.
Please check back later if you still haven't found the answer you need.
Common Problems and Symptoms for 3ET22DKXBW02
Viewing 17 of 17Leaking
Fixed by these parts


How to fix it
Light not working
Fixed by these parts


How to fix it
Door won’t open or close
Fixed by these parts


How to fix it
Freezer not defrosting
Fixed by these parts
How to fix it
Fridge too warm
Fixed by these parts

How to fix it
Ice maker not making ice
Fixed by these parts
How to fix it
Freezer section too warm
Fixed by these parts
How to fix it
Door Sweating
Fixed by these parts


How to fix it
Frost buildup
Fixed by these parts
How to fix it
Fridge too cold
Fixed by these parts
How to fix it
Freezer too cold
Fixed by these parts
How to fix it
Not dispensing water
Fixed by these parts
How to fix it
Ice maker won’t dispense ice
Fixed by these parts
How to fix it
Fridge runs too long
Fixed by these parts
How to fix it
Fridge and Freezer are too warm
Fixed by these parts
How to fix it
Too warm
Fixed by these parts
How to fix it
Clicking sound
Fixed by these parts
How to fix it


Keep searches simple. Use keywords, e.g. "leaking", "pump", "broken" or "fit".
- Customer:
- Charles from Orland Hills, IL
- Parts Used:
- WP2196157
- Difficulty Level:
- Really Easy
- Total Repair Time:
- Less than 15 mins
- Tools:
- Nutdriver
Broken elbow on icemaker water fill tube.
Removed 2 screws holding water fill tube to rear of refrigerator and pulled out, matched old part with new to make sure of proper match. Guide new fill tube thru hole, making sure it is aligned with slot in ice cube tray on inside of freezer. Install new plastic line from water pump outlet to water fill tube, check for leaks, job done.
Was this instruction helpful to you?
Thank you for voting!
- Customer:
- Edwin from Maplewood, NJ
- Parts Used:
- WP4387503
- Difficulty Level:
- Really Easy
- Total Repair Time:
- Less than 15 mins
- Tools:
- Nutdriver
water dripping inside fridge due to drain hole being frozen over wiith ice.
first I diagnosed the problem with the whirlpool do-it-yourself repair manual, which was very easy to understand. as per the repair manual, "this part located on the evaporator or the back of the liner is used during the defrost cycle. This bimetal senses the temperature from the evaporator. When the temperature reaches 50-70 degrees (F)
... Read more
the defrost bimetal turnd the defrost heater off. " then I emptied the freezer. removed the the back panel to expose the evaporator. I looked for the bimetal defrost thermostat clipped on the evaporator. tested the bi-metal defrost thermostat, as per the manual, " the ohmmeter should show ZERO resistance (continuity). if not, the bimetal is bad and needs replacing." NOTE: the bimetal must be cold. it is also tested with the bimetal warm/hot, by running it under hot water. i used a styrofoam cup with hot water & dipped the bimetal in. as per the manual, " the ohmmeter should show an open circuit. if not, the bimetal is bad and needs replacing. then got online found partselect.com. ordered the part, recieved it in less than 2 days. within minutes after recieving the part, I removed the bimetal defrost thermostat and spliced in the new one. thanks to partselect.com my fridge is back up and running properly again. prior to installing the new bimetal, i tested it, as descibed above, you can hear & feel the bimetal open/close when it gets hot/cold.
Read less
Was this instruction helpful to you?
Thank you for voting!
- Customer:
- Randy from Hays, KS
- Parts Used:
- WP2149705
- Difficulty Level:
- Really Easy
- Total Repair Time:
- 15 - 30 mins
- Tools:
- Socket set
Broken light switch
Took all the screws out of the plastic shroud that encloses the switch .There only four that I needed to remove, were the two in front where the switches that go,they go in horizontally and two in the back with large washers on them that hold the back to the top of the box that go in vertically.The switch was a snap ( make that two snaps
... Read more
) the wiring is almost self explanatory. then it gos back to the way you took it off. OH! and don't forget to turn the light bulb all the way back in to the socket , so the light will work after you take the time to install it yourself.I had the water supply line from under the box to the water dispenser in the door and the total bill on that was one hundred thirty seven and a hand full of change.Don't be afraid to do it yourself the savings is enough on one one item to make several months payments on a new one Randy the "Handy Man'
Read less
Was this instruction helpful to you?
Thank you for voting!