


Models
>
RT18AKXKQ09
RT18AKXKQ09 Roper Refrigerator
Jump to:
Find Part by Name
Keep searches simple, eg. "belt" or "pump".
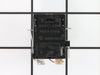
Diagrams for RT18AKXKQ09
Viewing 6 of 6


Keep searches simple, eg. "belt" or "pump".

$118.12
Replacing a broken crisper drawer in your refrigerator is a simple repair that does not require any tools. Simply remove any items from the damaged drawer, and remove the drawer from the fridge. The w...
In Stock
Order now and your part arrives by Jul 25

In Stock
Order now and your part arrives by Jul 25

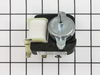
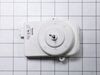
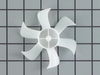
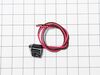
This evaporator fan motor is located in the back of the freezer, and circulates air over the refrigerator coils. These coils will convert the heat into cool air, which is then circulated.
NOTE: ...
In Stock
Order now and your part arrives by Jul 25

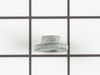
This genuine OEM part is an end cap for the door shelf retainer bar in your refrigerator. The end cap is used to secure the retainer bar and attach it to the fridge or freezer door. It is made of whit...
In Stock
Order now and your part arrives by Jul 25

$157.48
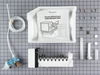
This genuine OEM ice maker kit is designed to fit refrigerators that did not originally come with an ice maker. This kit contains everything needed to install the new ice maker on your refrigerator in...
In Stock
Order now and your part arrives by Jul 25

In Stock
Order now and your part arrives by Jul 25

This part goes in the center of the crisper shelf and acts as a support.
In Stock
Order now and your part arrives by Jul 25

$24.15
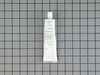
This 18 ml bottle of white appliance touch-up paint is used to cover scratches or marks on your appliance. The white touch-up paint can be used on refrigerators, microwaves, ranges, clothes dryers, an...
In Stock
Order now and your part arrives by Jul 25

$13.07
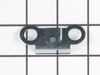
This hinge bracket, also known as a door stop, is attached to the bottom of the door and is used to limit how far the door swings out to protect the refrigerator itself, and any surrounding cabinets f...
In Stock
Order now and your part arrives by Jul 25

In Stock
Order now and your part arrives by Jul 25

$120.09
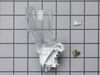
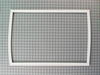
This is a replacement crisper drawer for your refrigerator. It is made of clear plastic and is sold individually. The crisper drawer slides in and out of the refrigerator, and is used to store items. ...
In Stock
Order now and your part arrives by Jul 25

In Stock
Order now and your part arrives by Jul 25
Common Problems and Symptoms for RT18AKXKQ09
Viewing 17 of 17Light not working
Fixed by these parts
How to fix it
Fridge too warm
Fixed by these parts
How to fix it
Door won’t open or close
Fixed by these parts

How to fix it
Noisy
Fixed by these parts
How to fix it
Ice maker not making ice
Fixed by these parts
How to fix it
Will Not Start
Fixed by these parts
How to fix it
Leaking
Fixed by these parts
How to fix it
Fridge and Freezer are too warm
Fixed by these parts
How to fix it
Freezer section too warm
Fixed by these parts
How to fix it
Freezer not defrosting
Fixed by these parts
How to fix it
Ice maker won’t dispense ice
Fixed by these parts
How to fix it
Door Sweating
Fixed by these parts
How to fix it
Fridge too cold
Fixed by these parts
How to fix it
Fridge runs too long
Fixed by these parts
How to fix it
Frost buildup
Fixed by these parts
How to fix it
Too warm
Fixed by these parts
How to fix it
Clicking sound
Fixed by these parts
How to fix it


Keep searches simple. Use keywords, e.g. "leaking", "pump", "broken" or "fit".
- Customer:
- Brian from Smock, PA
- Parts Used:
- WPW10189703
- Difficulty Level:
- Easy
- Total Repair Time:
- 30 - 60 mins
- Tools:
- Nutdriver, Screw drivers
Fridge was warm. No air circulating at all. Food was spoiling Fridge was just over 1 year old
First I removed the two screws that secure the guard in bottom back of the freezer and removed it . Next I removed the two screws that secure the guard on the back wall of the freezer and removed it. There are three wires connected to the motor, I unplugged those and removed the two screws that secure the motor and removed it. I swapped t
... Read more
he grommets, blade and support bracket from the old motor. I put it back together in reverse steps and its working great. My mother-in-law can,t stop thanking me ! I saved her at least $400 to buy a new fridge. Thank You, Brian Miner
Read less
Was this instruction helpful to you?
Thank you for voting!
- Customer:
- Aaron from Houston, TX
- Parts Used:
- WP2204605
- Difficulty Level:
- Easy
- Total Repair Time:
- Less than 15 mins
- Tools:
- Screw drivers, Socket set
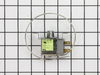
Faulty thermostat
My refrigerator is approximately seven years old (date of manufacture: 2001). I had come home twice in the last month to find that it had not been running for several hours (ice melted, milk spoiled, etc.) but it would start running again if I twisted the thermostat knob. So, I ordered a new thermostat. First I removed the 1/4" hex scr
... Read more
ew that held the plastic thermostat housing in place (it screws up into the top of the refrigerator compartment). Then I removed the plastic thermostat knob and slid the old thermostat out of the housing. I then disconnected the wires one-by-one from the old thermostat and connected them to the new one so I could be certain they were all connected correctly. Finally, I pulled the plastic sheathing off the old sensor wire, slid it onto the new one and popped the wire back into place. Slide the thermostat back into the housing, screw the housing back into the top of the refrigerator compartment, replace the plastic thermostat knob, and the job is done.
Read less
Was this instruction helpful to you?
Thank you for voting!
- Customer:
- Clint from Rayville, MO
- Parts Used:
- W11384469
- Difficulty Level:
- Really Easy
- Total Repair Time:
- Less than 15 mins
- Tools:
- Screw drivers
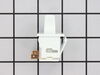
Lights inside refrigerator not working
I used a flat-head screwdriver to pop out the old light rocker switch. Then, I unplugged the wires, plugged them into the new light rocker switch, and then popped the new switch into the hole. That's it! Lights began working again.
Was this instruction helpful to you?
Thank you for voting!