


Models
>
NDNT229J
NDNT229J (8B21B) Maytag Refrigerator
Jump to:
Find Part by Name
Keep searches simple, eg. "belt" or "pump".
Diagrams for NDNT229J
Viewing 3 of 3


Keep searches simple, eg. "belt" or "pump".

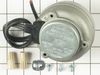
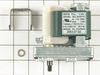
This condenser fan motor is used with frost-free refrigerators with a condenser coil. When the compressor runs, so does this fan, circulating air through the refrigerator grille, cooling the compresso...
In Stock
Order now and your part arrives by Jul 24

$16.35
Sold individually. This bulb is a 7 watt appliance incandescent light bulb.This appliance light bulb is two inches long. It is used for many clothes dryers.
In Stock
Order now and your part arrives by Jul 24

In Stock
Order now and your part arrives by Jul 24

In Stock
Order now and your part arrives by Jul 24

$11.98
This is a compression nut for your refrigerator/freezer. The compression nut is used with the plastic water line for the icemaker assembly. It is the connection between the water supply line and the o...
Special Order

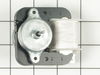
This evaporator fan motor assembly is just over three inches long. It is made of both metal and plastic, and is made up of black, white, and metalllic pieces.
On Order

This drive ring is three inches in diameter. It is all white in color and is made of plastic. This ring is used with a refrigeraor's icemaker assembly.
No Longer Available

$21.82
This is an authentic OEM replacement part. This screw is commonly used in the assembly of refrigerators, microwaves, ice makers, ranges, and smokers. Due to varied uses we recommend you refer to model...
In Stock
Order now and your part arrives by Jul 24

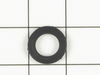
This high pressure inlet hose washer is black. It is an inch in diameter, made of rubber, and used with many washing machines, refrigerators, and dishwashers.
No Longer Available

In Stock
Order now and your part arrives by Jul 24

$18.54
This is an authentic OEM replacement part. This is an ice cube tray that is designed for use with refrigerators and freezers. You simply fill the tray up with water, place it in the freezer portion of...
Special Order

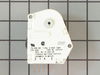
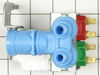
This double outlet water valve has a treaded outlet connection, and comes with all of the necessary screws, fittings, and brackets needed to make this valve compatible.
No Longer Available
Common Problems and Symptoms for NDNT229J
Viewing 11 of 11Fridge too warm
Fixed by these parts
How to fix it
Noisy
Fixed by these parts
How to fix it
Freezer section too warm
Fixed by these parts
How to fix it
Leaking
Fixed by these parts

How to fix it
Fridge runs too long
Fixed by these parts
How to fix it
Fridge and Freezer are too warm
Fixed by these parts
How to fix it
Will Not Start
Fixed by these parts
How to fix it
Ice maker won’t dispense ice
Fixed by these parts

How to fix it
Ice maker not making ice
Fixed by these parts
How to fix it
Not dispensing water
Fixed by these parts
How to fix it
Too warm
Fixed by these parts
How to fix it


Keep searches simple. Use keywords, e.g. "leaking", "pump", "broken" or "fit".
- Customer:
- Tom from Franklin, WI
- Parts Used:
- 833697
- Difficulty Level:
- A Bit Difficult
- Total Repair Time:
- 15 - 30 mins
- Tools:
- Nutdriver, Pliers
Sometimes the condenser fan would start causing the refrigerator to overheat.
Unplug the appliance.
Removed the screws holding the back panel.
Removed the fan blade.
removed 3 screws holding the condenser fan.
Remove the 3 metal brackets attached to the fan.
(First note which studs the brackets are attached to. Attach the 3 metal brackets to the new fan. (New screws were supplied)
Cut ... Read more and strip the wire about two inches from the fan.
Cut and strip the new wire. I cut the new wire in half (about 6 inches.) Connect the two wires, twist and used 2 wire nuts. Tie wrap the wire to the wire harness. Mount the new fan (three screws)
Screw the back panel back on.
Mount the new
Read less
Was this instruction helpful to you?
Thank you for voting!
- Customer:
- robert from nashotah, WI
- Parts Used:
- 833697
- Difficulty Level:
- A Bit Difficult
- Total Repair Time:
- 30 - 60 mins
- Tools:
- Nutdriver, Socket set
noisy fan motor
rmv panel (5min) rmv fan/motor 3 screws (10 m) cut wire 2in from motor, re route remainder of wire to front so can strip for wire nuts. ( 10m) attach old fan to new motor, place in old opening ,3 screws, a little fussy to align, ( 15m ) route and strip wire from new motor , zip ties work well, wire nuts , plug in fridge vola, no noise, c
... Read more
lose up, reverse panel. ( 20m). i also took time to clean grilles with small vac and damp rag, ( looks and sounds like new) bob Wi.
Read less
Was this instruction helpful to you?
Thank you for voting!
- Customer:
- Janet from Hillsboro, OR
- Parts Used:
- 833697
- Difficulty Level:
- A Bit Difficult
- Total Repair Time:
- More than 2 hours
- Tools:
- Nutdriver, Pliers, Screw drivers, Socket set, Wrench (Adjustable), Wrench set
Freezer and Fridge wouldnt cool
My husband replaced the condenser fan. It took awhile and a few choice words but he got it replaced. The fan seemed to work fine, but it still wasn't cooling. I noticed that when we had the fridge unplugged that water started draining out the dials at the top of the fridge under the freezer. And there was absolutely no water at all in
... Read more
the drip pan under the fridge. So I took the doors off and totally took the inside of the freezer apart. I discovered that the styrofoam on the floor of the freezer had become inudated with fluid and the under the foam the coils were all frozen solid with ice. Hence not allowing any drainage. I put a lamp in the freezer area and defrosted all the ice. In searching the internet i discovered that they no longer produce the foam so i went to home depot and got a piece of foam and aluminum foil and cut it to replace the ruined foam. I put the fridge all back together said a prayer and crossed my fingers and lo and behold it works perfectly now!!!!
Read less
Was this instruction helpful to you?
Thank you for voting!