


Models
>
RB17HN-2AF
RB17HN-2AF (8C63A) Magic Chef Refrigerator
Jump to:
Find Part by Name
Keep searches simple, eg. "belt" or "pump".
Diagrams for RB17HN-2AF
Viewing 1 of 1
Keep searches simple, eg. "belt" or "pump".

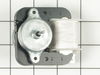
This evaporator fan motor assembly is just over three inches long. It is made of both metal and plastic, and is made up of black, white, and metalllic pieces.
On Order

This is an OEM part sourced directly from the manufacturer. This fan blade is commonly used in refrigerators. The evaporator fan pulls air from the refrigerator and moves it over the evaporator coils....
No Longer Available

Special Order
Common Problems and Symptoms for RB17HN-2AF
Viewing 3 of 3Fridge too warm
Fixed by these parts
How to fix it
Noisy
Fixed by these parts
How to fix it
Freezer section too warm
Fixed by these parts
How to fix it

Keep searches simple. Use keywords, e.g. "leaking", "pump", "broken" or "fit".
- Customer:
- Dwayne from Gastonia, NC
- Parts Used:
- WP61004888
- Difficulty Level:
- Easy
- Total Repair Time:
- 15 - 30 mins
- Tools:
- Nutdriver
evaporator fan was noisy
First I unplugged the refrigerator. Next item was the ice-maker; remove (3) screws and unplug it from the back wall. Third task is remove the (4) screws that attach the back wall of the freezer compartment. Lift the wall up enough to dislodge the center cooling shaft that the fan rides in and remove the rear wall. The last item is the fa
... Read more
n motor which is attached to the freezer wall by (2) screws and (3) wires which are easily removed. Change out the motor and reassemble freezer compartment .
Read less
Was this instruction helpful to you?
Thank you for voting!
- Customer:
- James from Bel Air, MD
- Parts Used:
- WP61004888
- Difficulty Level:
- Easy
- Total Repair Time:
- 30 - 60 mins
- Tools:
- Nutdriver, Pliers, Screw drivers
motor wore out making loud noise
unplug the refrigator, remove everything from
frezer compartment. remove ice maker three screws and un plug. remove rear panel 4 screws
remove motor bracket from rear panel 4 screws
unplug motor . replace motor and reasemble in
reverse order. the new motor is very quiet.
frezer compartment. remove ice maker three screws and un plug. remove rear panel 4 screws
remove motor bracket from rear panel 4 screws
unplug motor . replace motor and reasemble in
reverse order. the new motor is very quiet.
Was this instruction helpful to you?
Thank you for voting!
- Customer:
- James from Sacramento, CA
- Parts Used:
- WP61004888
- Difficulty Level:
- Easy
- Total Repair Time:
- Less than 15 mins
- Tools:
- Screw drivers
Temp in the refrig side was too high. Freezer OK
I unpluged the refrig, removed the shelves and the back panel on the freezer side of the unit. This exposed the fan motor and fan blade. I removed two screws holding the fan unit in place, unpluged the wires connecting the fan unit to power, and then removed two other screws securing the fan motor to the bracket. I removed the fan mot
... Read more
or blade from the old unit and installed it on the new fam motor. I replaced the fan unit into the bracket, pluged the wires back into the fan motor and secured the motor to the refrig. Replaced the back panel and shelves, pluged the refrig into the wall.....easy.
Read less
Was this instruction helpful to you?
Thank you for voting!