


Models
>
LRFC22750SB
LRFC22750SB LG Refrigerator
Jump to:
Find Part by Name
Keep searches simple, eg. "belt" or "pump".
Keep searches simple, eg. "belt" or "pump".

$24.10
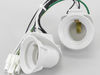
If the light inside your fridge is not coming on, or if it is staying on continuously, there may be an issue with your door switch. When the door to your fridge is closed, the button on the switch is...
In Stock
Order now and your part arrives by Mar 21

$14.65
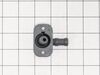
This refrigerator door hinge bushing is a durable white plastic component that provides a smooth pivot point for the hinge pin, helping keep the door properly aligned and sealed. It is commonly used t...
In Stock
Order now and your part arrives by Mar 21

$36.67
This is a genuine replacement switch. It is a push button style switch that is designed for use in your refrigerator. When the door of your appliance is opened the switch is released, and the light co...
Special Order

Special Order

In Stock
Order now and your part arrives by Mar 21

In Stock
Order now and your part arrives by Mar 21


$30.85
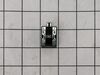
Replacing a worn shaft cam restores smooth door movement, reduces strain on the hinge assembly, and improves sealing efficiency to keep temperatures stable and energy consumption low.
In Stock
Order now and your part arrives by Mar 21

In Stock
Order now and your part arrives by Mar 21

$30.85
This camshaft helps control smooth opening and closing of freezer drawers. Wear can cause jamming or uneven movement. Replacement restores proper alignment and ease of use.
In Stock
Order now and your part arrives by Mar 21

In Stock
Order now and your part arrives by Mar 21
Questions and Answers
We're sorry, but our Q&A experts are temporarily unavailable.
Please check back later if you still haven't found the answer you need.
Common Problems and Symptoms for LRFC22750SB
Viewing 9 of 9Light not working
Fixed by these parts


How to fix it
Door won’t open or close
Fixed by these parts


How to fix it
Leaking
Fixed by these parts


How to fix it
Fridge too warm
Fixed by these parts

How to fix it
Noisy
Fixed by these parts

How to fix it
Will Not Start
Fixed by these parts
How to fix it
Clicking sound
Fixed by these parts
How to fix it
Freezer not defrosting
Fixed by these parts
How to fix it
Fridge and Freezer are too warm
Fixed by these parts
How to fix it
Keep searches simple. Use keywords, e.g. "leaking", "pump", "broken" or "fit".
- Customer:
- Debbie from Waltham, MA
- Parts Used:
- 6600JB1010A
- Difficulty Level:
- A Bit Difficult
- Total Repair Time:
- 30 - 60 mins
- Tools:
- Pliers, Screw drivers
Remove and replace light switch
Video makes it look easy. Kenmore refrigerator does not have "groove" along the right hand side of switch that allows for pushing down on release. Used a thin screwdriver to get under to push while holding switch edge with pliers. Kept slipping. Tape sides to avoid scratching inside of refrigerator.
Was this instruction helpful to you?
Thank you for voting!
- Customer:
- Jerry from CORSICANA, TX
- Parts Used:
- 4984JJ3003A
- Difficulty Level:
- Really Easy
- Total Repair Time:
- 30 - 60 mins
- Tools:
- Screw drivers, Socket set
old bushing worn and broken
removed the upper freezer door to access screws to remove lower door.
laid bottom door on its side, removed bad bushing, put new bushing in, put bottom door back on refridge, put upper door back on fridge. Door worked easy as when new. good closure of door and story..Happy customer, and wife even happier.....thank you....
laid bottom door on its side, removed bad bushing, put new bushing in, put bottom door back on refridge, put upper door back on fridge. Door worked easy as when new. good closure of door and story..Happy customer, and wife even happier.....thank you....
Was this instruction helpful to you?
Thank you for voting!
- Customer:
- Warren from Moodus, CT
- Parts Used:
- 4430JJ2005B, 4430JJ2005A
- Difficulty Level:
- A Bit Difficult
- Total Repair Time:
- 30 - 60 mins
- Tools:
- Screw drivers
Both cams had broken off the gasket retainer strips
Check YouTube, but no one shows all the details. Need to swap hinges and spring from old retainer to new retainers by removing screw at bottom of hinge, then removing rod with small screwdriver to poke the rod out. I laid the old and new side by side and did swap to ensure proper orientation. Attach cams before sliding gasket retainer bac
... Read more
k into gasket, I used a few drops of liquid soap as lubricant on the retainer to help it slide in. Very important to ensure the edge of the retainer is tucked behind the door edge or else things will not fit correctly. I did it a few times before I got it right, but didn’t break anything else. Good luck.
Read less
Was this instruction helpful to you?
Thank you for voting!