


Models
>
LRSC21935SW
LRSC21935SW LG Refrigerator
Jump to:
Find Part by Name
Keep searches simple, eg. "belt" or "pump".
Diagrams for LRSC21935SW
Viewing 7 of 7


Manuals & Guides for LRSC21935SW
Click to downloadKeep searches simple, eg. "belt" or "pump".

$25.10
If the light inside your fridge is not coming on, or if it is staying on continuously, there may be an issue with your door switch. When the door to your fridge is closed, the button on the switch is...
In Stock
Order now and your part arrives by Mar 27

In Stock
Order now and your part arrives by Mar 27

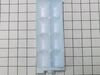
$15.26
This part is the replacement ice tray for your refrigerator. The tray is made of white plastic and is approximately 9 inches in length, and 3 inches in width. It has the capacity for 8 ice cubes. The ...
In Stock
Order now and your part arrives by Mar 27

$131.15
This water inlet valve has three solenoid valves and push in fittings. When energized this part releases water from the supply line into the ice mold.
In Stock
Order now and your part arrives by Mar 27

In Stock
Order now and your part arrives by Mar 27

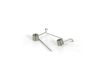
$15.26
This genuine OEM lever spring exerts tension between the ice maker door plunger and the ice maker itself on your refrigerator. If there is little to no tension holding your ice door seal in place, the...
In Stock
Order now and your part arrives by Mar 27

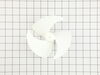
$50.36
This heated chute door prevents frost accumulation inside the ice dispenser by maintaining a controlled seal and temperature. If the flap sticks open, leaks warm air, or accumulates frost, replacing i...
In Stock
Order now and your part arrives by Mar 27

The water tube fitting connects lines that supply water to components such as the ice maker and water dispenser.
In Stock
Order now and your part arrives by Mar 27


On Order

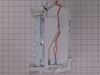
$122.82
This ice maker kit assembly is a genuine replacement for select LG and Kenmore refrigerators. It includes the full ice maker and housing, designed to restore reliable ice production. Installation is s...
In Stock
Order now and your part arrives by Mar 27

Special Order
Questions and Answers
We're sorry, but our Q&A experts are temporarily unavailable.
Please check back later if you still haven't found the answer you need.
Common Problems and Symptoms for LRSC21935SW
Viewing 8 of 8Leaking
Fixed by these parts


How to fix it
Light not working
Fixed by these parts

How to fix it
Ice maker won’t dispense ice
Fixed by these parts


How to fix it
Not dispensing water
Fixed by these parts
How to fix it
Door won’t open or close
Fixed by these parts
How to fix it
Noisy
Fixed by these parts
How to fix it
Ice maker not making ice
Fixed by these parts
How to fix it
Ice maker dispenses too much ice
Fixed by these parts
How to fix it
Keep searches simple. Use keywords, e.g. "leaking", "pump", "broken" or "fit".
- Customer:
- Debbie from Waltham, MA
- Parts Used:
- 6600JB1010A
- Difficulty Level:
- A Bit Difficult
- Total Repair Time:
- 30 - 60 mins
- Tools:
- Pliers, Screw drivers
Remove and replace light switch
Video makes it look easy. Kenmore refrigerator does not have "groove" along the right hand side of switch that allows for pushing down on release. Used a thin screwdriver to get under to push while holding switch edge with pliers. Kept slipping. Tape sides to avoid scratching inside of refrigerator.
Was this instruction helpful to you?
Thank you for voting!
- Customer:
- Kyle from WOODBURY, MN
- Parts Used:
- 5040JA2009B, 4681JB1029A
- Difficulty Level:
- A Bit Difficult
- Total Repair Time:
- 1- 2 hours
- Tools:
- Screw drivers, Wrench (Adjustable)
Evaporator Fan Squeeking
Detected noise as coming from top freezer department, and tips and part diagram clearly pointed to evaporator fan. You go in through the freezer (you have to empty top half of freezer); removing the side rails holding the ice bin, and then the 4 outer screws (only 2 each side - not the middle ones) holding the 'auger' that turns the bin
... Read more
. From there it gets interesting in trying to disconnect the wires. You might consider taking some pictures of the connected wires - perhaps it doesn't matter, but several of them can be hooked up in reverse. After the ice marker is out, remove light and light cover, side rails/mounts that hold hold up ice maker. This leaves a large white cover that pops out (seam at bottom of it has two tabs that you can pop out) holding the fan; and then only a few more wires to disconnect to be able to get at the fan. Mine clearly had a wobble to it confirming the source of the squeak and need to replace. Install was just reverse -- a bit tricky to get some of the wires connected given the tight spaces. Overall, not difficult - but a lot of wires and screws to connect/disconnect. I didn't take any pictures as I disassembled, and found myself having to take some extra time to figure it out as I reassembled. In the end -- a silent and functioning refrigerator Good luck!
Read less
Was this instruction helpful to you?
Thank you for voting!
- Customer:
- Tom from EASTON, PA
- Parts Used:
- MJU62070602
- Difficulty Level:
- Easy
- Total Repair Time:
- 30 - 60 mins
- Tools:
- Screw drivers, Wrench (Adjustable)
Water feed line running from water valve to filter housing was leaking
Shut off water supply. Disconnect main supply line. Remove rear lower panel on back of refrigerator. Remove all tubing clamps on back. Disconnect leaking tubing from water supply valve. Remove water filter and unscrew/remove water filter housing. Replace tubing - connect to water filter housing then to water supply valve. Reconnect filter
... Read more
housing and filter. Reinstall lower panel, then main water supply line, then all tubing clamps. Turn water back on and check for leaks after discarding several glasses of water to fill filter. Job complete!
Read less
Was this instruction helpful to you?
Thank you for voting!