


Models
>
73262
73262 (ASWCSEA) LG Refrigerator
Jump to:
Find Part by Name
Keep searches simple, eg. "belt" or "pump".
Keep searches simple, eg. "belt" or "pump".

In Stock
Order now and your part arrives by Mar 21

$14.65
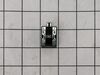
This refrigerator door hinge bushing is a durable white plastic component that provides a smooth pivot point for the hinge pin, helping keep the door properly aligned and sealed. It is commonly used t...
In Stock
Order now and your part arrives by Mar 21

Special Order

In Stock
Order now and your part arrives by Mar 21

$82.95
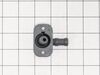
This water inlet valve controls the flow of water to your refrigerator?s ice maker and dispenser, ensuring proper operation and preventing leaks. It helps maintain efficiency by delivering the right a...
In Stock
Order now and your part arrives by Mar 21

In Stock
Order now and your part arrives by Mar 21


In Stock
Order now and your part arrives by Mar 21

Special Order

In Stock
Order now and your part arrives by Mar 21

In Stock
Order now and your part arrives by Mar 21
Questions and Answers
We're sorry, but our Q&A experts are temporarily unavailable.
Please check back later if you still haven't found the answer you need.
Common Problems and Symptoms for 73262
Viewing 7 of 7Door won’t open or close
Fixed by these parts


How to fix it
Leaking
Fixed by these parts

How to fix it
Ice maker not making ice
Fixed by these parts

How to fix it
Will Not Start
Fixed by these parts
How to fix it
Fridge too warm
Fixed by these parts
How to fix it
Clicking sound
Fixed by these parts
How to fix it
Fridge and Freezer are too warm
Fixed by these parts
How to fix it
Keep searches simple. Use keywords, e.g. "leaking", "pump", "broken" or "fit".
- Customer:
- Jerry from CORSICANA, TX
- Parts Used:
- 4984JJ3003A
- Difficulty Level:
- Really Easy
- Total Repair Time:
- 30 - 60 mins
- Tools:
- Screw drivers, Socket set
old bushing worn and broken
removed the upper freezer door to access screws to remove lower door.
laid bottom door on its side, removed bad bushing, put new bushing in, put bottom door back on refridge, put upper door back on fridge. Door worked easy as when new. good closure of door and story..Happy customer, and wife even happier.....thank you....
laid bottom door on its side, removed bad bushing, put new bushing in, put bottom door back on refridge, put upper door back on fridge. Door worked easy as when new. good closure of door and story..Happy customer, and wife even happier.....thank you....
Was this instruction helpful to you?
Thank you for voting!
- Customer:
- Daniel from TROY, MI
- Parts Used:
- 4930JJ2021A
- Difficulty Level:
- Very Easy
- Total Repair Time:
- Less than 15 mins
- Tools:
- Screw drivers
two screws and done
part fit into slot and screwed them down
Was this instruction helpful to you?
Thank you for voting!
- Customer:
- Norris from Telford, PA
- Parts Used:
- 5989JA0002N
- Difficulty Level:
- A Bit Difficult
- Total Repair Time:
- 30 - 60 mins
- Tools:
- Screw drivers
icemaker stopped working
This is bottom drawer type frige. Icemaker is inside (not in the door) and hard to reach. I first tested the solenoids by disconnecting them and using a test cord, energized them independent of the frige wiring. They worked ok. Note: this frige has (2) solenoids going to the icemaker. And it has (3) solenoids serving the water disp
... Read more
enser. The icemaker solenoids are wired in parallel. I removed the icemaker by removing (1) screw from the bottom and loosening (2) on the top. Then removed icemaker as a complete unit disconnecting the wire connector at the same time. On the bench I tested the icemaker to verify it was defective. The wire harness has a 10 amp fuse in the black wire (hot wire). `The fuse was blown. This was sufficient to indicate the icemaker is shot. I did however, do some other tests. Cold resistance of the mold heater was 72 ohms. The timer motor was 4000 ohms. These measurements should be ok. I then activated the icemaker with a test cord, bypassing the blown fuse. The unit cycled one complete rotation then stopped. The mold heater worked. I tested the amp draw on the mold heater and it was only .1 amps. I should be a about .8 amps. I then cycled it again and then the timer motor began to sizzle and smell. Then it smoked and stopped mid-rotation. I then purchased a new icemaker. I believe the mold heater was going bad over time as this unit made ice but very slowly. This put extra strain on the motor as the mold was not releasing quickly. This damaged the motor causing it to fail.
Read less
Was this instruction helpful to you?
Thank you for voting!