


Models
>
79753
79753 (AST1SER) LG Refrigerator
Jump to:
Find Part by Name
Keep searches simple, eg. "belt" or "pump".
Diagrams for 79753
Viewing 7 of 7


Keep searches simple, eg. "belt" or "pump".

$15.26
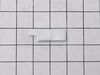
This part includes a single mounting bolt needed to secure the door handle to your refrigerator. This part is commonly replaced because the handle has started to loosen. Try tightening the screw first...
In Stock
Order now and your part arrives by Jul 23

In Stock
Order now and your part arrives by Jul 23

Enjoy cleaner, better-tasting water and ice with this refrigerator water filter. It uses activated carbon to reduce things like chlorine, lead, and other impurities—though it doesn’t remove fluoride. ...
In Stock
Order now and your part arrives by Jul 23

In Stock
Order now and your part arrives by Jul 23

In Stock
Order now and your part arrives by Jul 23

$269.07
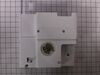
This ice maker assembly kit includes the ice maker, housing, and control device for full functionality. It automatically receives water, freezes it, and dispenses ice into the bin. Designed for easy i...
In Stock
Order now and your part arrives by Jul 23

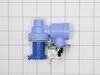
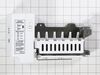
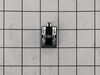
If your fridge isn?t making ice or the water dispenser isn?t working right, this water inlet valve could be the fix. It controls how water flows to both the ice maker and dispenser, helping everything...
In Stock
Order now and your part arrives by Jul 23

In Stock
Order now and your part arrives by Jul 23

$82.29
Freezer door gasket is on the inner door panel and creates a seal around the door to prevent warm air from entering the freezer compartment.
In Stock
Order now and your part arrives by Jul 23

$112.72
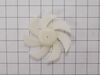
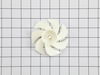
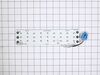
This 13-volt evaporator fan motor helps circulate air over the refrigerator coils. These coils will then convert the heat into cool air, which is then circulated from the freezer section to the fresh ...
In Stock
Order now and your part arrives by Jul 23


Common Problems and Symptoms for 79753
Viewing 13 of 13Leaking
Fixed by these parts

How to fix it
Door won’t open or close
Fixed by these parts

How to fix it
Ice maker not making ice
Fixed by these parts
How to fix it
Noisy
Fixed by these parts
How to fix it
Not dispensing water
Fixed by these parts
How to fix it
Fridge too warm
Fixed by these parts
How to fix it
Ice maker won’t dispense ice
Fixed by these parts

How to fix it
Light not working
Fixed by these parts
How to fix it
Frost buildup
Fixed by these parts

How to fix it
Will Not Start
Fixed by these parts
How to fix it
Clicking sound
Fixed by these parts
How to fix it
Freezer section too warm
Fixed by these parts
How to fix it
Fridge and Freezer are too warm
Fixed by these parts
How to fix it


Keep searches simple. Use keywords, e.g. "leaking", "pump", "broken" or "fit".
- Customer:
- Rick from CLEVELAND, TN
- Parts Used:
- 5901JA1021A, 4681JB1027C
- Difficulty Level:
- Easy
- Total Repair Time:
- 30 - 60 mins
- Tools:
- Screw drivers
Very bad noise which stopped when the door was opened
The Refrigerator now runs very quite.
After watching several videos I started on mine and found that it was a bit different than any in the videos. However all but the back panel was shown and that was helpful.
The back panel was a bit difficult but a hair dryer seemed to help .
All in all it was a good choice to do it myse ... Read more lf as it was done quicker than waiting on a repair man.
Read less
Was this instruction helpful to you?
Thank you for voting!
- Customer:
- Tom from EASTON, PA
- Parts Used:
- MJU62070602
- Difficulty Level:
- Easy
- Total Repair Time:
- 30 - 60 mins
- Tools:
- Screw drivers, Wrench (Adjustable)
Water feed line running from water valve to filter housing was leaking
Shut off water supply. Disconnect main supply line. Remove rear lower panel on back of refrigerator. Remove all tubing clamps on back. Disconnect leaking tubing from water supply valve. Remove water filter and unscrew/remove water filter housing. Replace tubing - connect to water filter housing then to water supply valve. Reconnect filter
... Read more
housing and filter. Reinstall lower panel, then main water supply line, then all tubing clamps. Turn water back on and check for leaks after discarding several glasses of water to fill filter. Job complete!
Read less
Was this instruction helpful to you?
Thank you for voting!
- Customer:
- John from HILLSBORO, OR
- Parts Used:
- AEQ36756901
- Difficulty Level:
- Easy
- Total Repair Time:
- 30 - 60 mins
- Tools:
- Pliers, Screw drivers
Ice maker bail frozen. Chose to replace the entire assembly
Examined old ice maker. It is held by some Philips screws. There are many screws you don't need to unscrew so look carefully. Then disconnected th dual in line connector. There is a little push tab to squeeze to release. Then the ground is connected with a screw. It's a little hard to see but unscrew that. My replacement came with no
... Read more
instructions or screws so try not to drop the screws down in the netherlands of the fridge. The hardest part was maneuvering the icemaker to reattach the power and ground. Even with that pretty straight forward replacement.
Read less
Was this instruction helpful to you?
Thank you for voting!