


Models
>
72049
72049 (AWBCSE0) LG Refrigerator
Jump to:
Find Part by Name
Keep searches simple, eg. "belt" or "pump".
Keep searches simple, eg. "belt" or "pump".

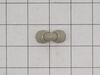
$15.26
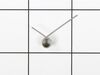
This part includes a single mounting bolt needed to secure the door handle to your refrigerator. This part is commonly replaced because the handle has started to loosen. Try tightening the screw first...
In Stock
Order now and your part arrives by Jul 30

In Stock
Order now and your part arrives by Jul 30

$66.86
Need more space in your fridge door? This clear, gallon-sized bin is a great way to organize drinks, sauces, and jars. It fits on the right-side door of certain refrigerators and installs easily—no to...
In Stock
Order now and your part arrives by Jul 30

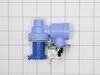
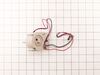
If your fridge isn?t making ice or the water dispenser isn?t working right, this water inlet valve could be the fix. It controls how water flows to both the ice maker and dispenser, helping everything...
In Stock
Order now and your part arrives by Jul 30

In Stock
Order now and your part arrives by Jul 30

$112.72
This 13-volt evaporator fan motor helps circulate air over the refrigerator coils. These coils will then convert the heat into cool air, which is then circulated from the freezer section to the fresh ...
In Stock
Order now and your part arrives by Jul 30

In Stock
Order now and your part arrives by Jul 30

In Stock
Order now and your part arrives by Jul 30

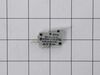
$261.17
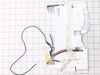
NOTE: The Secondary (smaller) wire connector has 3 wires in it. If original ice maker has 6 wire connector see part number AEQ73110205. Please verify connector before ordering.
In Stock
Order now and your part arrives by Jul 30

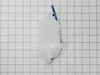
$64.74
The water reservoir holds the water for the water dispenser as the water chills.
In Stock
Order now and your part arrives by Jul 30

$103.17
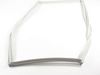
Keep your fridge cool and efficient with this replacement door gasket. Made from flexible rubber, it lines the edge of the refrigerator door to seal in cold air and keep warm air out. If your current ...
In Stock
Order now and your part arrives by Jul 30

Special Order
Common Problems and Symptoms for 72049
Viewing 12 of 12Leaking
Fixed by these parts
How to fix it
Not dispensing water
Fixed by these parts
How to fix it
Noisy
Fixed by these parts
How to fix it
Fridge too warm
Fixed by these parts
How to fix it
Ice maker won’t dispense ice
Fixed by these parts
How to fix it
Ice maker not making ice
Fixed by these parts
How to fix it
Door Sweating
Fixed by these parts
How to fix it
Frost buildup
Fixed by these parts

How to fix it
Door won’t open or close
Fixed by these parts
How to fix it
Fridge and Freezer are too warm
Fixed by these parts
How to fix it
Freezer section too warm
Fixed by these parts
How to fix it
Ice maker dispenses too much ice
Fixed by these parts
How to fix it

Keep searches simple. Use keywords, e.g. "leaking", "pump", "broken" or "fit".
- Customer:
- Nancy from NEW ALBANY, IN
- Parts Used:
- MJX41178908
- Difficulty Level:
- Very Easy
- Total Repair Time:
- Less than 15 mins
- Tools:
- Pliers, Screw drivers, Wrench (Adjustable)
Our refrigerator was not dispencing water or ice.
Turned of water to refrigerator and unplugged refrigerator. Removed the water line from refrigerator. Removed back panel. Removed mounting screw from the water valve, Unhooked wire harness from valve and removed the water line on back of valve. Reconnected wiring harness to new valve, reconnected water line on back of valve. Replaced the
... Read more
back panel to refrigerator and put the water line back on the new valve. Turned on water valve and checked for leaks. It's now dispensing water and ice.
Read less
Was this instruction helpful to you?
Thank you for voting!
- Customer:
- JONATHAN from ROSWELL, GA
- Parts Used:
- MJX41178908
- Difficulty Level:
- A Bit Difficult
- Total Repair Time:
- 30 - 60 mins
- Tools:
- Screw drivers, Wrench set
Water inlet valve was leaking
0) Look on the internet for a DIY/or pro-shop Video
1) Pull the refrigerator away from the wall, unplug the power cable
2) Shut off the water at the wall valve
3) Disconnect the water line at the inlet valve on the refrigerator (lower corner, right side), this is a threaded pipe fitting requiring a small open end wrench
... Read more />4) Remove the lower rear panel
5) Remove the water inlet and distribution valve assembly, there is one sheet-metal screw holding the assembly to the back edge of the refrigerator.
6) Carefully pull the assembly out of the back of the refrigerator, leave the distribution water lines attached, note the orientation
7) Disconnect the electrical connectors, note the orientation/types
8) Disconnect the water line from the inlet valve, remove the retaining clip, then pull out the line. Note - a small metal star shaped tube fitting may come out with the valve, this is fine and will not be used again.
9) Remove the inlet valve from the assembly (there are two small sheet-metal screws that are very tight, the correct/precise size, good quality Philips head screw driver is necessary or use a small set of vice-grips to grab the head of the screw)
10) Attach the new valve to the valve assembly, connect the electrical connectors, note - at the plastic refrigerator water line that connects to the inlet valve, trim/cut a small section off the end of the water line before connecting it to the valve. This will provide a fresh interface for the connection. Push the line in firmly and then install the retaining clip.
11) Perform a quick functional check before putting everything back together - Attach the water line from the wall, turn on the water, attach the electrical connectors, plug in the refrigerator power cable and test for operation and leaks.
12) Assuming no leaks/operational issues, unplug the refrigerator power cable again, turn off the water at the wall, disconnect the water line at the inlet valve and reinstall the valve assembly and rear panel. Reconnect the water line and plug in the power cable and you should be good to go.!
Read less
Was this instruction helpful to you?
Thank you for voting!
- Customer:
- Thomas from LA PLACE, LA
- Parts Used:
- AEQ73110203
- Difficulty Level:
- Really Easy
- Total Repair Time:
- 30 - 60 mins
- Tools:
- Screw drivers
Ice maker wore out.
I installed the new 3 wire ice maker very easily, but it was defective. I was told that instructions for the return of the defective part would be sent later due to the virus. I have never received the return instruction.
I did receive a credit for the defective part. VERY Satisfied with y’all’s service.
Waiting for return i ... Read more nstructions if y’all still want it back.
Thanks,
Thomas Pennebaker
I did receive a credit for the defective part. VERY Satisfied with y’all’s service.
Waiting for return i ... Read more nstructions if y’all still want it back.
Thanks,
Thomas Pennebaker
Read less
Was this instruction helpful to you?
Thank you for voting!