


Models
>
71069
71069 LG Refrigerator
Jump to:
Find Part by Name
Keep searches simple, eg. "belt" or "pump".
Keep searches simple, eg. "belt" or "pump".

$126.83
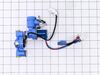
This includes the primary and secondary valves along with the wire harness.
In Stock
Order now and your part arrives by Jul 31

$24.00
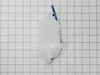
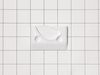
This is a manufacturer-approved refrigerator door closure for your refrigerator. It is made of white plastic and measures approximately 3 inches by 2 inches. If your old closure is damaged, your refri...
Special Order

Keep your refrigerator organized with this replacement door bin, ideal for storing bottles, jars, and condiments. Made of durable white plastic, it measures about 14 inches wide by 11 inches high and ...
No Longer Available

$112.72
This 13-volt evaporator fan motor helps circulate air over the refrigerator coils. These coils will then convert the heat into cool air, which is then circulated from the freezer section to the fresh ...
In Stock
Order now and your part arrives by Jul 31


$64.74
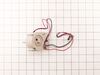
The water reservoir holds the water for the water dispenser as the water chills.
In Stock
Order now and your part arrives by Jul 31

$24.00
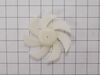
This fan assembly circulates air through the appliance to support proper temperature control and ventilation. Designed for quiet and efficient airflow, it is replaced when airflow weakens, noise incre...
In Stock
Order now and your part arrives by Jul 31

In Stock
Order now and your part arrives by Jul 31

In Stock
Order now and your part arrives by Jul 31


In Stock
Order now and your part arrives by Jul 31

Common Problems and Symptoms for 71069
Viewing 6 of 6Leaking
Fixed by these parts

How to fix it
Noisy
Fixed by these parts
How to fix it
Not dispensing water
Fixed by these parts
How to fix it
Door won’t open or close
Fixed by these parts
How to fix it
Fridge too warm
Fixed by these parts
How to fix it
Ice maker not making ice
Fixed by these parts
How to fix it


Keep searches simple. Use keywords, e.g. "leaking", "pump", "broken" or "fit".
- Customer:
- Richard from JACKSONVILLE, FL
- Parts Used:
- AJU72992601
- Difficulty Level:
- Really Easy
- Total Repair Time:
- 15 - 30 mins
- Tools:
- Screw drivers
replace leaking water inlet valve assembly
1. Shut off water to refrigerator. 2. Removed bottom sheet metal cover (6 screws). 3. Removed leaking water inlet valve assembly from refrigerator (1 screw). 4. Remove water inlet tube (loosen nut) and tube back to refrigerator (pull from water valve after remove cotter pin washer). 5. Detach two electrical wire harnesses. 6. Install new
... Read more
water inlet valve assembly to refrigerator (1 screw). 7. Replace both water tubes to water inlet assembly. 8. Re-attach both wiring harnesses. 9. Turn water to refrigerator on. 10. Check for leaks. 11. Re-attach bottom sheet cover (6 screws).
Read less
Was this instruction helpful to you?
Thank you for voting!
- Customer:
- Rick from CLEVELAND, TN
- Parts Used:
- 5901JA1021A, 4681JB1027C
- Difficulty Level:
- Easy
- Total Repair Time:
- 30 - 60 mins
- Tools:
- Screw drivers
Very bad noise which stopped when the door was opened
The Refrigerator now runs very quite.
After watching several videos I started on mine and found that it was a bit different than any in the videos. However all but the back panel was shown and that was helpful.
The back panel was a bit difficult but a hair dryer seemed to help .
All in all it was a good choice to do it myse ... Read more lf as it was done quicker than waiting on a repair man.
Read less
Was this instruction helpful to you?
Thank you for voting!
- Customer:
- George from WHITE BIRD, ID
- Parts Used:
- 4681JB1027C
- Difficulty Level:
- Easy
- Total Repair Time:
- 30 - 60 mins
- Tools:
- Screw drivers
Blower motor out on condenser
followed detailed movie from Utube video
Was this instruction helpful to you?
Thank you for voting!