


Models
>
KTLS22QDAL00
KTLS22QDAL00 KitchenAid Refrigerator
Jump to:
Find Part by Name
Keep searches simple, eg. "belt" or "pump".
Diagrams for KTLS22QDAL00
Viewing 10 of 10


Manuals & Guides for KTLS22QDAL00
Click to downloadKeep searches simple, eg. "belt" or "pump".

$123.87
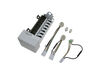
The ice maker works by filling with water from the inlet valve, freezing it into cubes, and then dispensing the cubes into the storage bucket. It will then refill with water and repeat this process un...
In Stock
Order now and your part arrives by Apr 6

$72.17
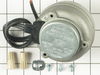
This part is used to help tell the icemaker what to do - it turns the timing cams and the ejector blades. Motor is not sold separately.
In Stock
Order now and your part arrives by Apr 6

In Stock
Order now and your part arrives by Apr 6

This condenser fan motor is used with frost-free refrigerators with a condenser coil. When the compressor runs, so does this fan, circulating air through the refrigerator grille, cooling the compresso...
In Stock
Order now and your part arrives by Apr 6

$19.63
This 10-watt clear bulb provides dependable lighting inside dryers and refrigerators, helping you see the interior clearly when the door is open. Compatible with a variety of appliance models, it inst...
In Stock
Order now and your part arrives by Apr 6

In Stock
Order now and your part arrives by Apr 6

This clip-on thermostat will sense the temperature increase in the evaporator during the defrost cycle and will cycle the defrost heater off after the ice or frost is melted.
In Stock
Order now and your part arrives by Apr 6

In Stock
Order now and your part arrives by Apr 6


$11.98
This 18 ml bottle of white appliance touch-up paint is used to cover scratches or marks on your appliance. The white touch-up paint can be used on refrigerators, microwaves, ranges, clothes dryers, an...
In Stock
Order now and your part arrives by Apr 6

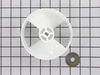
This icemaker water inlet cup is three inches long. It is all white in color and is made of plastic.
In Stock
Order now and your part arrives by Apr 6

$71.11
The evaporator is found in the back of the freezer. This kit comes with two mounting grommets, two sleeves (not to be used on porcelain models), two #8 mounting screws, and a push-on fan blade.
NOT...
In Stock
Order now and your part arrives by Apr 6
Questions and Answers
We're sorry, but our Q&A experts are temporarily unavailable.
Please check back later if you still haven't found the answer you need.
Common Problems and Symptoms for KTLS22QDAL00
Viewing 22 of 22Ice maker not making ice
Fixed by these parts


How to fix it
Leaking
Fixed by these parts

How to fix it
Ice maker won’t dispense ice
Fixed by these parts
How to fix it
Fridge too warm
Fixed by these parts

How to fix it
Not dispensing water
Fixed by these parts


How to fix it
Noisy
Fixed by these parts
How to fix it
Freezer section too warm
Fixed by these parts
How to fix it
Light not working
Fixed by these parts


How to fix it
Door won’t open or close
Fixed by these parts


How to fix it
Freezer not defrosting
Fixed by these parts

How to fix it
Fridge runs too long
Fixed by these parts
How to fix it
Fridge and Freezer are too warm
Fixed by these parts
How to fix it
Will Not Start
Fixed by these parts

How to fix it
Ice maker dispenses too much ice
Fixed by these parts


How to fix it
Ice maker dispenses too little ice
Fixed by these parts
How to fix it
Door Sweating
Fixed by these parts


How to fix it
Frost buildup
Fixed by these parts
How to fix it
Freezer too cold
Fixed by these parts
How to fix it
Won’t start
Fixed by these parts
How to fix it
Fridge too cold
Fixed by these parts
How to fix it
Too warm
Fixed by these parts
How to fix it
Clicking sound
Fixed by these parts
How to fix it


Keep searches simple. Use keywords, e.g. "leaking", "pump", "broken" or "fit".
- Customer:
- Max from Green Castle, IN
- Parts Used:
- 4317943
- Difficulty Level:
- Really Easy
- Total Repair Time:
- 15 - 30 mins
- Tools:
- Nutdriver, Screw drivers
Ice Maker quit working, I could manually cycle unit but then the water would overflow when unit was re-filling.
I backed out the 2 top screws about a quarter inch and then removed bottem screw with a quater inch nut driver. I then lifted Ice Maker clear of the two top screws and lowered it enough to unclip the power connection with a small screwdriver. The new Ice Maker was wired correctley for my refrigeator so all I had to do wea reconnect the
... Read more
power connection and mount new Ice Maker on the two top screws and install the bottem screw. It took e while for the new Ice Maker to start it's cycle but after it did, it worked GREAT. Part Select service was OUTSTANDING, ordered part one day and received the next. THANKS!!!!
Read less
Was this instruction helpful to you?
Thank you for voting!
- Customer:
- Daniel from Suwanee, GA
- Parts Used:
- W10190935
- Difficulty Level:
- Easy
- Total Repair Time:
- 15 - 30 mins
- Tools:
- Screw drivers, Socket set
No ice
removed flap door in front of icemaker...removed 3 screws with bolt heads...removed one additional screw with bolt head and ice unit slid out. I removed motor unit (pops out no screws). Replaced and had ice within 3 hours.
Was this instruction helpful to you?
Thank you for voting!
- Customer:
- Chris from Duluth, GA
- Parts Used:
- 4317943
- Difficulty Level:
- Really Easy
- Total Repair Time:
- Less than 15 mins
- Tools:
- Socket set
No Ice in the Ice Maker
I am NOT a handyman, and my family laughed at me when I said I was going to fix the ice maker all by myself. I ordered a replacement ice maker. When it arrived, I opened the box and read the instructions. It seemed easy. I removed the old ice maker, with a socket set. I then took off the shut off lever from the old one and placed it
... Read more
on the new one, since the new one didn't come with it. I then put the new one in place. All the parts fit perfectly. The ice machine was making ice within an hour. My family was amazed... and I got the last laugh!
Read less
Was this instruction helpful to you?
Thank you for voting!