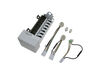
The ice maker works by filling with water from the inlet valve, freezing it into cubes, and then dispensing the cubes into the storage bucket. It will then refill with water and repeat this process un...
This 10-watt clear bulb provides dependable lighting inside dryers and refrigerators, helping you see the interior clearly when the door is open. Compatible with a variety of appliance models, it inst...
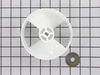
If your refrigerator or freezer is too warm, or making noises, you may need to replace the fan blade. The fan blade attaches to the evaporator motor, which is in the freezer section, to help circulate...
This ice cube mold and heater assembly has a flake resistant surface. It is used with modular style icemakers on some refrigerators.
In Stock
Order now and your part arrives by Mar 19
Questions and Answers
Ask our experts a question about this part and we'll get back to you as soon as possible!
1 question answered by our experts.
< Prev
1
Next >
Sort by:
Search filter:
Clear Filter
Your search term must have 3 or more characters.
Keep searches simple. Use keywords, e.g. "leaking", "pump", "broken" or "fit".
Sorry, we couldn't find any existing answers that matched. Try using some different or simpler keywords, or submit your new question by using the "Ask a Question" button above!
David
March 1, 2024
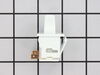
How to install a power connector switch part number WP22668002 in the KitchenAid refrigerator
For model number KSSS48DBW00
Hello David, thank you for your question. Yes it would. We actually do have a helpful piece of information from a customer about installation: "Our unit is a built-in unit so first had to remove the decorative cover panel to expose the internal on/off switch. Turned off the circuit breaker. Disconnected the wires (simple pull-off/push-on). Removed the old switch which meant clipping the plastic tabs holding the switch in position. Inserted the new switch by simply pushing it through the opening being sure to have it in the same alignment ('off' to the back of the unit.) Reconnected the wires making sure to have a white ground wires on the left and the black 'hot' wires on the right. Turned the circuit breaker back on. Turned the switch on. Now it runs." Good luck with your repair.
Was this helpful?
Thank you for voting!
Ask a Question
Ask our experts a question on this part and we'll respond as soon as we can.
I backed out the 2 top screws about a quarter inch and then removed bottem screw with a quater inch nut driver. I then lifted Ice Maker clear of the two top screws and lowered it enough to unclip the power connection with a small screwdriver. The new Ice Maker was wired correctley for my refrigeator so all I had to do wea reconnect the
... Read morepower connection and mount new Ice Maker on the two top screws and install the bottem screw. It took e while for the new Ice Maker to start it's cycle but after it did, it worked GREAT. Part Select service was OUTSTANDING, ordered part one day and received the next. THANKS!!!!
removed flap door in front of icemaker...removed 3 screws with bolt heads...removed one additional screw with bolt head and ice unit slid out. I removed motor unit (pops out no screws). Replaced and had ice within 3 hours.
I am NOT a handyman, and my family laughed at me when I said I was going to fix the ice maker all by myself. I ordered a replacement ice maker. When it arrived, I opened the box and read the instructions. It seemed easy. I removed the old ice maker, with a socket set. I then took off the shut off lever from the old one and placed it
... Read moreon the new one, since the new one didn't come with it. I then put the new one in place. All the parts fit perfectly. The ice machine was making ice within an hour. My family was amazed... and I got the last laugh!