


Models
>
1069730310
1069730310 Kenmore Refrigerator
Jump to:
Find Part by Name
Keep searches simple, eg. "belt" or "pump".
Keep searches simple, eg. "belt" or "pump".

$72.17
This part is used to help tell the icemaker what to do - it turns the timing cams and the ejector blades. Motor is not sold separately.
In Stock
Order now and your part arrives by Apr 11

$35.34
The defrost timer works on a predetermined schedule, to alternate between the cooling cycle and the defrost heater in your freezer. When the heating circuit is activated, it melts any ice that has for...
In Stock
Order now and your part arrives by Apr 11

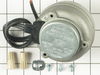
This condenser fan motor is used with frost-free refrigerators with a condenser coil. When the compressor runs, so does this fan, circulating air through the refrigerator grille, cooling the compresso...
In Stock
Order now and your part arrives by Apr 11

This door shelf end cap set contains two white end caps. Each end cap can be used as either the right or the left side. These end caps also come with adhesive strips and an instructions sheet.
In Stock
Order now and your part arrives by Apr 11

In Stock
Order now and your part arrives by Apr 11

This clip-on thermostat will sense the temperature increase in the evaporator during the defrost cycle and will cycle the defrost heater off after the ice or frost is melted.
In Stock
Order now and your part arrives by Apr 11

Also known as a Water Solenoid Valve. The water inlet valve is a solenoid-operated switch that, when activated, releases water from the supply line to the water valve and into the compact icemaker mold.
In Stock
Order now and your part arrives by Apr 11

$24.00
This door shelf end cap set contains two white end caps and adhesive tape.
In Stock
Order now and your part arrives by Apr 11


This icemaker water inlet cup is three inches long. It is all white in color and is made of plastic.
In Stock
Order now and your part arrives by Apr 11

$71.11
The evaporator is found in the back of the freezer. This kit comes with two mounting grommets, two sleeves (not to be used on porcelain models), two #8 mounting screws, and a push-on fan blade.
NOT...
In Stock
Order now and your part arrives by Apr 11

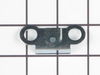
$13.07
This hinge bracket, also known as a door stop, is attached to the bottom of the door and is used to limit how far the door swings out to protect the refrigerator itself, and any surrounding cabinets f...
In Stock
Order now and your part arrives by Apr 11
Questions and Answers
We're sorry, but our Q&A experts are temporarily unavailable.
Please check back later if you still haven't found the answer you need.
Common Problems and Symptoms for 1069730310
Viewing 21 of 21Ice maker not making ice
Fixed by these parts


How to fix it
Leaking
Fixed by these parts


How to fix it
Fridge too warm
Fixed by these parts
How to fix it
Freezer section too warm
Fixed by these parts
How to fix it
Freezer not defrosting
Fixed by these parts
How to fix it
Noisy
Fixed by these parts

How to fix it
Light not working
Fixed by these parts


How to fix it
Will Not Start
Fixed by these parts

How to fix it
Door won’t open or close
Fixed by these parts

How to fix it
Ice maker won’t dispense ice
Fixed by these parts

How to fix it
Fridge and Freezer are too warm
Fixed by these parts
How to fix it
Fridge runs too long
Fixed by these parts
How to fix it
Frost buildup
Fixed by these parts
How to fix it
Freezer too cold
Fixed by these parts
How to fix it
Not dispensing water
Fixed by these parts

How to fix it
Fridge too cold
Fixed by these parts
How to fix it
Too warm
Fixed by these parts
How to fix it
Door Sweating
Fixed by these parts


How to fix it
Ice maker dispenses too much ice
Fixed by these parts
How to fix it
Won’t start
Fixed by these parts
How to fix it
Clicking sound
Fixed by these parts
How to fix it


Keep searches simple. Use keywords, e.g. "leaking", "pump", "broken" or "fit".
- Customer:
- Daniel from Suwanee, GA
- Parts Used:
- W10190935
- Difficulty Level:
- Easy
- Total Repair Time:
- 15 - 30 mins
- Tools:
- Screw drivers, Socket set
No ice
removed flap door in front of icemaker...removed 3 screws with bolt heads...removed one additional screw with bolt head and ice unit slid out. I removed motor unit (pops out no screws). Replaced and had ice within 3 hours.
Was this instruction helpful to you?
Thank you for voting!
The frost free feature of the freezer was freezing over with ice and cooling coils were being insulated with thickening frost which caused the cooling air to rise in temperature from -5 degrees to 20 degrees.
I troubleshot the problem by reading the electrical schematic and concluding the heating elements (defrost cables) were either defective or the bi-metal temp sensor was open. When closed the temp sensor completes the circuit for the current to flow through the heaters to defrost the cooling coils every 8 hours and then when the bimetal o
... Read more
pens at 55 degrees the circuit is open and the coils are cooled because the refridgeration motor is in run mode. A timer between the motor and heater elements also was defective. The timer controls the cooling period and the defrost period. I ohmed out each part according to the spec sheet of normal resistance of parts and thus the bimetal and timer were defective. I gather a surge of some duration and amplitude affected these parts because a storm 24 hours prior to refridgerator problem had passsed through the area and the AC electrical power had oscillated several times during that event. I used hand tools to do the repair. If you are not mechanically inclined a step by step proceedure would be moot. It is a matter of disassembly and assembly paying close attention to fragile parts.
Read less
Was this instruction helpful to you?
Thank you for voting!
- Customer:
- Tom from Franklin, WI
- Parts Used:
- 833697
- Difficulty Level:
- A Bit Difficult
- Total Repair Time:
- 15 - 30 mins
- Tools:
- Nutdriver, Pliers
Sometimes the condenser fan would start causing the refrigerator to overheat.
Unplug the appliance.
Removed the screws holding the back panel.
Removed the fan blade.
removed 3 screws holding the condenser fan.
Remove the 3 metal brackets attached to the fan.
(First note which studs the brackets are attached to. Attach the 3 metal brackets to the new fan. (New screws were supplied)
Cut ... Read more and strip the wire about two inches from the fan.
Cut and strip the new wire. I cut the new wire in half (about 6 inches.) Connect the two wires, twist and used 2 wire nuts. Tie wrap the wire to the wire harness. Mount the new fan (three screws)
Screw the back panel back on.
Mount the new
Read less
Was this instruction helpful to you?
Thank you for voting!