


Models
>
106M12P-F
106M12P-F Kenmore Refrigerator
Jump to:
Find Part by Name
Keep searches simple, eg. "belt" or "pump".
Diagrams for 106M12P-F
Viewing 3 of 3


Keep searches simple, eg. "belt" or "pump".

$22.91
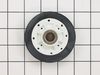
If your dryer is not tumbling, takes a long time to dry, or is noisy while tumbling, it may be time to replace the drum support rollers. These hold the drum in place while it rotates, so if they have ...
In Stock
Order now and your part arrives by Aug 1

In Stock
Order now and your part arrives by Aug 1

In Stock
Order now and your part arrives by Aug 1

In Stock
Order now and your part arrives by Aug 1

$40.65
This fourteen cube ice cube tray is eleven inches long. It is all white in color and is made entirely of plastic.
In Stock
Order now and your part arrives by Aug 1

In Stock
Order now and your part arrives by Aug 1

$17.44
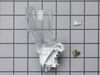
This is an OEM part sourced directly from the manufacturer. This leveling leg is commonly used with refrigerators, dryers, freezers, ranges, cooktops, and microwaves. This leveling leg ensure that you...
Special Order

In Stock
Order now and your part arrives by Aug 1

In Stock
Order now and your part arrives by Aug 1

On Order

In Stock
Order now and your part arrives by Aug 1

Special Order
Common Problems and Symptoms for 106M12P-F
Viewing 4 of 4Noisy
Fixed by these parts
How to fix it
Light not working
Fixed by these parts
How to fix it
Drum Not Spinning
Fixed by these parts
How to fix it
Door won’t close
Fixed by these parts
How to fix it


Keep searches simple. Use keywords, e.g. "leaking", "pump", "broken" or "fit".
- Customer:
- Fred from Chicago, IL
- Parts Used:
- WP37001042
- Difficulty Level:
- A Bit Difficult
- Total Repair Time:
- 30 - 60 mins
- Tools:
- Socket set
Support Roller removal and Installation
First I turned off the gas supply line. Then unplug the dryer. Remove bottom front cover by removing the 2 screws (1 at each side) at the bottom. Next remove the 2 screws (1 at each side) located at bottom of front door panel. Pull front panel away from dryer and pull down slightly. This will disconnect the entire front panel(with door) f
... Read more
rom dryer. Carefull because there is a switch located at the top right corner of the panel on the inside. This will not allow you to remove the door yet. On some scratch paper, sketch the switch and correct color wire positions. Remove wires at connections. Pull the drum toward front dryer carefully. This dislodges it from the back of the dryer. No need to remove it from dryer. This way the belt still remains in place. From inside drum, use a pair of snap ring pliers to remove the snap ring from the support roller shaft located on left side of drum, below where the drum was sitting prior to pulling it forward to dislodge it from inside rear of dryer.
Remove old wheel , place some grease on inside of new support roller and some on the shaft. Install new roller and replace snap ring. Slide drum back in place inside the dryer at the rear. Hand rotate the drum to ensure it is properly installed. Reconnect the switch wires to the front panel. Slide panel up into place so that the clips (at top of panel) lock into place(square holes in top cover plate of dryer). Have the door open when doing this because you have to seat the front of the drum into the front cover. Reinstall the 2 screws. Test spin the drum again by hand. If it feels right, it's correctly seated.
Reinstall bottom front cover. While everything is apart, you may want to use a vacuum cleaner to clean the inside of your dryer. Perfect time to do this. Plug dryer back in and open gas supply line. Test the dryer. Should be nice and quiet again.
This fix is for the left side support roller only. There is a support roller on the right side also. In my case I only needed to fix the left side support roller. The inner diameter of the roller was badly worn and needed to be replaced. You may want to purchase the support roller shaft at the same time. I didn't and will need to do this repair again. I only purchased the support roller and when I removed it, I noticed the shaft is badly worn also. In my case, temporary fix until the shaft is ordered and then I'll do this again.
Read less
Was this instruction helpful to you?
Thank you for voting!
- Customer:
- DANIEL from MINNEAPOLIS, MN
- Parts Used:
- 4387478
- Difficulty Level:
- Easy
- Total Repair Time:
- Less than 15 mins
- Tools:
- Screw drivers
Light Would Not Go On In The Refrigerator
First I removed the old lightbulb from the socket and replaced it with a new one to confirm that the bulb was not the problem. I then pryed the socket out with a flat-head screwdriver. I could tell that the socket was anchored in its hole with clips so it was relatively easy to pry it out. Once the socket was out, I disconnected the le
... Read more
ad wires and ordered a replacement socket kit from Partselect. When the new one arrived, I reconnected the lead wires to it, snapped it back into its hole, screwed in a new lightbulb, and presto!! The light was back on with no further problem. Thank you, Partselect!! A $15.00 part saved me what probably would have been at least a $100. service call and heaven knows what the technician would have told me I needed!!!
Read less
Was this instruction helpful to you?
Thank you for voting!
- Customer:
- martin l. from JACKSONVILLE,, IL
- Parts Used:
- 4387478
- Difficulty Level:
- Really Easy
- Total Repair Time:
- Less than 15 mins
socket melted with bulb in it.
plastic warped in ,spaced out and, the socket snapped back in place.
Was this instruction helpful to you?
Thank you for voting!