


Models
>
5648600160
5648600160 Kenmore Refrigerator
Jump to:
Find Part by Name
Keep searches simple, eg. "belt" or "pump".
Diagrams for 5648600160
Viewing 4 of 4


Keep searches simple, eg. "belt" or "pump".

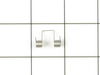
This metallic spring is for your dishwasher's soap cup cover. Sold individually.
In Stock
Order now and your part arrives by Jul 28

In Stock
Order now and your part arrives by Jul 28

This seals between the cup and the door so there is no leaking of water between the door.
Special Order

This water inlet valve is intended for use with under counter style dishwashers. It has a 3/8 of an inch FPT (female pipe thread) valve and a mounting bracket. - This water inlet valve should be loca...
No Longer Available


Special Order

Common Problems and Symptoms for 5648600160
Viewing 5 of 5Will not dispense detergent
Fixed by these parts
How to fix it
Door latch failure
Fixed by these parts
How to fix it
Not cleaning dishes properly
Fixed by these parts
How to fix it
Door won’t close
Fixed by these parts
How to fix it
Leaking
Fixed by these parts

How to fix it

Keep searches simple. Use keywords, e.g. "leaking", "pump", "broken" or "fit".
- Customer:
- John from WESTERVILLE, OH
- Parts Used:
- WP8066018
- Difficulty Level:
- A Bit Difficult
- Total Repair Time:
- 30 - 60 mins
- Tools:
- Pliers
The spring on the detergenet dispenser box door failed and needed replaced
The old spring on the detergent dispenser box door failed and the dispenser door would not pop open at the right time in the wash cycle.
Ordering the new spring was easy on the website. Need dishwasher model number, stock number and serial number.
Hint - Order at least 2 springs! They are not expensive.
... Read more >I followed the instructions in the video. I could get the spring on the spindle correctly but could not get the two spring prongs to catch to create spring tension on the door without using a thin knife blade to carefully push each prong to where it caught on the dispenser door.
I needed to slide the prongs slowly and carefully to get them to catch on the door. This distorted the spring. That's why you really need two springs. I then used needle nose pliers to pull the latching part of the spring to catch on the inner door. That distorts the spring, too.
So you really need two springs. One spring to learn how to do it and a second one to replace the one you distorted as you learned.
Take care
Read less
Was this instruction helpful to you?
Thank you for voting!
- Customer:
- Anthony from CLEVELAND, OH
- Parts Used:
- WP8066018
- Difficulty Level:
- Really Easy
- Total Repair Time:
- Less than 15 mins
Soap door wouldn't open.
I looked online to see a video. Dad to pop lid off soap dispenser. Slide a plastic part to the left n the spring slide off. Video showed how to place prongs on spring . Then had to lift the upper part of spring to lift onto plastic part of soap dispenser. That was it.
Unfortunately it still doesn't work. I asked Ina email to yo ... Read more ur company for any suggestions, No reply.
Unfortunately it still doesn't work. I asked Ina email to yo ... Read more ur company for any suggestions, No reply.
Read less
Was this instruction helpful to you?
Thank you for voting!
- Customer:
- John from Dubuque, IA
- Parts Used:
- WP8066018
- Difficulty Level:
- A Bit Difficult
- Total Repair Time:
- 1- 2 hours
- Tools:
- Pliers, Screw drivers
soap dish door does not always pop open
the plastic pin that retains the spring has a head on one end that hits a plastic stop on the door to keep it from coming out. I used a small grinder and made a flat spot on the head diameter to make it easy to slide out. This is easier than trying to pry the door off the pin at the two retaing snaps. I was conderned these pin retainer
... Read more
clips were brittle and would break off.
Once the pin is slid out, it is a matter to hold the new spring holes in line with the pin. rotate pin so flat side you ground is turned up, so pin will not move out that way. Tiij about an hour
Once the pin is slid out, it is a matter to hold the new spring holes in line with the pin. rotate pin so flat side you ground is turned up, so pin will not move out that way. Tiij about an hour
Read less
Was this instruction helpful to you?
Thank you for voting!