


Models
>
1068490211
1068490211 Kenmore Refrigerator
Jump to:
Find Part by Name
Keep searches simple, eg. "belt" or "pump".
Keep searches simple, eg. "belt" or "pump".

$44.24
The capacitor, also known as a run capacitor, is a component in your fridge that allows the compressor to cycle on and off to maintain a constant temperature. If your fridge and freezer are too warm i...
In Stock
Order now and your part arrives by Mar 26

This genuine OEM part is a thermostat assembly for your fridge. This part acts as a sensor to detect temperature changes in the evaporator. When the defrost cycle is running and the ice has melted, th...
In Stock
Order now and your part arrives by Mar 26

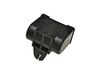
This condenser fan motor is used with frost-free refrigerators with a condenser coil. When the compressor runs, so does this fan, circulating air through the refrigerator grille, cooling the compresso...
In Stock
Order now and your part arrives by Mar 26

$25.15
This kit contains two options - One that is a push and turn and the other that is a screw in.
In Stock
Order now and your part arrives by Mar 26


In Stock
Order now and your part arrives by Mar 26

In Stock
Order now and your part arrives by Mar 26

In Stock
Order now and your part arrives by Mar 26

$101.95
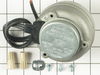
This refrigerator evaporator fan motor kit comes with a wiring harness and a four-inch push on fan blade.
In Stock
Order now and your part arrives by Mar 26

$76.45
This is the replacement evaporator drip tray for your refrigerator. It is made of white plastic and is approximately 19 inches by 9 inches. The evaporator drip tray sits below the evaporator to collec...
In Stock
Order now and your part arrives by Mar 26

This part screws into the side of the wall in your fresh food compartment and supports a shelf.
No Longer Available

$9.40
This fourteen cube ice cube tray is eleven inches long. It is all white in color and is made entirely of plastic.
In Stock
Order now and your part arrives by Mar 26
Questions and Answers
We're sorry, but our Q&A experts are temporarily unavailable.
Please check back later if you still haven't found the answer you need.
Common Problems and Symptoms for 1068490211
Viewing 15 of 15Fridge too warm
Fixed by these parts

How to fix it
Will Not Start
Fixed by these parts
How to fix it
Freezer section too warm
Fixed by these parts
How to fix it
Fridge and Freezer are too warm
Fixed by these parts
How to fix it
Noisy
Fixed by these parts

How to fix it
Light not working
Fixed by these parts

How to fix it
Fridge runs too long
Fixed by these parts
How to fix it
Leaking
Fixed by these parts

How to fix it
Fridge too cold
Fixed by these parts
How to fix it
Clicking sound
Fixed by these parts
How to fix it
Too warm
Fixed by these parts
How to fix it
Freezer too cold
Fixed by these parts
How to fix it
Door Sweating
Fixed by these parts

How to fix it
Won’t start
Fixed by these parts
How to fix it
Freezer not defrosting
Fixed by these parts
How to fix it


Keep searches simple. Use keywords, e.g. "leaking", "pump", "broken" or "fit".
- Customer:
- garth from forest lake, MN
- Parts Used:
- WPW10662129
- Difficulty Level:
- Really Easy
- Total Repair Time:
- 15 - 30 mins
- Tools:
- Nutdriver, Screw drivers
My refrigerator stopped cooling and the freezer section stopped freezing
I knew the chances of all the freon leaking out was unlikely so I looked at the wiring to the compressor and there was a capacitor and a starter/overload so i figured I would start there. I went on line and found the parts at this site and they were less than the minimum service call charge for a service tech so I figured what the heck le
... Read more
t's give her a shot so I did give it a shot. I ordered the parts and they were there in less time than a service tech could come out and i installed the parts and guess what for 90.00 in parts and 15 minutes in time I repaired my refrigerator. Thanks guys, It took less time to order the parts than it did to make the repair so thanks, your website rocks and is very well designed so my hat is off to you guys!
Read less
Was this instruction helpful to you?
Thank you for voting!
- Customer:
- Steve earney from Brooks, GA
- Parts Used:
- WP2198202
- Difficulty Level:
- Really Easy
- Total Repair Time:
- 30 - 60 mins
- Tools:
- Nutdriver, Pliers, Screw drivers
inconsistent compressor and condensor fan operation
Compressor start relay would cycle several times before compressor would come on. Replaced start relay and defrost timer assy. Operated more consistently however not completely reliable. Ice would begin to melt. Noticed that if you would cycle the temperature control the compressor would start again and operate for several hours then n
... Read more
ot cycle again. Jumpered temp control and operation was continuous and reliable. Replaced cold control thermostat. Operation now normal. Suspect high resistance in switch caused start relay and timer contacts to arc. Small amount of carbon noticed under temp control...
Read less
Was this instruction helpful to you?
Thank you for voting!
- Customer:
- Tom from Franklin, WI
- Parts Used:
- 833697
- Difficulty Level:
- A Bit Difficult
- Total Repair Time:
- 15 - 30 mins
- Tools:
- Nutdriver, Pliers
Sometimes the condenser fan would start causing the refrigerator to overheat.
Unplug the appliance.
Removed the screws holding the back panel.
Removed the fan blade.
removed 3 screws holding the condenser fan.
Remove the 3 metal brackets attached to the fan.
(First note which studs the brackets are attached to. Attach the 3 metal brackets to the new fan. (New screws were supplied)
Cut ... Read more and strip the wire about two inches from the fan.
Cut and strip the new wire. I cut the new wire in half (about 6 inches.) Connect the two wires, twist and used 2 wire nuts. Tie wrap the wire to the wire harness. Mount the new fan (three screws)
Screw the back panel back on.
Mount the new
Read less
Was this instruction helpful to you?
Thank you for voting!