


Models
>
36358892898
36358892898 Kenmore Refrigerator
Jump to:
Find Part by Name
Keep searches simple, eg. "belt" or "pump".
Manuals & Guides for 36358892898
Click to downloadKeep searches simple, eg. "belt" or "pump".

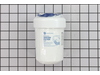
This is an OEM replacement water filter for your refrigerator. The manufacturer suggests replacing this filter every 6 months or 300 gallons of water. If not replaced regularly, you will risk contamin...
In Stock
Order now and your part arrives by Aug 1

$229.80
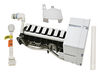
The ice maker assembly makes ice by filling the tray with water from the inlet valve, freezing it until solid cubes are formed, and then ejecting them into the ice bucket. This process will repeat unt...
In Stock
Order now and your part arrives by Aug 1

This is a genuine OEM replacement door flap for the ice maker in your refrigerator. This part goes by many different names, including door recess assembly, ice door assembly, dispenser door, ice chute...
In Stock
Order now and your part arrives by Aug 1

If you are experiencing temperature issues with your refrigerator, there may be an issue with the defrost heater. If this part has failed, it can cause your fridge and freezer to get too warm. It can ...
On Order

This grommet is found on both the front and back of the fan motor assembly for the condenser and the evaporator in your fridge. It is used to provide a buffer between the fan motor and the mounting br...
In Stock
Order now and your part arrives by Aug 1

$21.95
This 40-Watt light bulb is sold individually.
It is specially designed to withstand extreme temperatures, so this bulb is compatible with a variety of appliance types including refrigerators, ranges,...
In Stock
Order now and your part arrives by Aug 1

$41.26
This part is the replacement water line for your refrigerator. It is a long plastic tube, which is 5/16 of an inch in diameter. If your refrigerator is leaking, or will not dispense water or ice, you ...
In Stock
Order now and your part arrives by Aug 1

$80.11
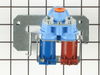
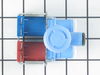
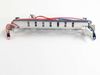
This part has one port and 2 solenoids and comes with a mounting bracket. The water valve is a solenoid-operated switch located at the bottom of the refrigerator. When it is energized by electrical p...
Special Order

$54.95
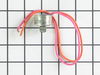
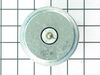
This clip on refrigerator defrost thermostat clips on to your refrigerator's evaporator. It will cut out at 60 degrees Fahrenheit and kick back in when the temperature drops to 32 degrees Fahrenheit.
In Stock
Order now and your part arrives by Aug 1

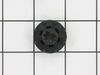
This kit includes 1 cube solenoid, 1 armature, 2 tooth washers and 2 1/4 hex head screws.
In Stock
Order now and your part arrives by Aug 1


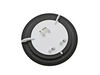
This white dispenser grill is located at the bottom of the ice/water dispenser.
No Longer Available
Common Problems and Symptoms for 36358892898
Viewing 21 of 21Leaking
Fixed by these parts
How to fix it
Ice maker not making ice
Fixed by these parts
How to fix it
Not dispensing water
Fixed by these parts
How to fix it
Fridge too warm
Fixed by these parts

How to fix it
Freezer not defrosting
Fixed by these parts
How to fix it
Freezer section too warm
Fixed by these parts
How to fix it
Noisy
Fixed by these parts
How to fix it
Ice maker won’t dispense ice
Fixed by these parts
How to fix it
Frost buildup
Fixed by these parts
How to fix it
Door Sweating
Fixed by these parts
How to fix it
Door won’t open or close
Fixed by these parts
How to fix it
Ice maker dispenses too little ice
Fixed by these parts
How to fix it
Fridge and Freezer are too warm
Fixed by these parts
How to fix it
Freezer too cold
Fixed by these parts
How to fix it
Too warm
Fixed by these parts
How to fix it
Ice maker dispenses too much ice
Fixed by these parts
How to fix it
Fridge runs too long
Fixed by these parts
How to fix it
Fridge too cold
Fixed by these parts
How to fix it
Won’t start
Fixed by these parts
How to fix it
Touchpad does not respond
Fixed by these parts
How to fix it
Clicking sound
Fixed by these parts
How to fix it


Keep searches simple. Use keywords, e.g. "leaking", "pump", "broken" or "fit".
- Customer:
- James from Centerville, OH
- Parts Used:
- WR57X10023
- Difficulty Level:
- Easy
- Total Repair Time:
- Less than 15 mins
- Tools:
- Nutdriver, Socket set, Wrench (Adjustable)
Leaking water valve
Removed black cardboard covering on back of refrig with nut driver (6 screws), turned off water supply to pump, removed cooper waterline to pump with adjustable wrench, removed 1 screw holding pump to refrigerator, removed plastic waterline from pump by turning hose counter clockwise. Inserter plastic water line in new pump by screwing li
... Read more
ne in clockwise, pushed orange plastic stop around waterline into pump, connected cooper water line to pump first wrapping threads on pump with teflon plumbers tape, reinstalled pump to refrig and cardboard back on refrig with 6 screws.
One side note:.
This is the second pump which has burst at the blue plastic seam in seven years.
One side note:.
This is the second pump which has burst at the blue plastic seam in seven years.
Read less
Was this instruction helpful to you?
Thank you for voting!
- Customer:
- Alfred from Novato, CA
- Parts Used:
- MWFP
- Difficulty Level:
- Really Easy
- Total Repair Time:
- Less than 15 mins
Replace water filter
Unscrew old filter and remove(counterclockwise). Line up arrow on new filter with arrow on connection housing. Turn clockwise till resistance met. Do not overtighten. Follow directions. Simple.
Was this instruction helpful to you?
Thank you for voting!
- Customer:
- Alan from Houston, TX
- Parts Used:
- WR57X10023
- Difficulty Level:
- Easy
- Total Repair Time:
- 30 - 60 mins
- Tools:
- Nutdriver, Pliers, Screw drivers
Water dispenser did not work (ice-maker did work)
This is a side-by-side frige with water and ice dispenser in the left freezer door. I first checked for possible water line freezing in the freezer door or in the water chiller area (behind the vegetable drawers) as described in e-articles I had read, but this did not appear to be the problem. I found two solenoid valve pairs; one that
... Read more
routes dispenser or ice-maker water to the filter and the other that routes the water to the end device. I ran a couple of tests on the solenoid valves and found that the first inlet valve that sends water to the filter did not work, but the second valve that relays the water to the dispenser was still working. By temorarily connecting the wiring for the dispenser solenoid to the functioning ice-maker solenoid, I confirmed that the wiring and switch were working properly and that the problem must be the solenoid itself (it also still hummed when the dispenser button was pressed). The entire quad solenoid valve assembly can be pulled out after removing the one hex-screw on the back of the frige (the assembly is all held together with a bracket). I disconnected the wiring connector to the solenoid valves. I disconnected the plastic water tubing by pushing it toward the fitting and then depressing the tubing inlet ring to release the tubing. I removed the two screws holding the solenoid valve and replaced it.
Read less
Was this instruction helpful to you?
Thank you for voting!