


Models
>
59655659500
59655659500 Kenmore Refrigerator
Jump to:
Find Part by Name
Keep searches simple, eg. "belt" or "pump".
Manuals & Guides for 59655659500
Click to downloadKeep searches simple, eg. "belt" or "pump".

$88.39
This package contains one individual water filter that is NSF-certified, and OEM approved. To ensure that the filter is successfully removing contaminants, it will need to be replaced at least every 6...
In Stock
Order now and your part arrives by Aug 1

$99.38
If your freezer has stopped making ice cubes, it may be time to replace your ice maker. Normal wear and tear, or accidental damage may be the cause of this. This model includes the control device and ...
In Stock
Order now and your part arrives by Aug 1

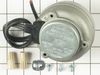
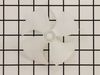
This condenser fan motor is used with frost-free refrigerators with a condenser coil. When the compressor runs, so does this fan, circulating air through the refrigerator grille, cooling the compresso...
In Stock
Order now and your part arrives by Aug 1

$31.05
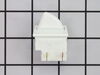
This part includes one authentically sourced 3-pin rocker switch for a refrigerator. It is responsible for turning the light on inside the fridge when the door is open. It is commonly replaced because...
In Stock
Order now and your part arrives by Aug 1

This part, when activated, releases water from the supply line into the ice mold. This water inlet valve is for refrigerators.
Water inlet valve supplies water to the refrigerator ice maker and wat...
In Stock
Order now and your part arrives by Aug 1

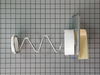
This includes both the run capacitor and the start relay. The capacitor helps the compressor kick on and off while maintaining a constant temperature to keep things frozen in your freezer.
The start ...
On Order

$7.60
This is a multi-use screw and can be used on a variety of appliances. The measurements of the screw are: 8/18 x 3/8. *Please note: the screw is sold individually. Refer to the manual provided by the m...
In Stock
Order now and your part arrives by Aug 1

In Stock
Order now and your part arrives by Aug 1

$55.18
This part helps the compressor kick on and off while maintaining a constant temperature to keep things frozen in your freezer.
In Stock
Order now and your part arrives by Aug 1

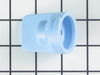
Need to keep your fridge’s water and ice working while the filter is out? This bypass cap lets water flow to the dispenser and ice maker without a filter. It’s easy to install and fits Whirlpool, Mayt...
In Stock
Order now and your part arrives by Aug 1

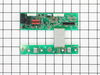
If your fridge isn’t cooling properly, runs too long, or won’t start, this control board might be the fix. It helps manage temperature and defrost settings to keep everything running smoothly. You’ll ...
In Stock
Order now and your part arrives by Aug 1

$27.83
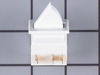
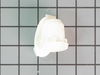
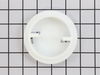
This helix end cap is almost four inches in diameter. It is all white in color and is made of plastic. This end cap is used in a refrigerator's icemaker.
In Stock
Order now and your part arrives by Aug 1
Common Problems and Symptoms for 59655659500
Viewing 23 of 23Ice maker not making ice
Fixed by these parts
How to fix it
Leaking
Fixed by these parts
How to fix it
Fridge too warm
Fixed by these parts
How to fix it
Light not working
Fixed by these parts
How to fix it
Not dispensing water
Fixed by these parts
How to fix it
Will Not Start
Fixed by these parts
How to fix it
Freezer section too warm
Fixed by these parts
How to fix it
Noisy
Fixed by these parts
How to fix it
Ice maker won’t dispense ice
Fixed by these parts
How to fix it
Fridge and Freezer are too warm
Fixed by these parts
How to fix it
Fridge too cold
Fixed by these parts
How to fix it
Freezer not defrosting
Fixed by these parts
How to fix it
Fridge runs too long
Fixed by these parts
How to fix it
Clicking sound
Fixed by these parts
How to fix it
Ice maker dispenses too little ice
Fixed by these parts
How to fix it
Freezer too cold
Fixed by these parts
How to fix it
Too warm
Fixed by these parts
How to fix it
Ice maker dispenses too much ice
Fixed by these parts
How to fix it
Frost buildup
Fixed by these parts
How to fix it
Won’t start
Fixed by these parts
How to fix it
Touchpad does not respond
Fixed by these parts
How to fix it
Door Sweating
Fixed by these parts
How to fix it
Door won’t open or close
Fixed by these parts
How to fix it


Keep searches simple. Use keywords, e.g. "leaking", "pump", "broken" or "fit".
- Customer:
- Douglas from Byron, NY
- Parts Used:
- EDR4RXD1
- Difficulty Level:
- Really Easy
- Total Repair Time:
- Less than 15 mins
light on to order water filter
Pressed in the end of the filter cover, lowered it down part way. Twisted the old filter 1/4 turn and removed it. Set in the sink to drain. Inserted new filter and twisted it to lock. closed cover. Done. Total time @ 1 Minute.
Was this instruction helpful to you?
Thank you for voting!
- Customer:
- Bernie from Diamond Bar, CA
- Parts Used:
- D7824706Q
- Difficulty Level:
- Easy
- Total Repair Time:
- 30 - 60 mins
- Tools:
- Nutdriver
Icemaker producing few or no cubes and often leaving "kling-ons" on ice tray
Interior surface of ice tray felt rough & flaky (coating deteriorated) so cubes would not release.
Unplug appliance.
Remove timer cover by hand pressure @ edge.
Remove single attachment screw & bracket at lower front of icemaker.
Disconnect wiring harness from socket @ rear of compartment.
Tricky part was determin ... Read more ing what type of connection held the other two attachment points along the long edge of the icemaker. I did not have repair manual or useful drawing but looked @ PartsDirect pic of side brackets & used a small mirror to confirm that mine were also some sort of "snap in" attachment.
Remove icemaker unit by pushing upward and outward on the unit. I takes a good bit of pressure and will pop loose, but be careful not to break attachment bracket from freezer wall.
Scavenge shut off bar and wiring harness from old icemaker once you have it out & attach to new one before installing it back in freezer.
Again, you might find a mirror useful to align those pesky snap-in brackets with the new unit.
Since you probably kept your freezer running while waiting for the part, the plastic snap-ins will be cold and brittle. I warmed them up first by applying a dampened cloth heated in the microwave to make them a little more pliable.
A good push of the new unit towards the snap-ins along with some upward force will get it stable.
Reattach the metal screw in bracket & connect the wiring harness to rear plug... and don't forget to plug the whole thing back in.
It will take awhile for the first batch of cubes dump as the timer may need to cycle completely around to get to the fill cycle... be patient.
Dump the first couple of batches of cubes just to make sure you're free of any residue.
Read less
Was this instruction helpful to you?
Thank you for voting!
Ice maker leaking at first then quit making ice all together
unplugged refrigerator and shut off water, removed one screw and loosened two more, after removing one side of the ice bucket rail, unplugged electrical from old ice maker. Then I removed the bail and out on new one, reinstalled ice maker in reverse order from taking it out.
Was this instruction helpful to you?
Thank you for voting!