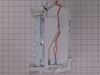
This is an authentic OEM part sourced directly from the manufacturer. The crisper slide rail for your refrigerator allows the crisper drawer to slide in and out, and supports the drawer as it does so....
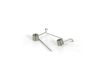
This genuine OEM lever spring exerts tension between the ice maker door plunger and the ice maker itself on your refrigerator. If there is little to no tension holding your ice door seal in place, the...
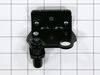
This ice maker kit assembly is a genuine replacement for select LG and Kenmore refrigerators. It includes the full ice maker and housing, designed to restore reliable ice production. Installation is s...
This genuine LG water filter is used in your refrigerator to help reduce contaminants and chlorine taste that may be in the water supply. The water filter measures approximately 3" in diameter and 6" ...
Ask our experts a question about this part and we'll get back to you as soon as possible!
3 questions answered by our experts.
< Prev
1
Next >
Sort by:
Search filter:
Clear Filter
Your search term must have 3 or more characters.
Keep searches simple. Use keywords, e.g. "leaking", "pump", "broken" or "fit".
Sorry, we couldn't find any existing answers that matched. Try using some different or simpler keywords, or submit your new question by using the "Ask a Question" button above!
Karl
June 4, 2023
how to replace ice maker
For model number 79551312011
Hello Karl, thank you for your query. We have found some relevant instructions for you to replace the ice maker assembly, part number FIX3528728. They may not be of the exact same model, but they will help you with the installation. You may follow the following steps:
1. Open the freezer door and take out the ice bin. Hold it on both sides, lift it up, and then pull it out. Next, remove the top cover by holding it from the bottom and pushing it up.
2. Use a Phillips screwdriver to take out the panel holding the plug and the assembly. Remove the screws, lift up the whole assembly, and take it out.
3. To unplug the plug, use a flat screwdriver to press on the tab to remove it and put it on a table.
4. Now, turn the assembly backward and remove the green ground wire. Use a Phillips screwdriver to take out the screws.
5. To disconnect the plug there, press down on the tab and remove it from there.
6. Now, turn the assembly over and remove the couple of Phillips screws that hold the ice maker. After that, take out the ice maker.
7. Follow the same step backward and install the new ice maker assembly.
We hope this solves your problem!
how do i drain the water from the drip trays on bottom of refrigerator there is no access dooryard
For model number 79551312011
Hello Karl, thank you for contacting us. The drip tray is located at the back of the refrigerator, inside the machine compartment behind the access panel. Use the following instructions to drain the water from the drip pan:
1. Turn off the refrigerator.
2. Remove the back access panel.
3. Disconnect the plug from the water inlet valve.
4. Remove the drain tube.
5. Remove the fan housing located on top of the drip pan.
6. Dislocated the tabs locking the drip pan to the refrigerator.
7. Lift the pan up and remove it.
8. Drain water from the drip pan.
We hope this information helps!
Was this helpful?
Thank you for voting!
Karl
June 5, 2023
How do I drain the water from the drain pans on the bottom of this refrigerator there is no access door
For model number 79551312011
Hello Karl, thank you for your inquiry. The drip tray is located at the back of the refrigerator, inside the machine compartment behind the access panel. Use the following instructions to drain the water from the drip pan:
1. Turn off the refrigerator.
2. Remove the back access panel.
3. Disconnect the plug from the water inlet valve.
4. Remove the drain tube.
5. Remove the fan housing located on top of the drip pan.
6. Dislocated the tabs locking the drip pan to the refrigerator.
7. Lift the pan up and remove it.
8. Drain water from the drip pan.
We hope this information helps!
Was this helpful?
Thank you for voting!
Ask a Question
Ask our experts a question on this part and we'll respond as soon as we can.
This site was awesome! I was able to very quickly look up my refrigerator model, find the proper part number, and order the part. The only suggestion I would make is to update the cut sheet with a more clear version, it was a little difficult to make out the part number because the scan/drawing was fuzzy, but I was still able to make it
... Read moreout. Got the part in the mail very quickly and it was super easy to remove the old rail and install the new one. Take out the screws from the old one, remove the old rail, line up the holes, install the new one, and put back the screws. It's so nice to have a site like this to fine parts and order them! Too cool! Thank you so much!
Removed ice dispenser and display with small screwdriver from front of the fridge. Pried out the whole piece slowly. This exposed the motor that activates the chute. Plugged in the new motor before any removal to verify the motor was the problem. When it worked, removed old and installed new. 3 screws. Piece of cake.