


Models
>
3638698784
3638698784 Kenmore Refrigerator
Jump to:
Find Part by Name
Keep searches simple, eg. "belt" or "pump".
Keep searches simple, eg. "belt" or "pump".

$21.95
This 40-Watt light bulb is sold individually.
It is specially designed to withstand extreme temperatures, so this bulb is compatible with a variety of appliance types including refrigerators, ranges,...
In Stock
Order now and your part arrives by Jul 23

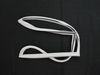
This end cap can be used for the right or left side of the refrigerator door shelf or the freezer door shelf.
In Stock
Order now and your part arrives by Jul 23

$142.26
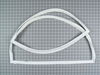
This fresh food door gasket is used to seal the refrigerator door when closed to keep the cool air inside and the room air out.
In Stock
Order now and your part arrives by Jul 23


In Stock
Order now and your part arrives by Jul 23


In Stock
Order now and your part arrives by Jul 23

In Stock
Order now and your part arrives by Jul 23


Special Order

Common Problems and Symptoms for 3638698784
Viewing 4 of 4Door Sweating
Fixed by these parts
How to fix it
Leaking
Fixed by these parts
How to fix it
Fridge too warm
Fixed by these parts
How to fix it
Fridge runs too long
Fixed by these parts
How to fix it
Keep searches simple. Use keywords, e.g. "leaking", "pump", "broken" or "fit".
- Customer:
- Kah Po from San Francisco, CA
- Parts Used:
- WR24X450
- Difficulty Level:
- Really Easy
- Total Repair Time:
- 15 - 30 mins
it appears some one damaged the gasket in the front
First, I removed the old gasket by ripping it out of front,
Second, I cleansed the rust (no idea how that get there, maybe it's a cheap fridge)
Third, I took some boiling water from the water boiler and dip the new gasket in it to "smooth" out the gasket and make it more "pliable" (really, it didn't seem like much h ... Read more appened, nonetheless, I did it to make sure I don't have to struggle if it comes to that)
Forth, I slap the new gasket in the top corner (inner edge closes to the fridge) and work across then down. But somehow after everything is accomplished, the gasket at the bottom appears bulged so I re-did it from the bottom up. and double checked on the firmness by checking with a flash light w/ the fridge closed (I made sure I did this near night time lol)
Lastly, I did love to thank PartSelect for shipping it out so quick. I ordered on Sunday, they shipped it on Monday and I received it on Tuesday morning at work. Incredible speedy service that even RadioShack overnight service took 3 "overnights" to recieve.
Read less
Was this instruction helpful to you?
Thank you for voting!
Both the freezer and refridgerator seals were leaking
We took the old seals off, T\they really just peal off, and replaced with the new ones.We were not really sure how they went on, because there really was no instructions with the seals, but we figured it out. After we really figured it out and got started, it was pretty easy. The only instructions that come with it is how to prep the seal
... Read more
s before they go on.
Read less
Was this instruction helpful to you?
Thank you for voting!
- Customer:
- Leo from TWIN FALLS, ID
- Parts Used:
- 40A15
- Difficulty Level:
- Really Easy
- Total Repair Time:
- Less than 15 mins
- Tools:
- Nutdriver
Interior light needed replaced
Unplugged the appliance for safety. Removed two 1/4" screws that held the assembly in place. Carefully removed the wire guard that retains the glass shield. Unscrewed old light bulb and replaced with new part. Reversed the steps after cleaning glass cover.
Was this instruction helpful to you?
Thank you for voting!